
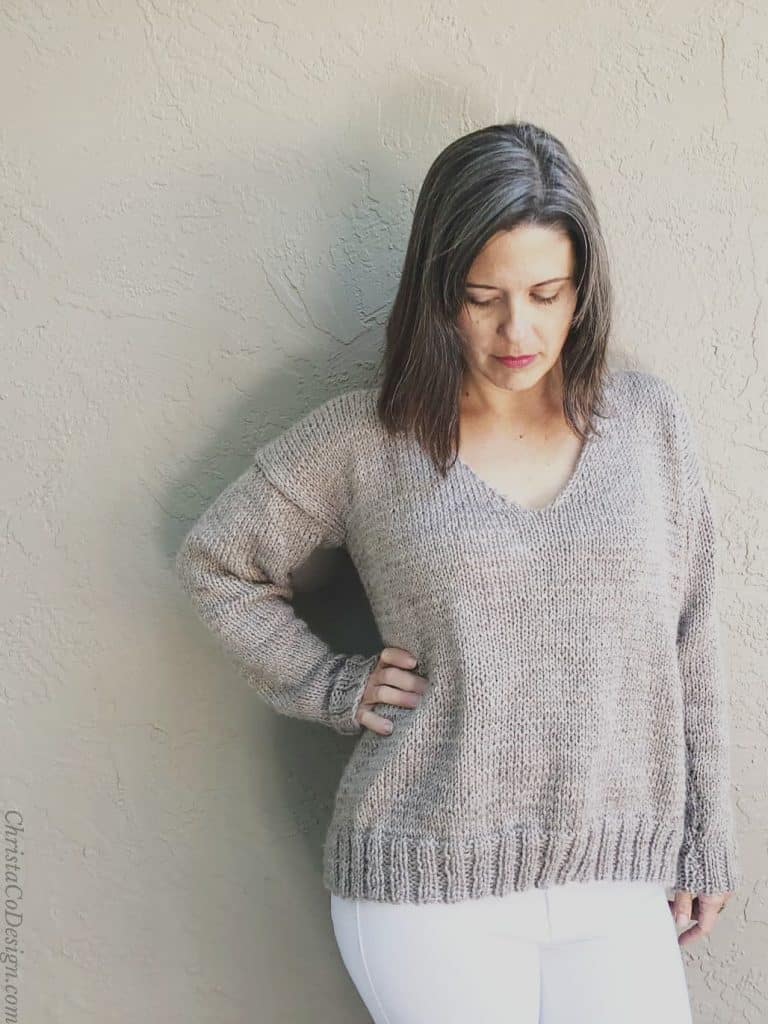
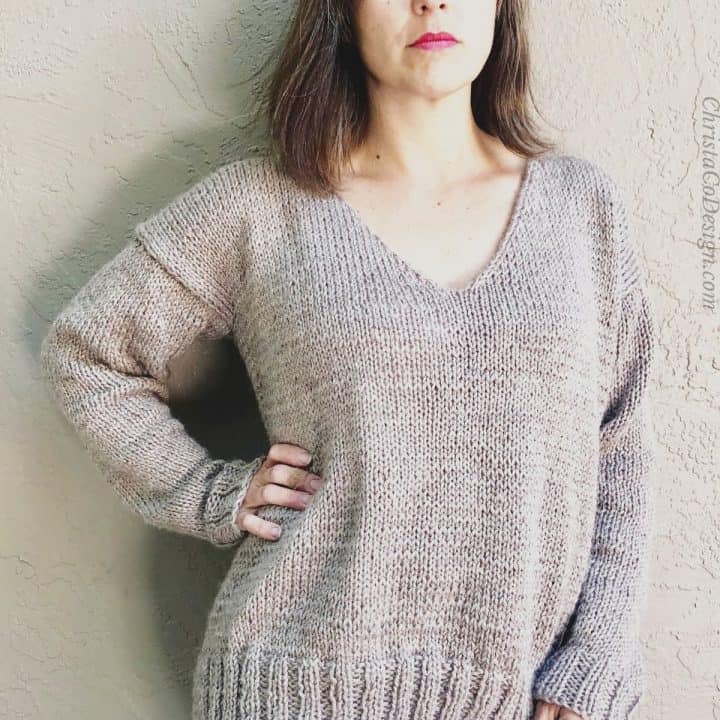
Elena V-Neck Sweater Knitting Pattern for Beginners
The Elena is an easy sweater knitting pattern crafted with beginners in mind. Whether you’re new to knitting or garment making, the Elena is an easy sweater to make.

This post contains affiliate links, I may earn a fee. Read more disclosure policy.
Join the ChristaCoDesign Newsletter
Never miss a pattern!
This comfy pullover sweater features a v-neck that’s simply made. Along the cuffs and hem the stretchy rib stitch gives the perfect finish.
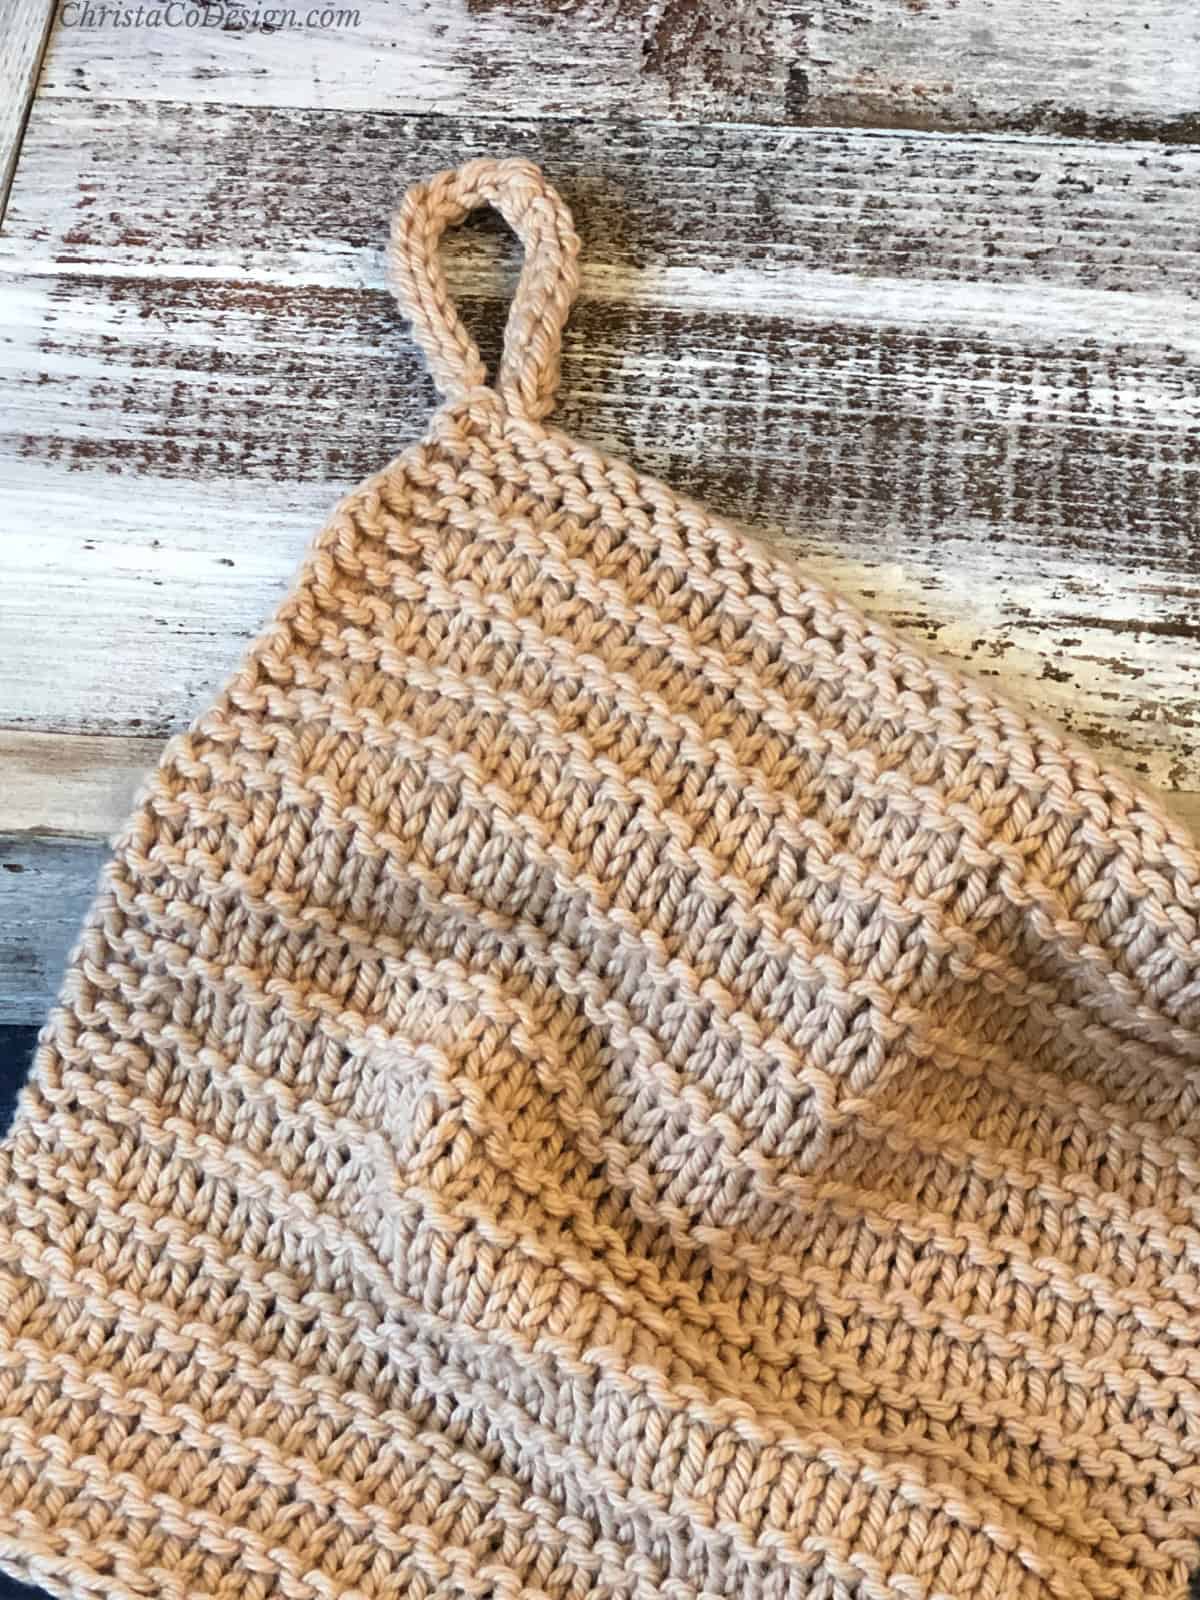
The stockinette stitch creates a timeless classic sweater that drapes beautifully in worsted weight yarn. This is one of my favorite sweaters, I hope it will be yours too!
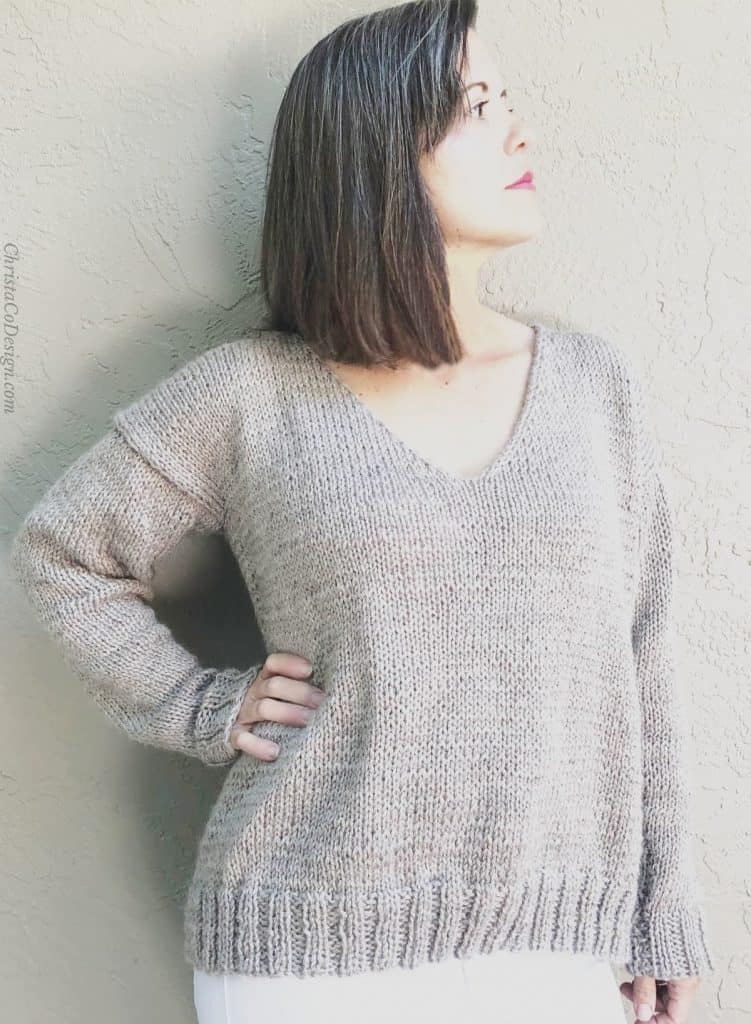
The Elena Sweater is knit flat, in four pieces: a front panel, back panel and two sleeves. Those pieces are then seamed together. Since this one is knit in flat pieces and seamed you can use straight needles or a circular needle, as I did.
This free knitting pattern includes 9 sizes. The sizes are to fit bust sizes 30″ through 62″ with a generous amount of ease.
Purchase the ad-free, well formatted printable PDF Pattern from my shop. Scroll down for the free pattern!
Purchase My Ad-Free PDF Patterns In Your Favorite Shop Here:
More Easy Knitting Patterns
The Giana Pocket Shawl is a squishy knit in garter stitch.
Another of my favorite simple knits is the Umbria Shawl knit in chunky yarn.
The Bella Vita Blanket makes a gorgeous knit home–warming gift for a favorite couple.
More top knitting patterns popular with knitters in this round up.
Yarn
Touch of Alpaca* is a lovely blend of acrylic and alpaca, which is hypoallergenic. It’s warm, wears well, washable and perfect for worsted sweater patterns.
Can you substitute a different yarn? Absolutely. Many #4 medium worsted weight yarns will work well for this sweater pattern. If you wish to use an alternative yarn, be sure to choose a yarn that has plenty of drape and that meets the gauge requirements specified.
Stitch
The Elena Sweater is knit simply with a 2 x 2 ribbing. The main sweater is knit in stockinette stitch.
The v-neck is simple to achieve with decreases. So you’ll need to know (or learn) how to knit two together. I link up some tutorials for you in the stitches section too.
Never Miss a Pattern
Be sure to join my newsletter for my weekly emails + access to my Resource Library.
Materials
- Lion Brand’s Touch of Alpaca* #4 medium worsted weight yarn (90% Acrylic, 10% Alpaca, 207 yd (190 m) per 100 g skein); see yarn details by size below.
- 4 mm (US 6) 24” or longer circular needles (for knitting flat).
- 4.5 mm (US 7) 24”* or longer circular needles or size needed to meet gauge.
- Yarn needle, Measuring tape, Scissors
It is possible to knit this sweater on straight needles. However, if you’re in the market for knitting needles circulars are very versatile and I highly recommend interchangeables!
Yarn By Size
- XS – 621 yds (568 m)
- SM – 725 yds (663 m)
- MED – 828 yds (757 m)
- LG – 948 yds (867 m)
- XL – 1078 yds (986 m)
- 2X – 1208 yds (1105 m)
- 3X – 1342 yds (1227 m)
- 4X – 1449 yds (1325 m)
- 5X – 1656 yds (1514 m)
Notes
- Please read through all notes and pattern before you begin.
- Please check gauge first by knitting at least a 6” (15cm) square in stockinette with your chosen yarn + needles, block your swatch + measure. Compare it to the listed gauge and adjust your needle size if needed. Stitch gauge is more important than row gauge for this pattern.
- Pattern is written for multiple sizes where the first number given is the smallest size and larger sizes come next in parenthesis. For example: CO 74 [82, 90, 98, 106, 114, 122, 130, 138] indicates to cast on 74 sts for the XS size, 82 sts for SM, 106 sts for XL size, etc. Where no size is indicated, instructions apply to all sizes.
- Stitch multiple is 4 +2.
Stitches
Abbreviations In US Terms
- BO – bind off
- CO – cast on You might like this super easy short tail cast on, or the crocheter’s cast on.
- Kfb – knit front and back
- K – Knit
- K2tog – knit two together
- K2tog–L – you can use any left leaning decrease, I used this one-get the tutorial here. This is used on the neck edge so you will want it to look as finished as possible.
- P – purl
- rep – repeat
- RS – right side
- St st – stockinette stitch
- st(s) – stitch(es)
- WS – wrong side
Gauge
15 sts x 20 rows (after blocking) to 4” (10 cm) measured in St st using 4.5 mm (US 7) needles.
Please swatch carefully, as incorrect gauge will cause the sweater to come out the wrong size.
Skill Level
Beginner
Construction
This easy sweater is knit flat and from the bottom up. The body ribbing and sleeve cuffs are knit in 2×2 ribbing. There are 4 pieces: the back panel, front panel and two sleeves. After knitting you will sew the panels together, sew the sleeves together, and then add them to the main body of the sweater. I bound off and seamed the shoulders. You may choose to do a 3 needle bind off if you prefer.
Fit
Finished Measurements
After blocking 38.5″ [43, 47.5, 51.5, 56, 60.5, 64.5, 68.5, 73] in (98 [109, 120.5, 131, 142, 153.5, 164, 174, 185.5] cm) bust circumference.
Intended to be worn with 8 – 10” (20.5 – 25.5 cm) of positive ease at the bust.
The model is 5’ 2” and wears size M with 11” (28 cm) of positive ease at the bust.
It’s best to take your bust measurements and compare it to the bust circumference of the finished sweater measurement to choose the right size. And, of course, be sure to check and meet gauge for best fit!
Size
XS [S, M, L, XL, 2X, 3X, 4X, 5X]
To fit 30″ [34, 38, 42, 46, 50, 54, 58, 62] in (76 [86.5, 96.5, 106.5, 117, 127, 137, 147, 157.5] cm) bust circumference.
Adjustment
To lengthen your sweater repeat more rows on the panels before the neckline. I’s often easiest to go up or down a size first in the pattern.
If you would like to add neck ribbing you can use the same ribbing technique I use for the Bosa Sweater.
Scroll down for the v–neck sweater knitting pattern.
Save your favs!
Add this pattern to your Ravelry queue.
Pin It Now & Make It Later
Don’t forget to pin this for later!

Pattern Instructions
Back Panel
Using smaller needles CO 74 [82, 90, 98, 106, 114, 122, 130, 138] sts using alternating cable cast on.
Row 1. K1, *k2, p2; rep from * to last st, k1.
Rows 2 – 12. Rep Row 1 for 12 rows total or until ribbing is 2.5” (6.5 cm) long.
Change to larger needles.
Row 13. (RS) K all.
Row 14. (WS) K1, *p; rep from * to last st, k1.
Rep last two rows until entire panel is 22” [23, 23, 23.5, 24, 24, 24, 24, 24.5] in (56 [58.5, 58.5, 59.5, 61, 61, 61, 61, 62] cm) long or to your desired length.
BO. Leave a long tail for seaming, cut yarn.
Front Panel Pattern
Using smaller needles CO 74 [82, 90, 98, 106, 114, 122, 130, 138] sts using alternating cable cast on.
Row 1. K1, *k2, p2; rep from * to last st, k1.
Rows 2 – 12. Rep Row 1 for 12 rows total or until ribbing is 2.5” (6.5 cm) long.
Change to larger needles.
Row 13. (RS) K all.
Row 14. (WS) K1, *p; rep from * to last st, k1.
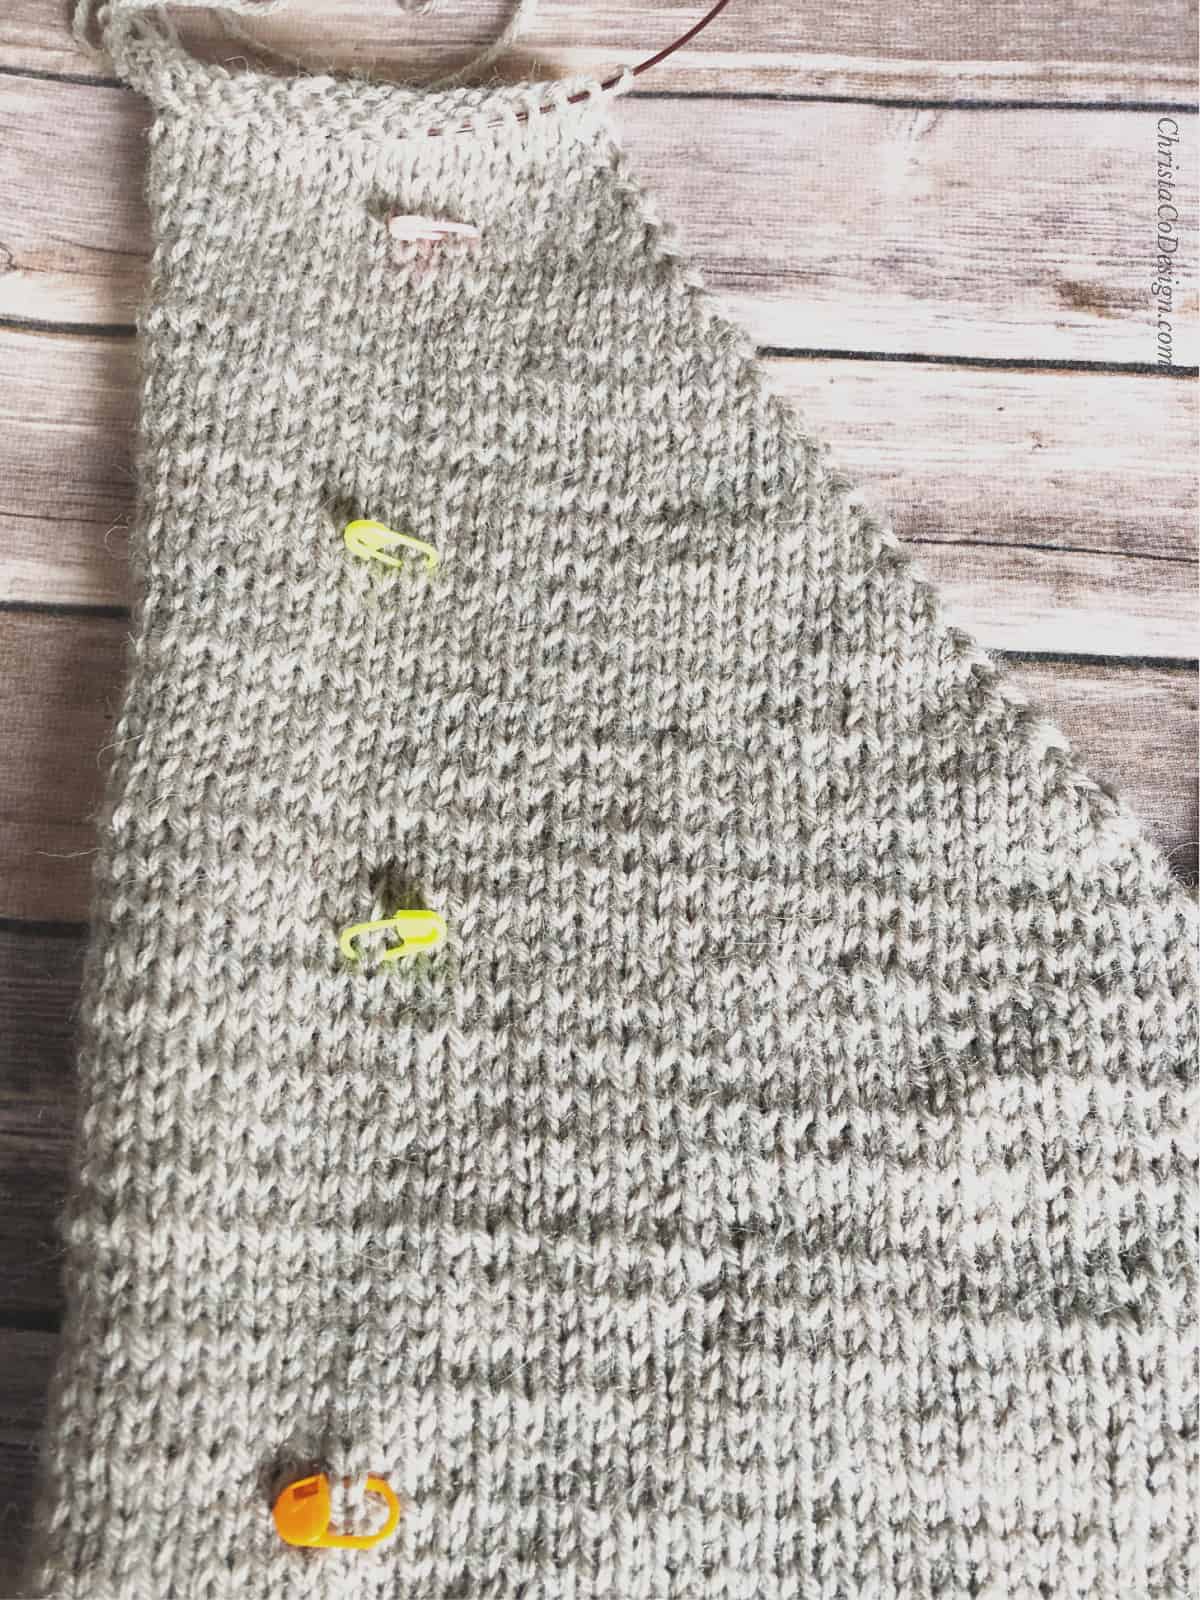
Rep last two rows until entire panel is 18” [18.5, 17, 16.5, 16.5, 16, 15, 15, 14] in (45.5 [47, 43, 42, 42, 40.5, 38, 38, 35.5] cm) long. *If you lengthened your Back Panel add more length here. V–neck will span the last 4.5” [4.5, 6.25, 7, 7.5, 8.25, 9, 9.5, 10.5] in (11.5 [11.5, 16, 18, 19, 21, 23, 24, 26.5] cm) of panel length.
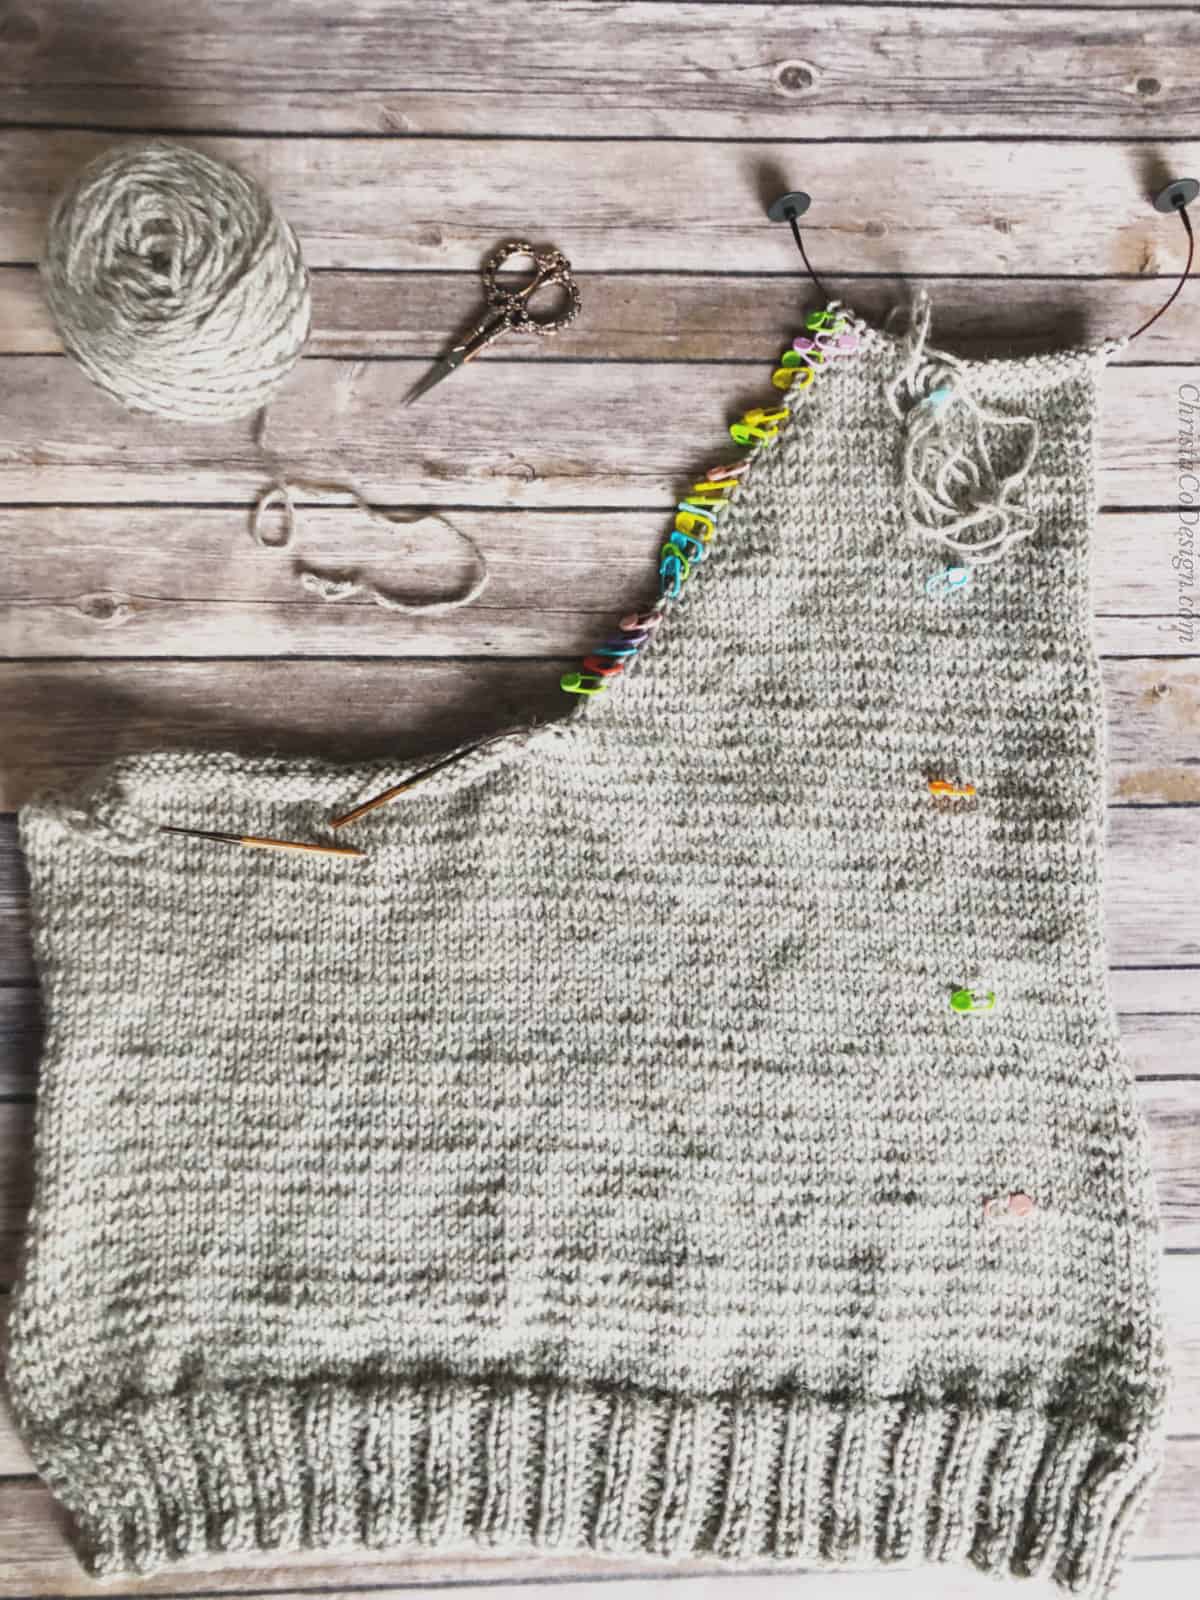
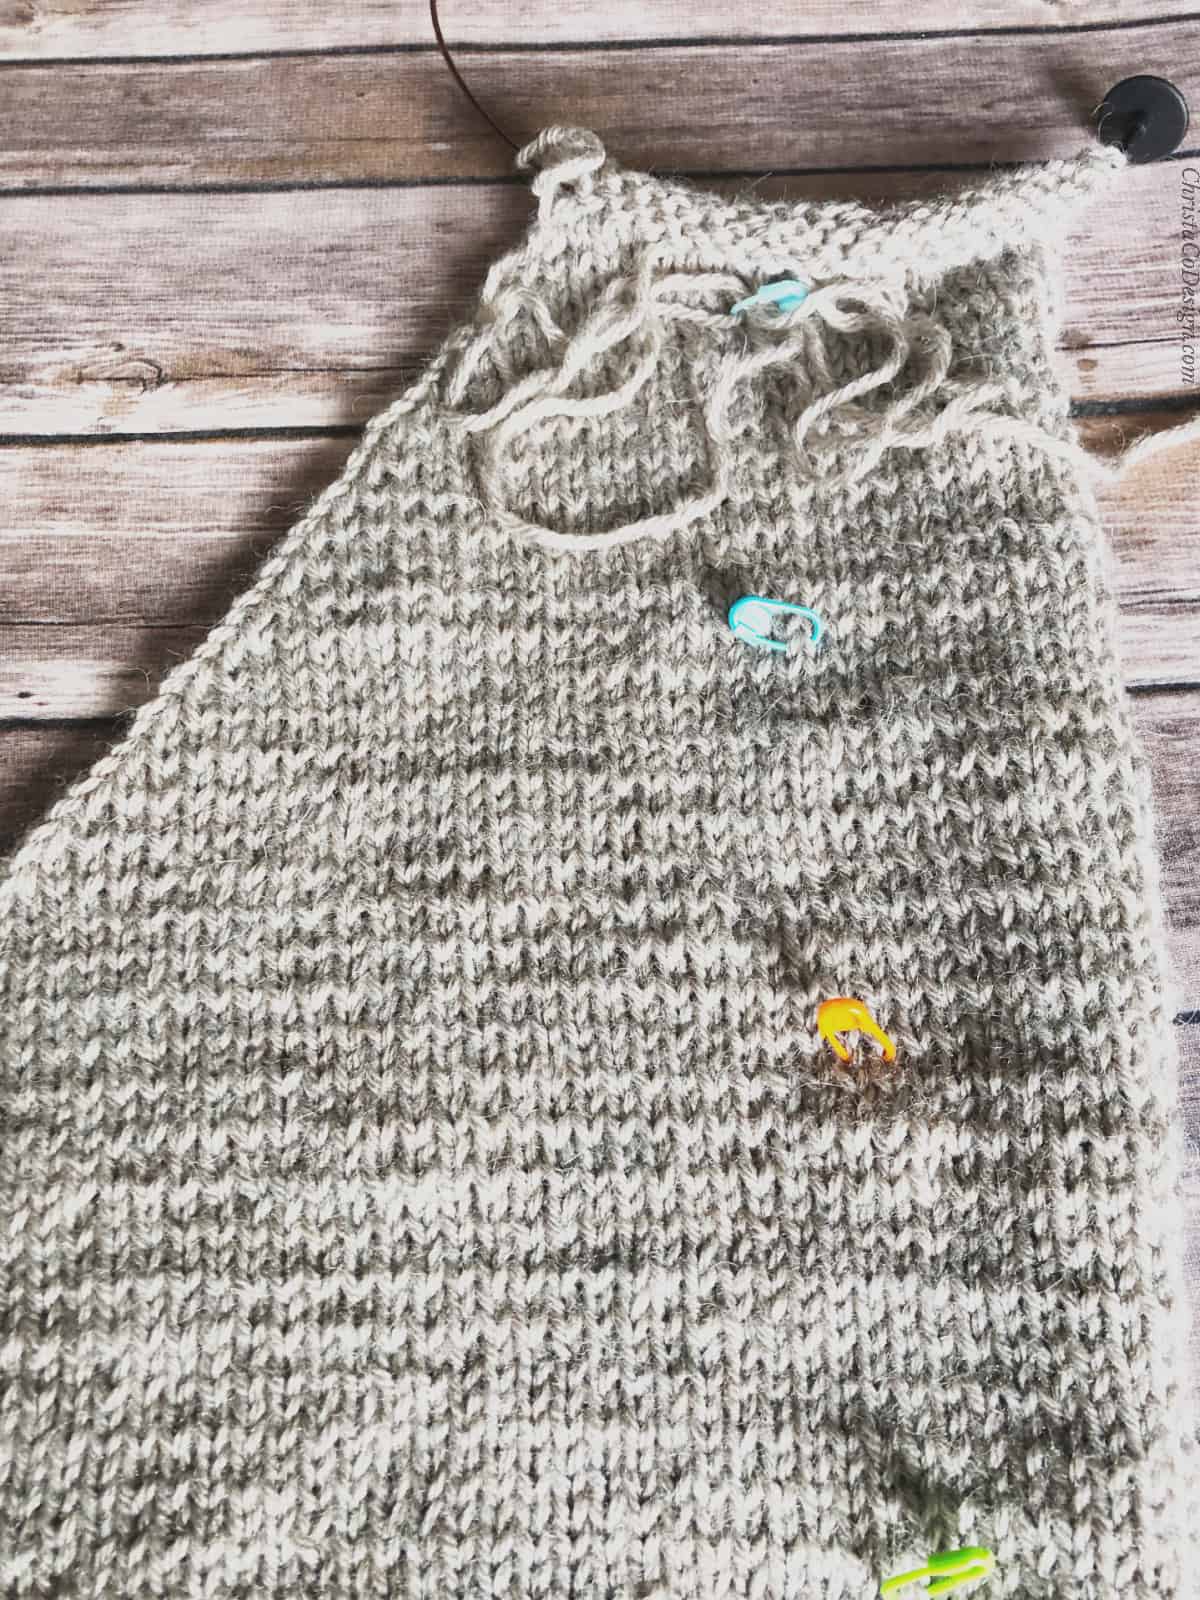
Divide Panels
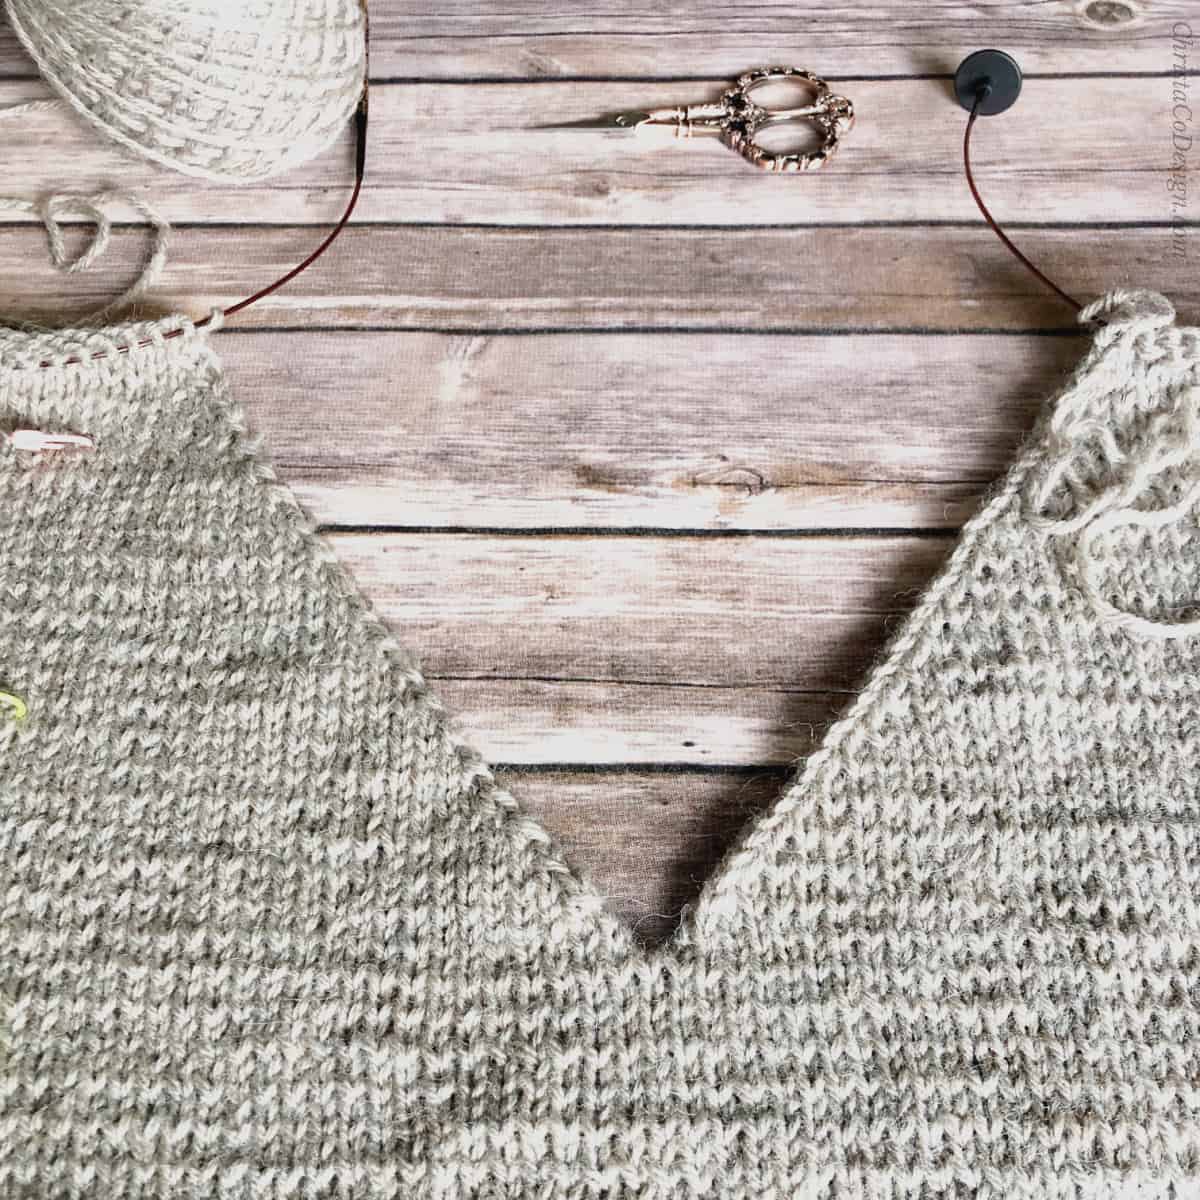
On the next right side row you will divide your front panel in half and begin decreases one panel at a time to create the v-neck.
Left Front Panel When Wearing
Row 1. On your next RS row K 37 [41, 45, 49, 53, 57, 61, 65, 69] sts, slip remaining 37 [41, 45, 49, 53, 57, 61, 65, 69] sts on an extra needle or spare length of yarn for later. Continue with sts on your needle.
Row 2. (WS) K1, *p; rep from * to last st, k1. 37 [41, 45, 49, 53, 57, 61, 65, 69] sts
Decrease
Row 3. (RS) K to last 3 sts, k2tog, k1. 1 st decreased.
Row 4. (WS) K1, *p; rep from * to last st, k1.
Rep last two rows continuing to decrease every RS row until you have 24 [28, 29, 31, 34, 36, 38, 42, 42] sts left and shoulder is 6.5” [7.5, 7.75, 8.5, 9, 9.5, 10, 11.25, 11.25] in (16.5 [19, 19.5, 21.5, 23, 24, 25.5, 28.5, 28.5] cm) wide. Leave a long tail for seaming and cut yarn. BO.
Right Front Panel When Wearing
Slip other half of sts back onto your working needle. Rejoin join yarn at center st.
Row 1. (RS) K all. 37 [41, 45, 49, 53, 57, 61, 65, 69] sts
Row 2. (WS) K1, *p; rep from * to last st, k1.
Decrease
Row 3. (RS) K1, K2tog-L, k to end. 1 st decreased.
Row 4. (WS) K1, *p; rep from * to last st, k1.
Rep last two rows continuing to decrease every RS row until you have 24 [28, 29, 31, 34, 36, 38, 42, 42] sts left and shoulder measures 6.5” [7.5, 7.75, 8.5, 9, 9.5, 10, 11.25, 11.25] in (16.5 [19, 19.5, 21.5, 23, 24, 25.5, 28.5, 28.5] cm) wide. Leave a long tail for seaming and cut yarn. BO.
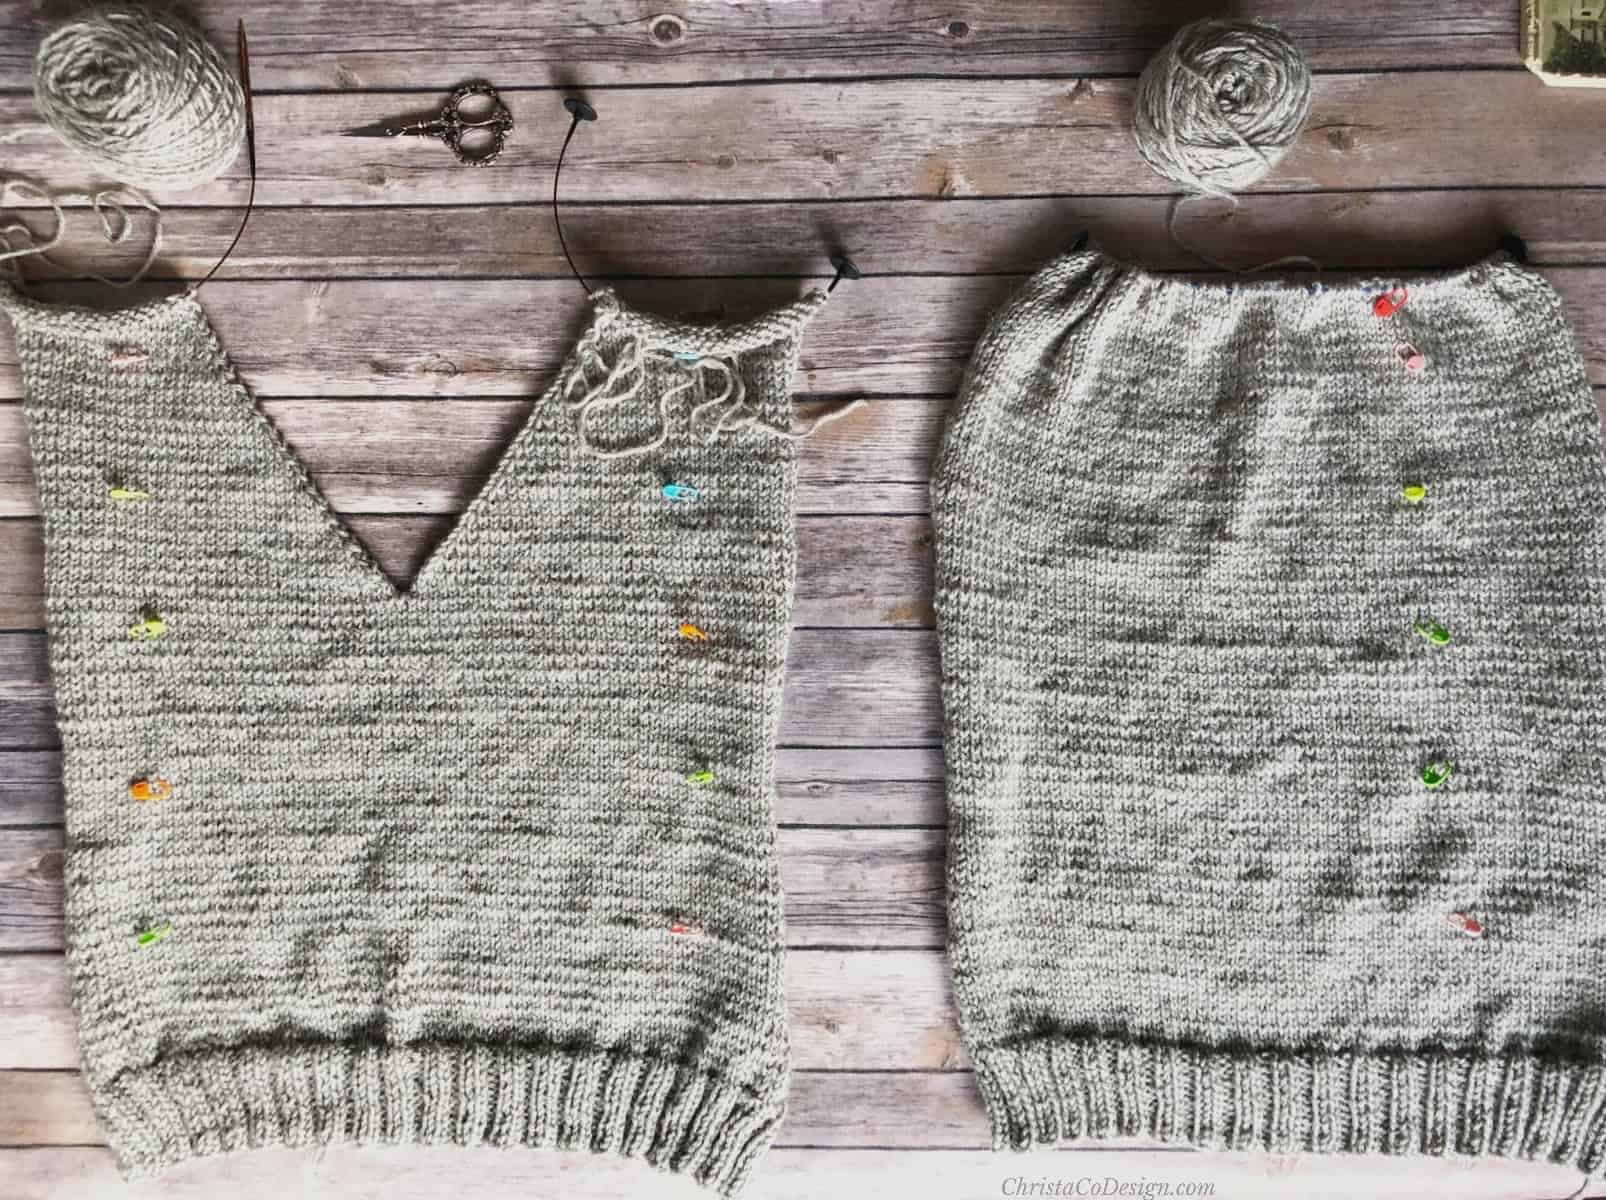
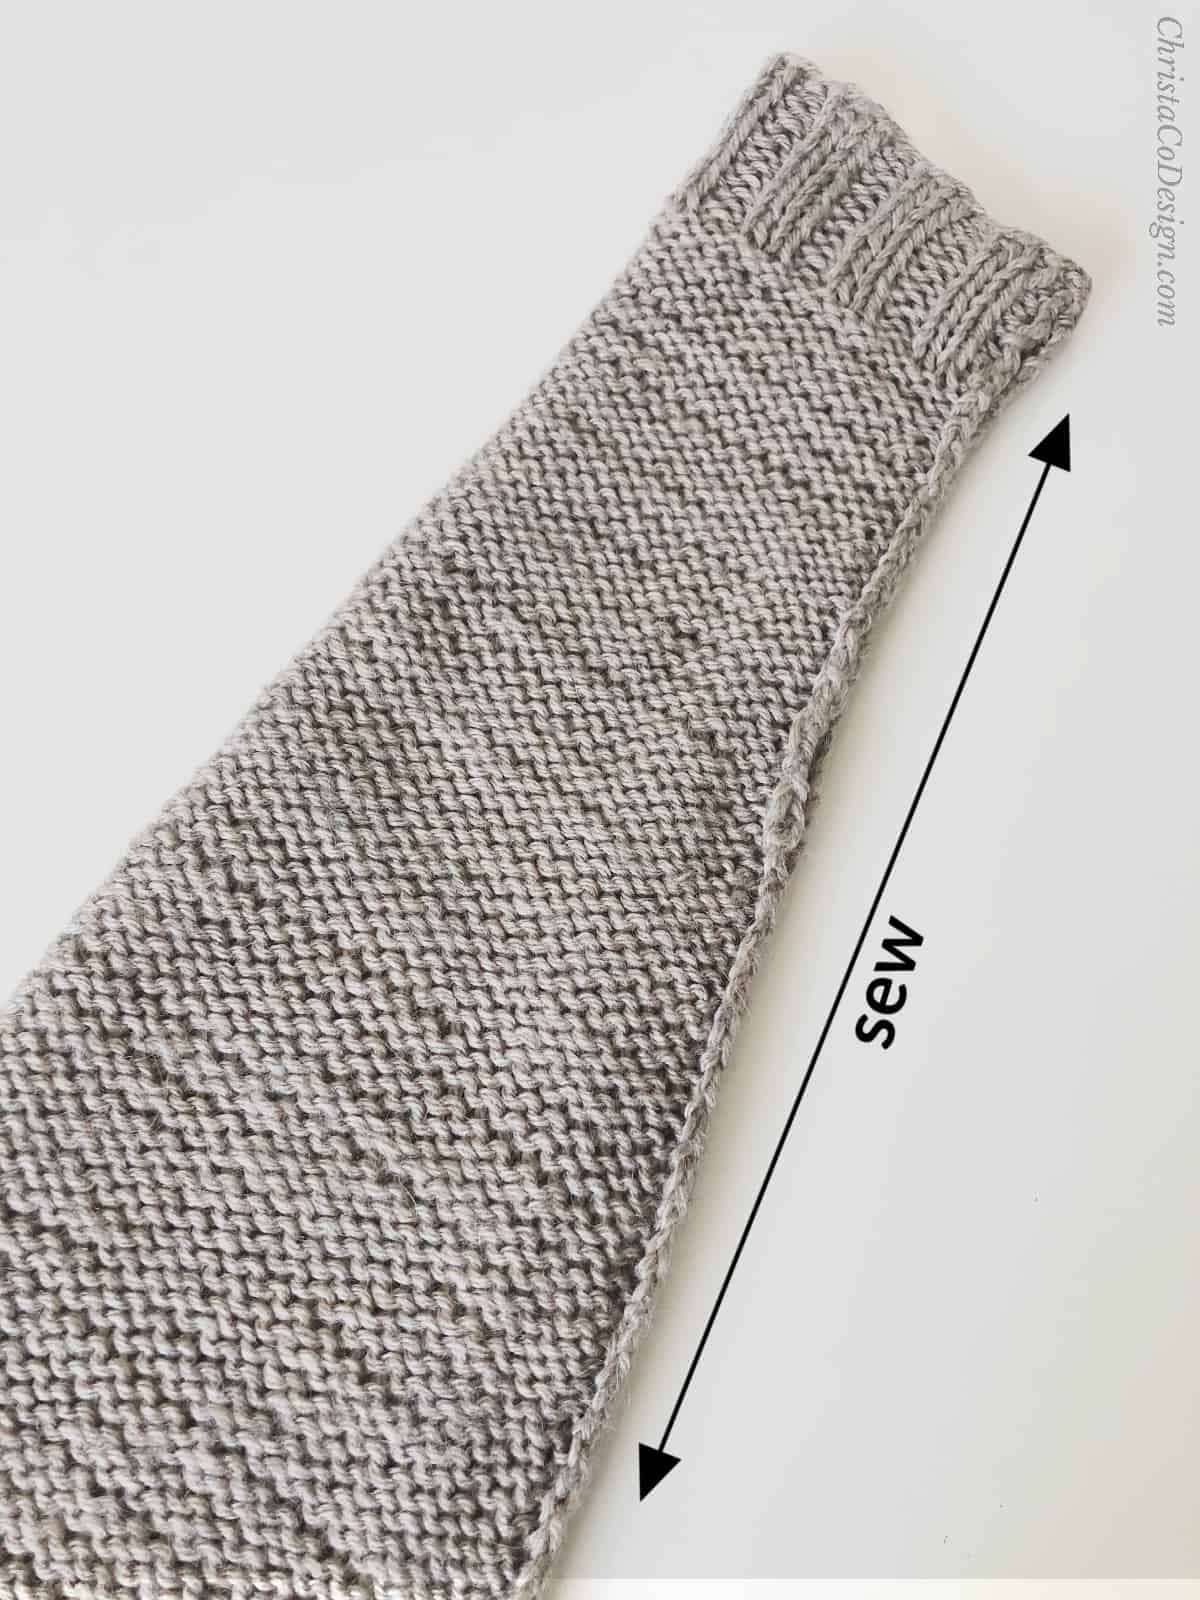
Block Panels
Block your panels now, before seaming.
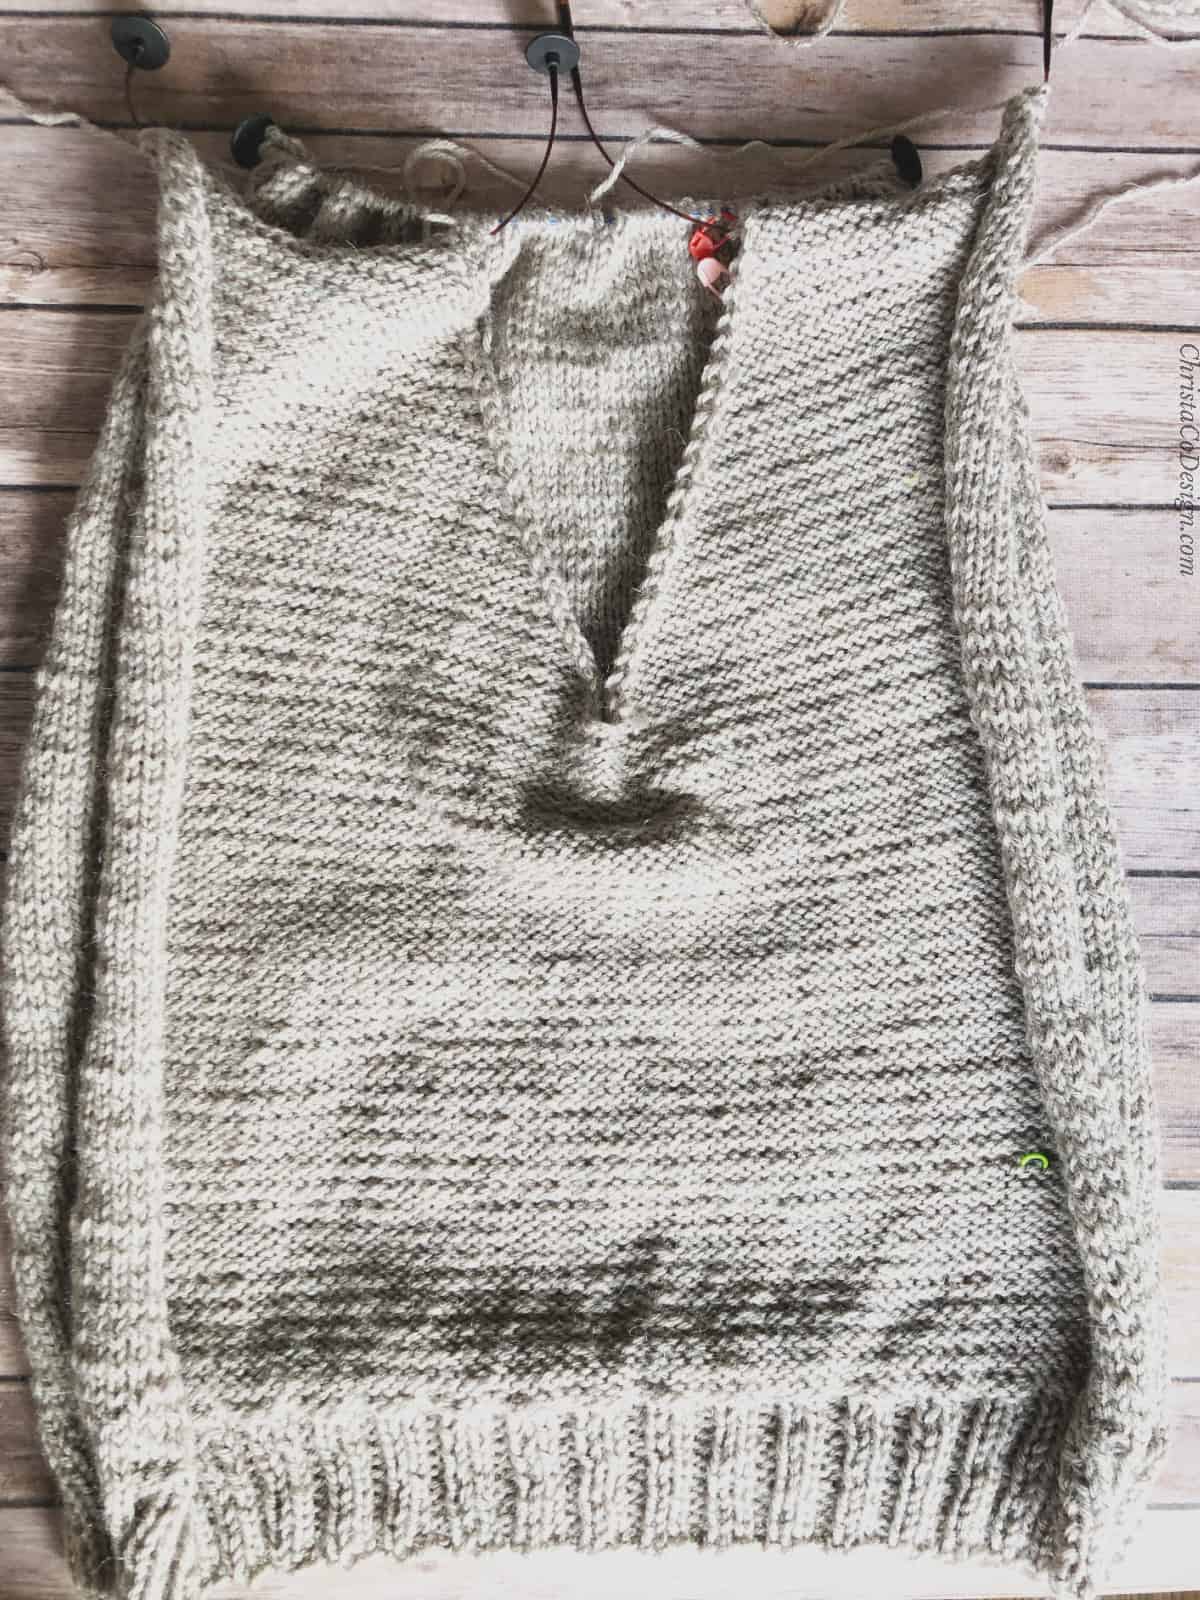
Assembly
Seam Panels
Lay front and back panels together with RS touching.
Sew together at the shoulders.
Sew sides together from hem to last 6.5” [7, 7.5, 8, 8.5, 9, 9.5, 10, 10.5] in (16.5 [18, 19, 20.5, 21.5, 23, 24, 25.5, 26.5] cm) of panel, leave this open for armhole.
Sleeves
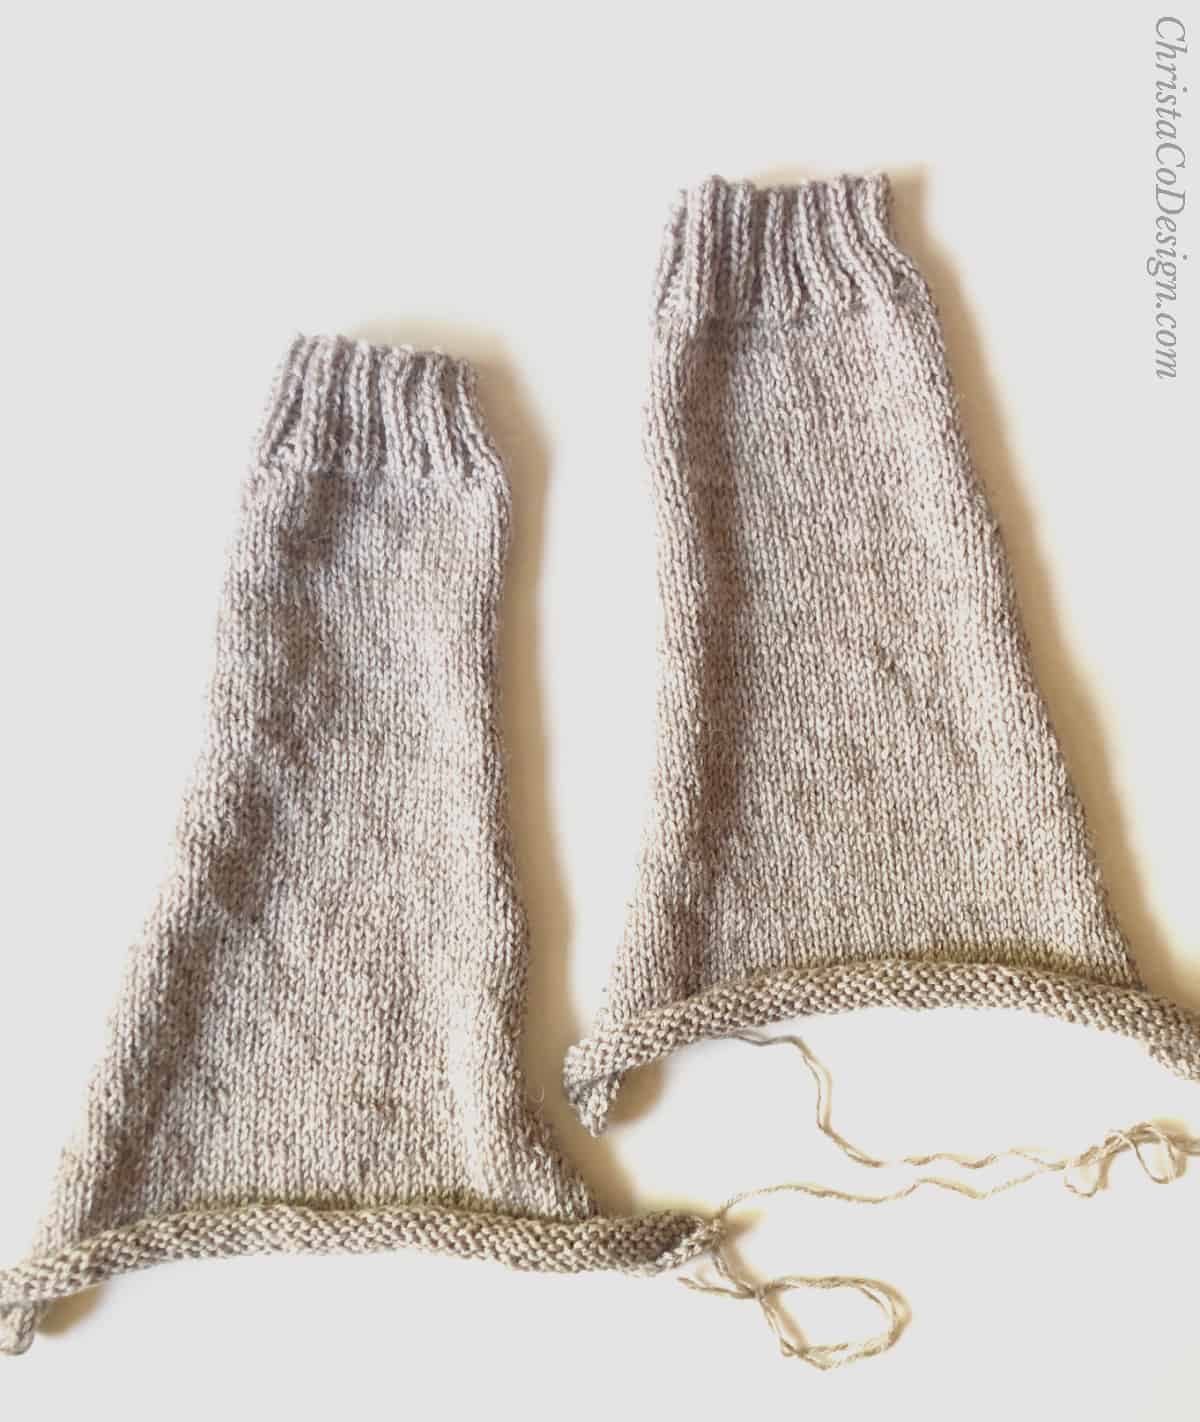
Make 2
To find the exact sleeve length for you try your sweater on now. Measure from where the sweater comes off your shoulder down to where you would like your sleeve to stop. Usually this is between the wrist and first thumb joint. Sleeve is knit from the wrist up, so you can also check width and length as you go and make adjustments, if needed.
Using smaller needles CO 34 [34, 34, 38, 38, 38, 42, 42, 42] sts using alternating cable cast on.
Row 1. K1, *k2, p2; rep from * to last st, k1.
Rows 2 – 12. Rep Row 1 for 12 rows total or until ribbing is 2.5” (6.5 cm) long.
Change to larger needles.
Row 13. (RS) K all.
Row 14. (WS) K1, *p; rep from * to last st, k1.
Row 15. K1, kfb, k to last 2 sts, kfb, k1. +2 sts increased.
Row 16. (WS) K1, *p; rep from * to last st, k1.
Repeat last two rows until you have 48 [52, 56, 60, 64, 68, 72, 76, 78] sts and sleeve is 13” [14, 15, 16, 17, 18, 19, 20, 21] in (33 [35.5, 38, 40.5, 43, 45.5, 48.5, 51, 53.5] cm) wide.
Then rep rows 13 – 14 until your sleeve is 18”/45.7cm long or to desired length.
Cut yarn, leaving a long tail for seaming.
Block Sleeves
Block your sleeves now, before seaming.
Seam Sleeves
Fold sleeve in half lengthwise with RS touching.
Sew long edge together.
Turn sleeve RS out.
With sweater body still WS out, and sleeve RS out, slide sleeve in sweater, from the neckhole to the armhole. Sleeve seam should be down (it will lie along the elbow). Line up shoulder end of sleeve to armhole opening for seaming.
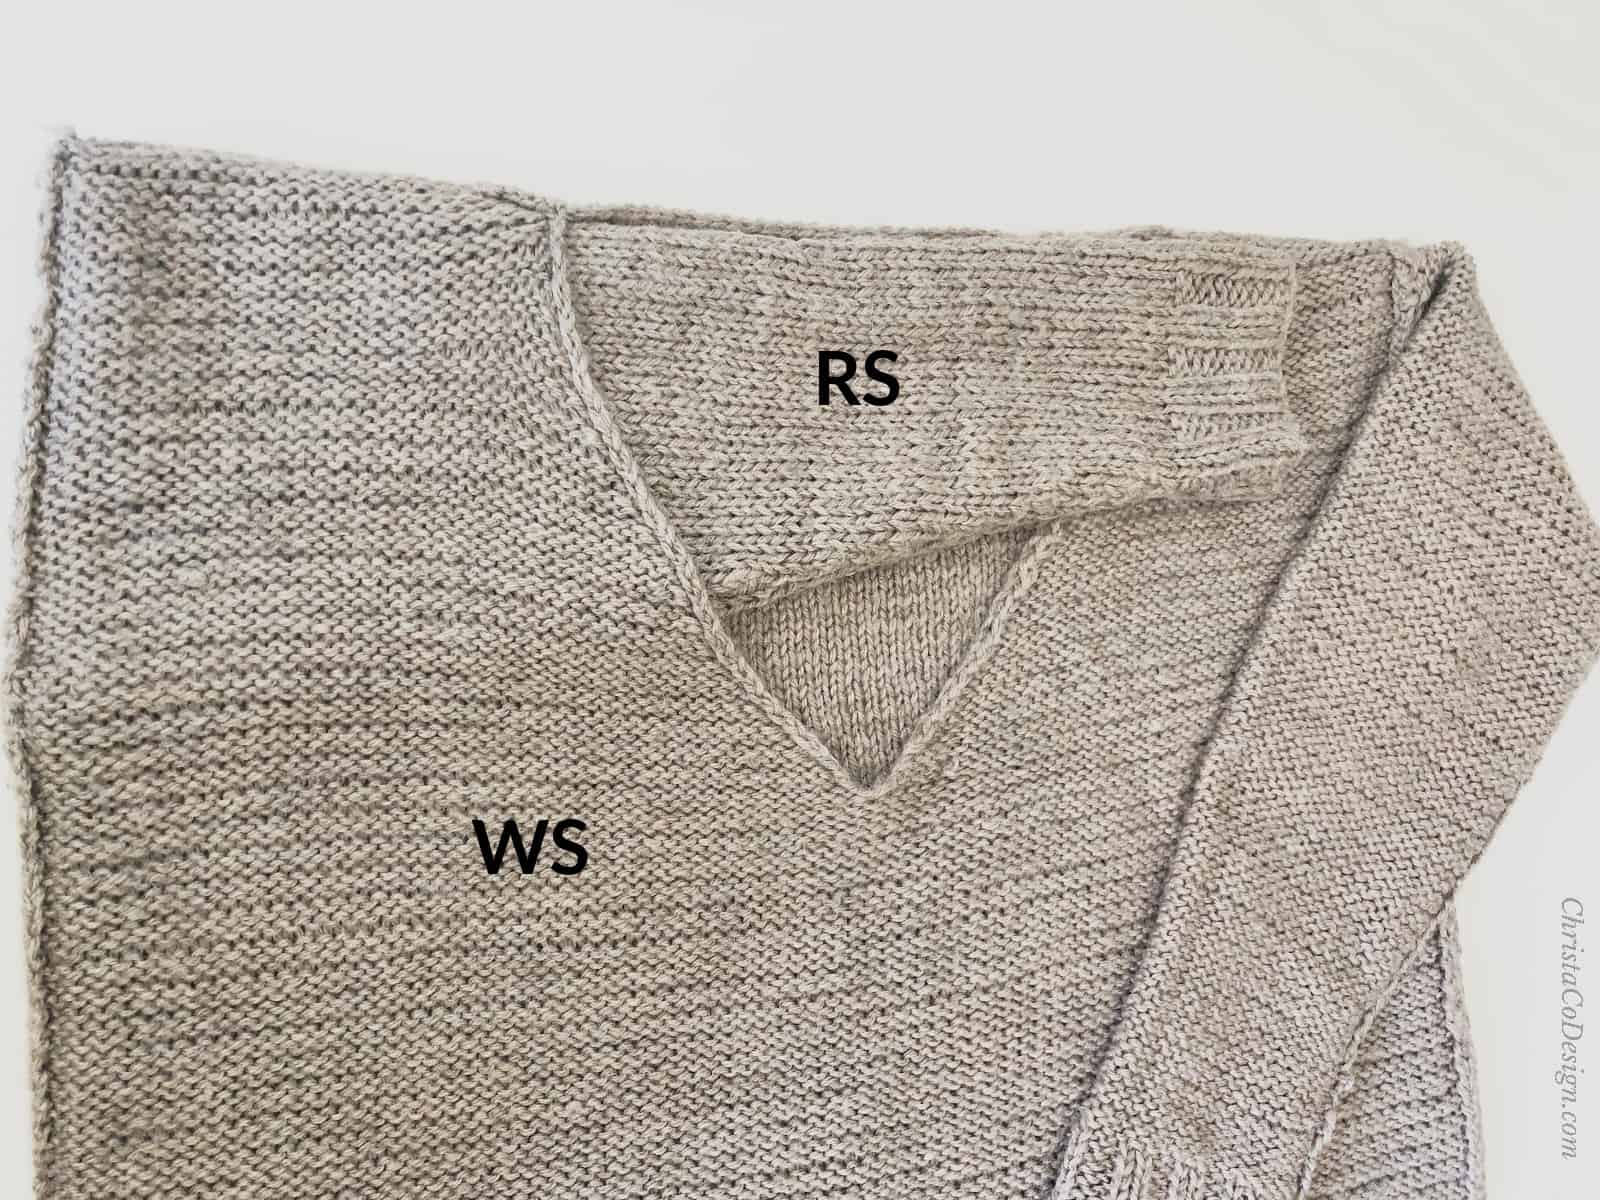
Sew sleeve to armhole. Rep for other sleeve.
Finishing
Cut yarn, weave in ends.
Elena Sweater Knitting Pattern
The Elena Sweater is an easy knitting pattern crafted with beginners in mind.
Materials
- #4 medium worsted weight yarn, pictured is Lion Brand’s Touch of Alpaca (90% Acrylic, 10% Alpaca, 3.5 oz/100 g, 207 yd/190 m):
- XS-3 skeins or approximately 621 yds/568 m
- SM-4 skeins or approximately 725 yds/663 m
- MED-4 skeins or approximately 828 yds/757 m
- LG-5 skeins or approximately 948 yds/867 m
- XL-6 skeins or approximately 1078 yds/986 m
- 2X-6 skeins or approximately 1208 yds/1105 m
- 3X-7 skeins or approximately 1342 yds/1227 m
- 4X-7 skeins or approximately 1449 yds/1325 m
- 5X-8 skeins or approximately 1656 yds/1514 m
Tools
- US 7/4.5mm needles or needles needed to meet gauge
- Yarn needle
- Measuring tape
- Scissors
Instructions
Back Panel
Using smaller needles CO 74 [82, 90, 98, 106, 114, 122, 130, 138] sts using alternating cable cast on.
Row 1. K1, *k2, p2; rep from * to last st, k1.
Rows 2 – 12. Rep Row 1 for 12 rows total or until ribbing is 2.5” (6.5 cm) long.
Change to larger needles.
Row 13. (RS) K all.
Row 14. (WS) K1, *p; rep from * to last st, k1.
Rep last two rows until entire panel is 22” [23, 23, 23.5, 24, 24, 24, 24, 24.5] in (56 [58.5, 58.5, 59.5, 61, 61, 61, 61, 62] cm) long or to your desired length.
BO. Leave a long tail for seaming, cut yarn.
Front Panel Pattern
Using smaller needles CO 74 [82, 90, 98, 106, 114, 122, 130, 138] sts using alternating cable cast on.
Row 1. K1, *k2, p2; rep from * to last st, k1.
Rows 2 – 12. Rep Row 1 for 12 rows total or until ribbing is 2.5” (6.5 cm) long.
Change to larger needles.
Row 13. (RS) K all.
Row 14. (WS) K1, *p; rep from * to last st, k1.
Rep last two rows until entire panel is 18” [18.5, 17, 16.5, 16.5, 16, 15, 15, 14] in (45.5 [47, 43, 42, 42, 40.5, 38, 38, 35.5] cm) long. *If you lengthened your Back Panel add more length here. V–neck will span the last 4.5” [4.5, 6.25, 7, 7.5, 8.25, 9, 9.5, 10.5] in (11.5 [11.5, 16, 18, 19, 21, 23, 24, 26.5] cm) of panel length.
Divide Panels
On the next right side row you will divide your front panel in half and begin decreases one panel at a time to create the v-neck.
Left Front Panel When Wearing
Row 1. On your next RS row K 37 [41, 45, 49, 53, 57, 61, 65, 69] sts, slip remaining 37 [41, 45, 49, 53, 57, 61, 65, 69] sts on an extra needle or spare length of yarn for later. Continue with sts on your needle.
Row 2. (WS) K1, *p; rep from * to last st, k1. 37 [41, 45, 49, 53, 57, 61, 65, 69] sts
Decrease
Row 3. (RS) K to last 3 sts, k2tog, k1. 1 st decreased.
Row 4. (WS) K1, *p; rep from * to last st, k1.
Rep last two rows continuing to decrease every RS row until you have 24 [28, 29, 31, 34, 36, 38, 42, 42] sts left and shoulder is 6.5” [7.5, 7.75, 8.5, 9, 9.5, 10, 11.25, 11.25] in (16.5 [19, 19.5, 21.5, 23, 24, 25.5, 28.5, 28.5] cm) wide. Leave a long tail for seaming and cut yarn. BO.
Right Front Panel When Wearing
Slip other half of sts back onto your working needle. Rejoin join yarn at center st.
Row 1. (RS) K all. 36 [40, 44, 48, 52, 56, 60, 64, 68] sts
Row 2. (WS) K1, *p; rep from * to last st, k1.
Decrease
Row 3. (RS) K1, K2tog-L, k to end. 1 st decreased.
Row 4. (WS) K1, *p; rep from * to last st, k1.
Rep last two rows continuing to decrease every RS row until you have 24 [28, 29, 31, 34, 36, 38, 42, 42] sts left and shoulder measures 6.5” [7.5, 7.75, 8.5, 9, 9.5, 10, 11.25, 11.25] in (16.5 [19, 19.5, 21.5, 23, 24, 25.5, 28.5, 28.5] cm) wide. Leave a long tail for seaming and cut yarn. BO.
Block Panels
Block your panels now, before seaming.
Seam Panels
Lay front and back panels together with RS touching.
Sew together at the shoulders.
Sew sides together from hem to last 6.5” [7, 7.5, 8, 8.5, 9, 9.5, 10, 10.5] in (16.5 [18, 19, 20.5, 21.5, 23, 24, 25.5, 26.5] cm) of panel, leave this open for armhole.
Sleeves
Make 2
To find the exact sleeve length for you try your sweater on now. Measure from where the sweater comes off your shoulder down to where you would like your sleeve to stop. Usually this is between the wrist and first thumb joint. Sleeve is knit from the wrist up, so you can also check width and length as you go and make adjustments, if needed.
Using smaller needles CO 34 [34, 34, 38, 38, 38, 42, 42, 42] sts using alternating cable cast on.
Row 1. K1, *k2, p2; rep from * to last st, k1.
Rows 2 – 12. Rep Row 1 for 12 rows total or until ribbing is 2.5” (6.5 cm) long.
Change to larger needles.
Row 13. (RS) K all.
Row 14. (WS) K1, *p; rep from * to last st, k1.
Row 15. K1, kfb, k to last 2 sts, kfb, k1. +2 sts increased.
Row 16. (WS) K1, *p; rep from * to last st, k1.
Repeat last two rows until you have 48 [52, 56, 60, 64, 68, 72, 76, 78] sts and sleeve is 13” [14, 15, 16, 17, 18, 19, 20, 21] in (33 [35.5, 38, 40.5, 43, 45.5, 48.5, 51, 53.5] cm) wide.
Then rep rows 13 – 14 until your sleeve is 18”/45.7cm long or to desired length.
Cut yarn, leaving a long tail for seaming.
Block Sleeves
Block your sleeves now, before seaming.
Seam Sleeves
Fold sleeve in half lengthwise with RS touching.
Sew long edge together.
Turn sleeve RS out.
With sweater body still WS out, and sleeve RS out, slide sleeve in sweater, from the neckhole to the armhole. Sleeve seam should be down (it will lie along the elbow). Line up shoulder end of sleeve to armhole opening for seaming.
Sew sleeve to armhole. Rep for other sleeve.
Finishing
Cut yarn, weave in ends.
Recommended Products
As an Amazon Associate and member of other affiliate programs, I earn from qualifying purchases.


Thank you for sharing so much info for making this sweater. I’m just getting back into knitting and I’m sure to enjoy making this one
You’re quite welcome! I hope you get to make one soon!
How did you join shoulders together am I missing something
Hi Barbara,
The shoulders are sewn to the back panel here:
Seam Panels
Lay front and back panels together with RS touching.
Sew together at the shoulders.
Alternatively, if you have not bound off yet, you can use a three needle bind off to join the shoulders to the back panel.
I hope this helps!
Crystal
Hi Crystal, I’m making this Elena sweater in a size large with 96 stitches cast on. The pattern for the first row of knitting reads: k1, *k2, p2* to final stitch, then k1. When I do this my row ends with three knit stitches, not 2 purl then a knit. Is this correct? I’ve redone it several times but always have this same result. Thank you for any guidance you have.
Hi Debbie,
Thanks, this is a great question. You’re correct, and this is how it was written originally. Now I think I would rework it be cast on 98, then p2, *k2, p2 for the first row and then k2, *p2, k2 for the second row. Then just add the two extra sts into your counts from here on. So if you want to cast on two extra sts and follow this for both front and back you’ll be set for the ribbings working out better and seaming nicely. And you would just divide those sts evenly at the v-neck as well. I’ll have a look over the other sizes and adjust as well. Please let me know if you have any other questions. I hope this helps!
Thanks again,
Crystal
Thank you for this lovely pattern. I just want to make sure I know what I am looking at. The first picture after the “Front Panel Pattern” section looks like a panel with a “C” shape due to decreases for a sleeve inset. Is it actually something to do with the V-neck? Thanks for clarifying. I’m a mediocre knitter and always worry I’m doing something wrong!
Thank you!
Hi Caroline,
This picture shows the front panel with the left shoulder and v-neck worked up. There is no other shaping (like the sleeve inset) on this one. It’s likely curving in the pic because it’s unblocked stockinette here. I hope this helps!
In row 15 of sleeves you say kfb to decrease you mean increase?
Yes, thank you for catching that! It’s been updated to say ‘increase.’