Kids V-Neck Pullover Sweater Free Knitting Pattern
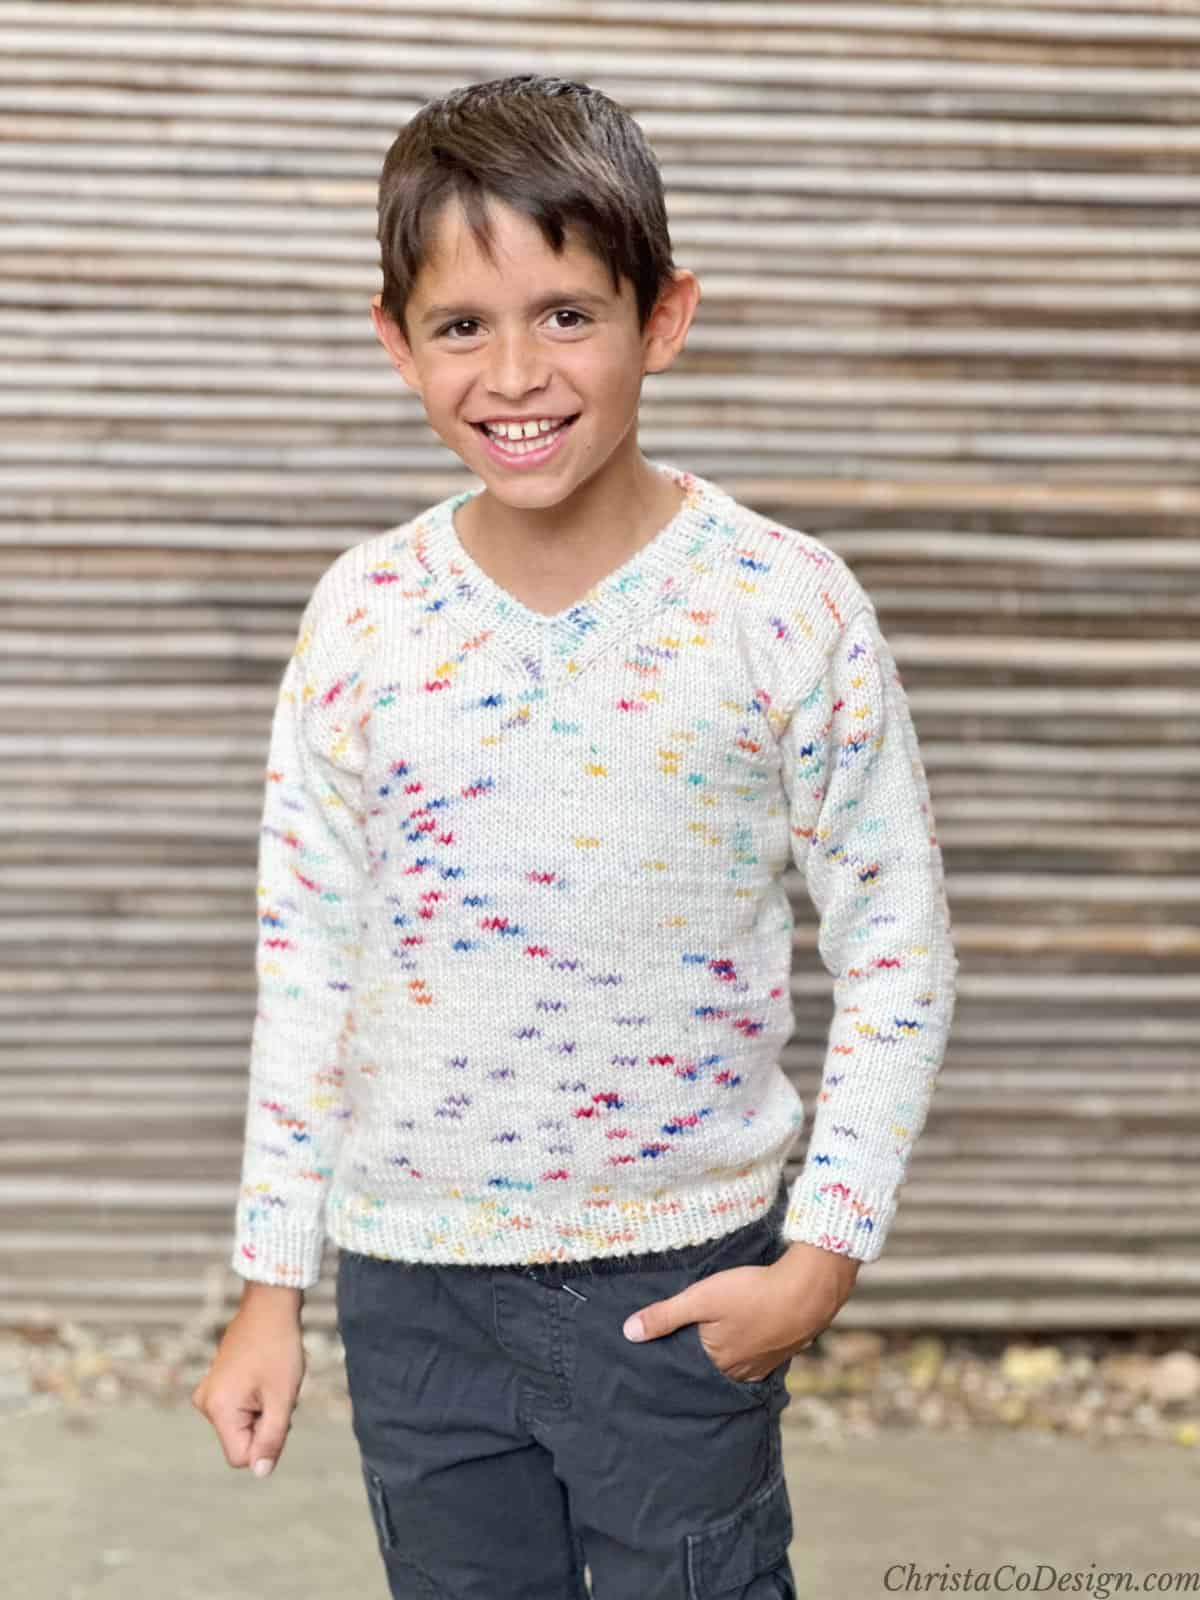
The Bosa Sweater is an easy knit pullover using stockinette stitch in child sizes 2 – 16. This playful sweater is knit with 2″ of ease and a high v-neck. The ribbed hems give this one a classic finish.
To get that nice fitting v-neck we’ll knit the upper back and neckline flat before joining at the under arms to knit the rest in the round. The sleeve stitches are picked up and knit in the round.
This kids sweater knits up fairly quickly in worsted weight yarn. And the speckled yarn makes it colorful without all the extra ends!
This post contains affiliate links, I may earn a fee. Read more disclosure policy.
The model wears size 8 in shade Cake Pop on a 25.5” chest with 3″ (7.5 cm) of positive ease at the chest.
Purchase the ad-free, well formatted printable PDF Pattern from my shop. Scroll down for the free pattern!
Beginner knitters will be happy to know that all the techniques used in this easy sweater knitting pattern include a video tutorial.
You Can Purchase My Ad-Free PDF Patterns Here:
FUN SCRAP YARN
Knitting Patterns
Materials
- KnitPicks’s Brava Speckle* #4 medium worsted weight yarn (100% acrylic, 218 yd (199 m) per 100 g skein in shade Cake Pop Speckle: 2 [3, 3, 4, 4, 5, 5, 6] skeins; blue version in Tidal Speckle.
- 4 mm (US 6) 40” (101.5 cm) circular needles & 4.5 mm (US 7) 40” (101.5 cm) circular needle (or needle size needed to meet gauge).
- Measuring tape, yarn needle, stitch markers (2) and scissors.
Notes
A kid’s sweater needs to be hard-wearing and versatile to handle hours of play. This speckled yarn does all the colorwork for you with playful pops of color. A simple knit pullover features classic styling with the rib stitch on the hem and sleeve cuffs. The mitered rib v-neck is polished and allows for easy on and off. Knitted in machine washable worsted weight yarn this sweater is easy to wear and easy to care for.

Construction
The upper back of this sweater is worked flat, top down. Stitches are picked up for the shoulders at each side of the cast-on edge and knit flat. The two shoulder pieces are joined to form the v-neck yoke and the front chest is knit flat before joining with the upper back in the round. From there, the lower body is knit top down in the round. The sleeves are picked up and knit in the round.
Save your favs!
Add this pattern to your Ravelry queue.
Tutorials
These are recommended for the best look, however, you can substitute them with a different technique if needed.
Skill Level
Easy
Stitches / Abbreviations
US Terms
BOR – beginning of round
dec – decrease
k – knit
k2tog – knit 2 together
m – marker
M1L – make one left increase
M1R – make one right increase
cdd – center double decrease – slip 2 sts tog as if to k2tog, k1, pass the 2 slipped set over.
p – purl
pm – place marker
rep – repeat
rnd – round
RS – right side
sm – slip marker
ssk – slip, slip, knit decrease
st(s) – stitch(es)
St st – stockinette stitch
tog – together
WS – wrong side
Gauge
18 sts x 24 rnds (after blocking) to 4” (10 cm) measured over St st using x 4.5 mm (US 7) needles
Sizing
2 [4, 6, 8, 10, 12, 14, 16]
To fit 21 [23, 25, 26.5, 28, 30, 31.5, 32.5]” (53.5 [58.5, 63.5, 67.5, 71, 76, 80, 82.5] cm) chest circumference.
Finished Measurements
23 [25, 27.5, 28.5, 30, 32, 33.5, 34.5] ” (58.5 [63.5, 70, 72.5, 76, 81.5, 85, 87.5] cm) circumference at the chest.
Intended to be worn with 2″ (5 cm) of positive ease at the chest.

The model wears size 12 in shade Tidal on 28” chest with 4″ (10 cm) of positive ease at the chest.
Little boys and girls grow fast so if you might consider sizing up to get another season out their sweater.
Scroll down for the free knitting pattern!
Pin It
Don’t forget to pin this for later!

Pattern Instructions

How To Kids V-Neck Sweater Knitting Pattern
Learn how to knit this simple v-neck in kids sizes 2-16!
Materials
- WeCrochet’s Brava Speckle* #4 medium worsted weight yarn (100% acrylic, 218 yd (199 m) per 100 g skein in shade Cake Pop Speckle: 2 [3, 3, 4, 4, 5, 5, 6] skeins; blue version in Tidal Speckle.
Tools
- You'll need both 4 & 4.5 mm needles (size US 7 & 7.5), or sizes needed to meet gauge.
- Measuring tape, yarn needle, stitch markers (2) and scissors.
Instructions
Upper Back
Using larger needles, cast on 52 (56, 60, 64, 68, 72, 76, 78) sts using the cable cast-on.
Set-up Row (RS): K 15 (16, 18, 18, 20, 22, 23, 24), place locking stitch marker through cast-on edge, k 22 (24, 24, 28, 28, 28, 30, 30), place locking stitch marker through cast-on edge, k to end.
These markers indicate the placement of the back neck.
Row 1 (WS): P all.
Row 2 (RS): K all.
Rep Rows 1 & 2: 14 (16, 17, 18, 19, 21, 23, 24) more times, then rep Row 1 one more time. Total rows = 31 (35, 37, 39, 41, 45, 49, 51) measuring 5.25” (6, 6.25, 6.5, 7, 7.5, 8.25, 8.5)" from cast-on edge.
Cut yarn and place 52 (56, 60, 64, 68, 72, 76, 78) sts for the Upper Back on a stitch holder or waste yarn. In this video I show you how.
With RS facing, turn the Upper Back so that the cast-on edge is at the top and the live sts are at the bottom. The edge to the left of the back neck is the Left Shoulder and the edge to the right is the Right Shoulder.

Left Shoulder
In this video I show you how to do the shoulders.
Using larger needles and with RS facing, pick up and knit 15 (16, 18, 18, 20, 22, 23, 24) sts along the Left Shoulder, removing the locking stitch marker at the neck edge.
Row 1 (WS): P all.
Row 2 (RS): K all.
Rep Rows 1 & 2: 3 (3, 3, 3, 3, 3, 3, 3) more times. Total rows on shoulder = 8 (8, 8, 8, 8, 8, 8, 8).
Set-Up Row (WS): P 12 (13, 15, 15, 17, 19, 20, 21), pm, p last 3 sts.
Left Increase V-Neck
Row 1 (RS): K to m, sm, M1L, k to end. 1 st increased.
Row 2 (WS): P all.
Rep Rows 1 & 2: 10 (11, 11, 13, 13, 13, 14, 14) more times until you have 26 (28, 30, 32, 34, 36, 38, 39) sts total.
Total rows = 22 (24, 24, 28, 28, 28, 30, 30).
Cut yarn and place the 26 (28, 30, 32, 34, 36, 38, 39) sts for the Left Shoulder on a stitch holder/waste yarn, removing the stitch marker. 
Right Shoulder
Using larger needles and with RS facing, pick up and knit 15 (16, 18, 18, 20, 22, 23, 24) sts along the Right Shoulder, removing the locking stitch marker at the neck edge.
Row 1 (WS): P all.
Row 2 (RS): K all.
Rep Rows 1 & 2: 3 (3, 3, 3, 3, 3, 3, 3) more times.
Total rows on shoulder = 8 (8, 8, 8, 8, 8, 8, 8).
Set-up Row (WS): P3, pm, p to end.
Right Increase V-Neck
Row 1 (RS): K to m, M1R, sm, k to end.
Row 2 (WS): P all.
Rep Rows 1 & 2: 10 (11, 11, 13, 13, 13, 14, 14) more times until you have 26 (28, 30, 32, 34, 36, 38, 39) sts total.
Total rows = 22 (24, 24, 28, 28, 28, 30, 30).
Do not cut yarn. Place 26 (28, 30, 32, 34, 36, 38, 39) sts for the Left Shoulder behind the 26 (28, 30, 32, 34, 36, 38, 39) sts for the Right Shoulder on the left needle, removing the stitch marker. 52 (56, 60, 64, 68, 72, 76, 78) sts. See how to do it in the video.
Chest
On next RS row K all 52 (56, 60, 64, 68, 72, 76, 78) sts.
Sizes x, (x, 6, 8, 10, 12, 14, 16) only.
Row 1 (WS): P all.
Row 2 (RS): K all.
Sizes x (x, 6, 8, 10, 12, 14, 16) only.
Rep Rows 1 & 2: x (x, 1, 1, 2, 4, 4, 6) more times.
Total rows = 33 (35, 37, 41, 43, 47, 49, 53) to match back panel.
Lower Body
Watch the video here.
Place the 52 (56, 60, 64, 68, 72, 76, 78) sts for the Upper Back on the left needle, after the 52 (56, 60, 64, 68, 72, 76, 78) sts for the chest, preparing the stitches for magic loop. You will now be working the Lower Body in the round. 104 (112, 120, 128, 136, 144, 152, 156) sts.
Set-up Rnd: Join to knit in the round. Pm to mark BOR. K all.  You will join again as you come to the second armhole.
Knit for 51 (55, 65, 73, 71, 79, 89, 85) more rnds or until the sweater is the desired length. Note that the hem adds 1” to length. Target length 14” (15, 17, 19, 19, 21, 23, 23).
Hem
Change to smaller needles.
Next rnd: *K1, p1; rep from * to end.
Rep last rnd 5 more times. Bind off in the round using the Tubular Bind-Off.
Sleeves (Both)
Watch the video here.
Using larger needles and with RS facing, pick up and knit 48 (54, 56, 64, 66, 68, 70, 74) sts around the armhole, starting at the underarm. Pm to mark BOR. 
Knit for 6 (6, 6, 6, 6, 6, 6, 6) rnds.
Dec Rnd: K1, ssk, k to last 3 sts, k2tog, k1. 2 sts decreased.
Size 2 Rep Dec Rnd every 5th rnd 3 more times, then every 6th rnd 7 more more times. 26 sts.
Size 4 Rep Dec Rnd every 5th rnd 3 more times, then every 6th rnd 8 more more times. 30 sts.
Size 6 Rep Dec Rnd every 5th rnd 3 more times, then every 6th rnd 8 more more times. 32 sts.
Size 8 Rep Dec Rnd every 4th rnd 1 more times, then every 5th rnd 14 more more times. 32 sts.
Size 10 Rep Dec Rnd every 5th rnd 13 more times, then every 6th rnd 3 more more times. 32 sts.
Size 12 Rep Dec Rnd every 5th rnd 11 more times, then every 6th rnd 6 more more times. 32 sts.
Size 14 Rep Dec Rnd every 5th rnd 7 more more times, then every 6th rnd 10 more times. 34 sts.
Size 16 Rep Dec Rnd every 5th rnd 15 more times, then every 6th rnd 4 more times. 34 sts.
All sizes knit for 12 rnds. If desired adjust long sleeve length here by knitting more or less rounds.
Cuff
Change to smaller needles.
Next rnd: *K1, p1; rep from * to end.
Rep last rnd 5 more times.
Bind off in the round using the Tubular Bind-Off.
Neckband
Watch the video here.
Using smaller needles and with RS facing, pick up and knit 46 (50, 54, 58, 62, 68, 70, 74) sts around the Front Neck and 22 (24, 24, 28, 28, 28, 30, 30) sts around the Back Neck. Along the neck's cast-on edges, pick up approx. stitch for stitch and along the shaped edges, pick up approx. 3 sts every 4 rows. Pm to mark BOR. 68 (74, 78, 86, 90, 96, 100, 104).
Count 22 (24, 26, 28, 30, 32, 34, 36) sts, place locking stitch marker in center st for v-neck. Be sure you have an even number of sts leading up to the center st and after it.
Next rnd: *K1, p1; rep from * to 1 st before center st, cdd; rep from * to end. You will have 3 knits in a row after the decrease, continue knitting the knits and purling the purls to the end. It will switch to a purl on the next rnd, just continue knitting the knits and purling the purls.
Rep last rnd 5 more times.
Bind off in the round using the Tubular Bind-Off. 
Finishing
Cut yarn and pull through last st of bind off.
Weave in all ends and block using your preferred blocking method.
Recommended Products
As an Amazon Associate and member of other affiliate programs, I earn from qualifying purchases.


