
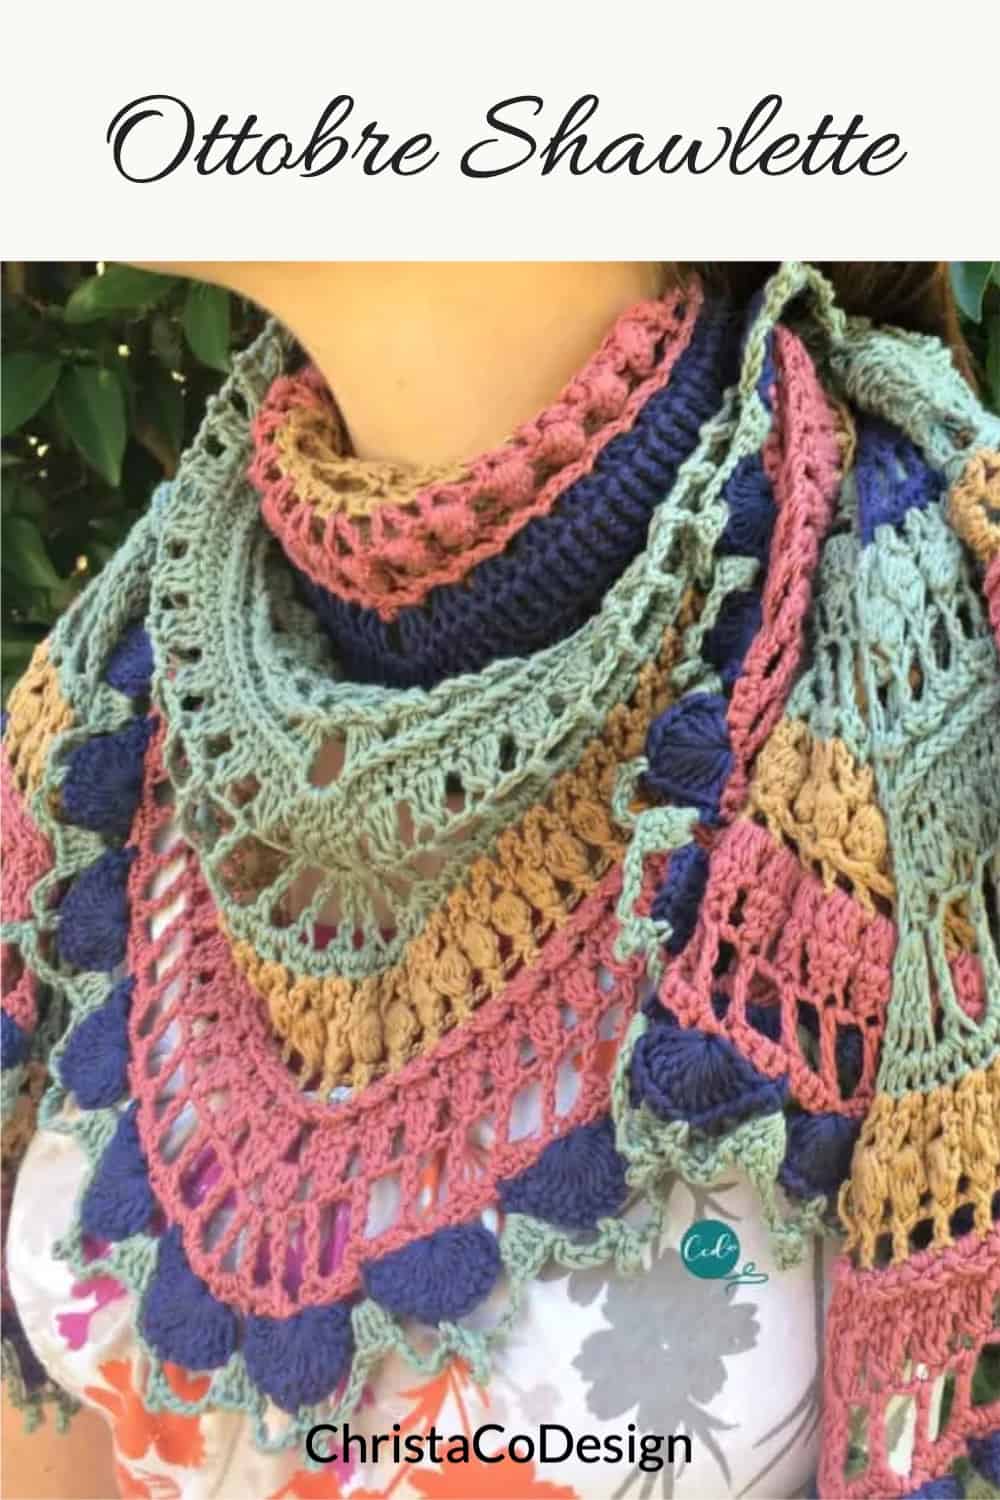
Crochet Shawlette Pattern | Ottobre Shawlette Crochet Pattern
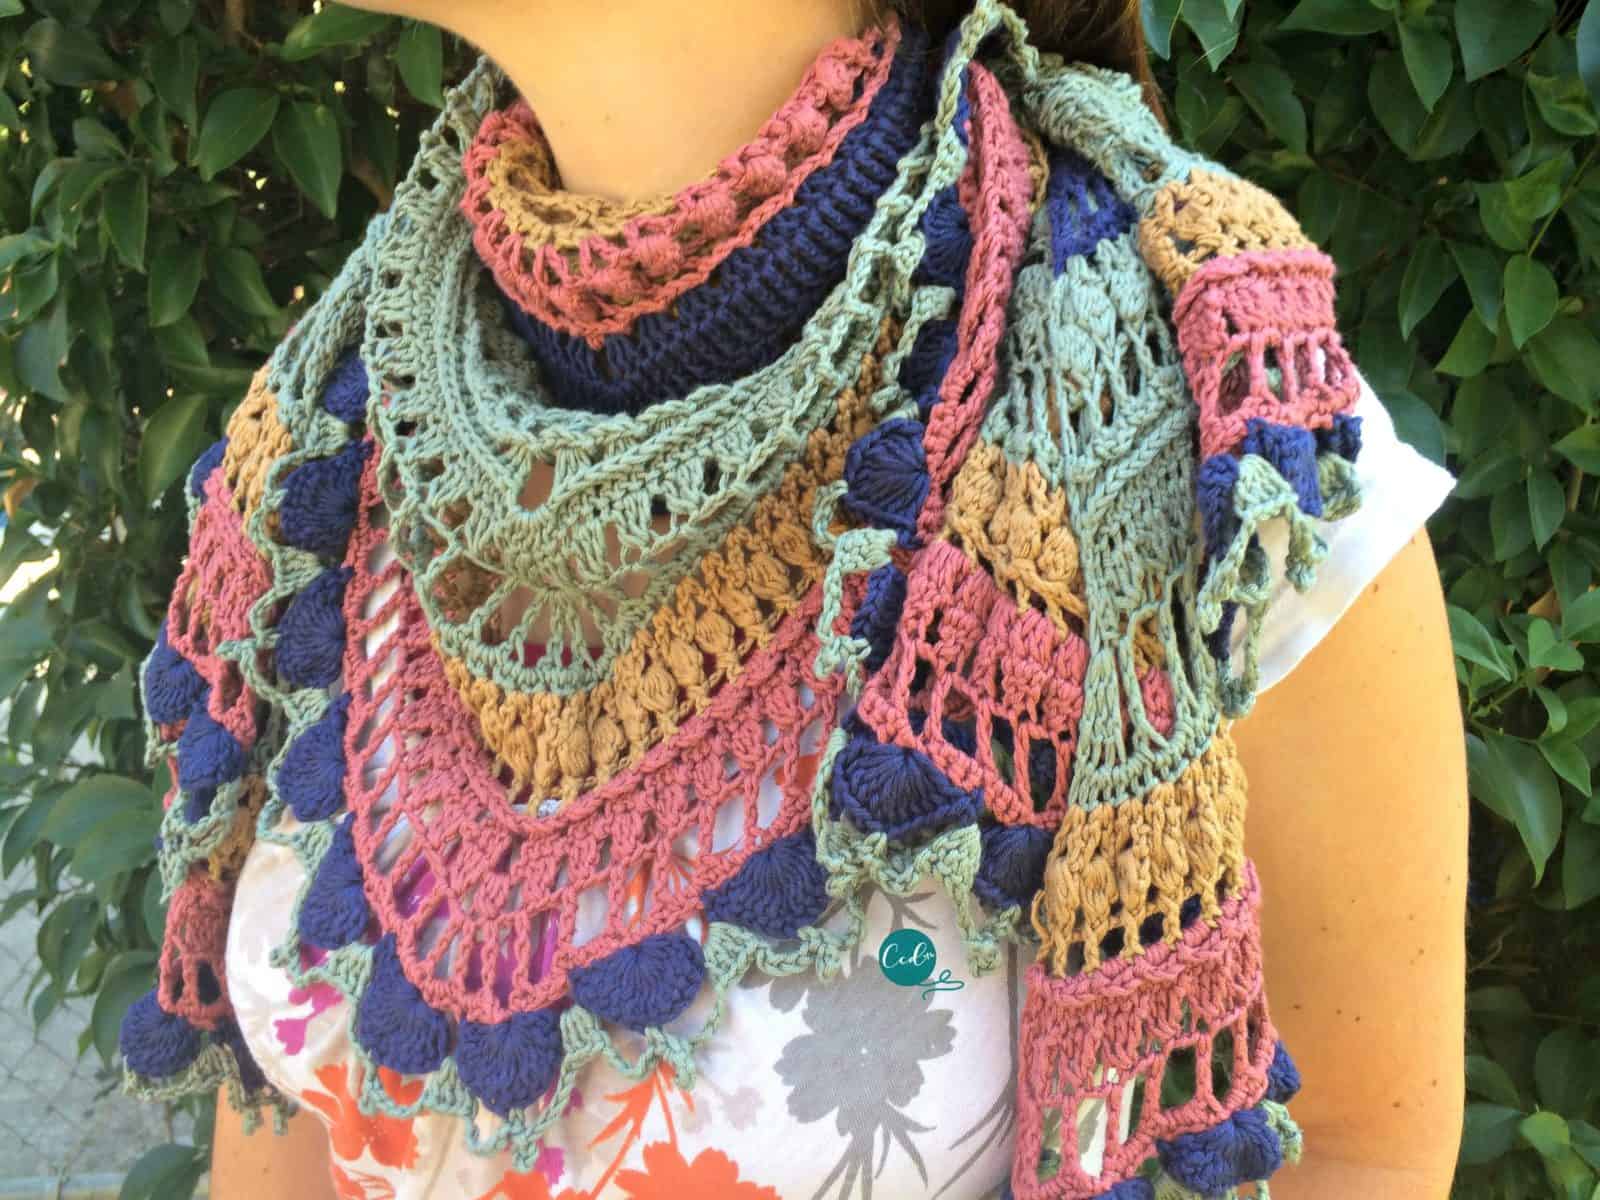
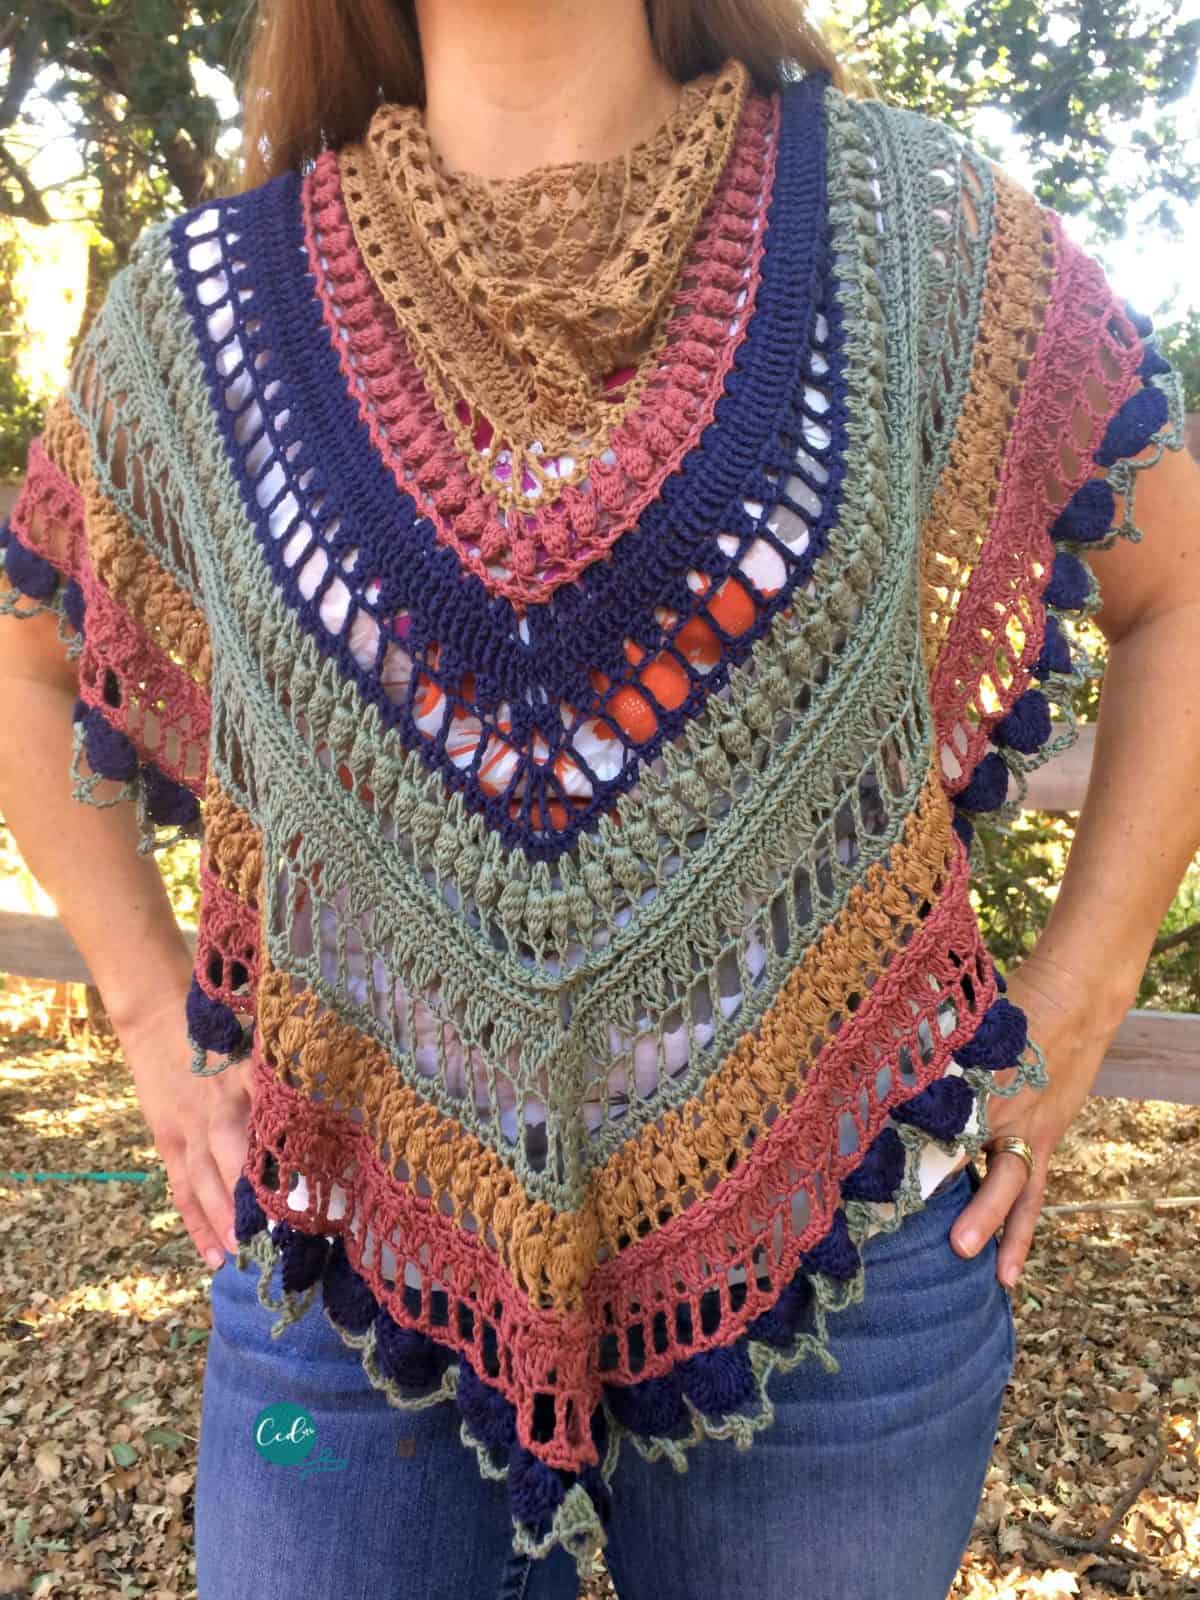
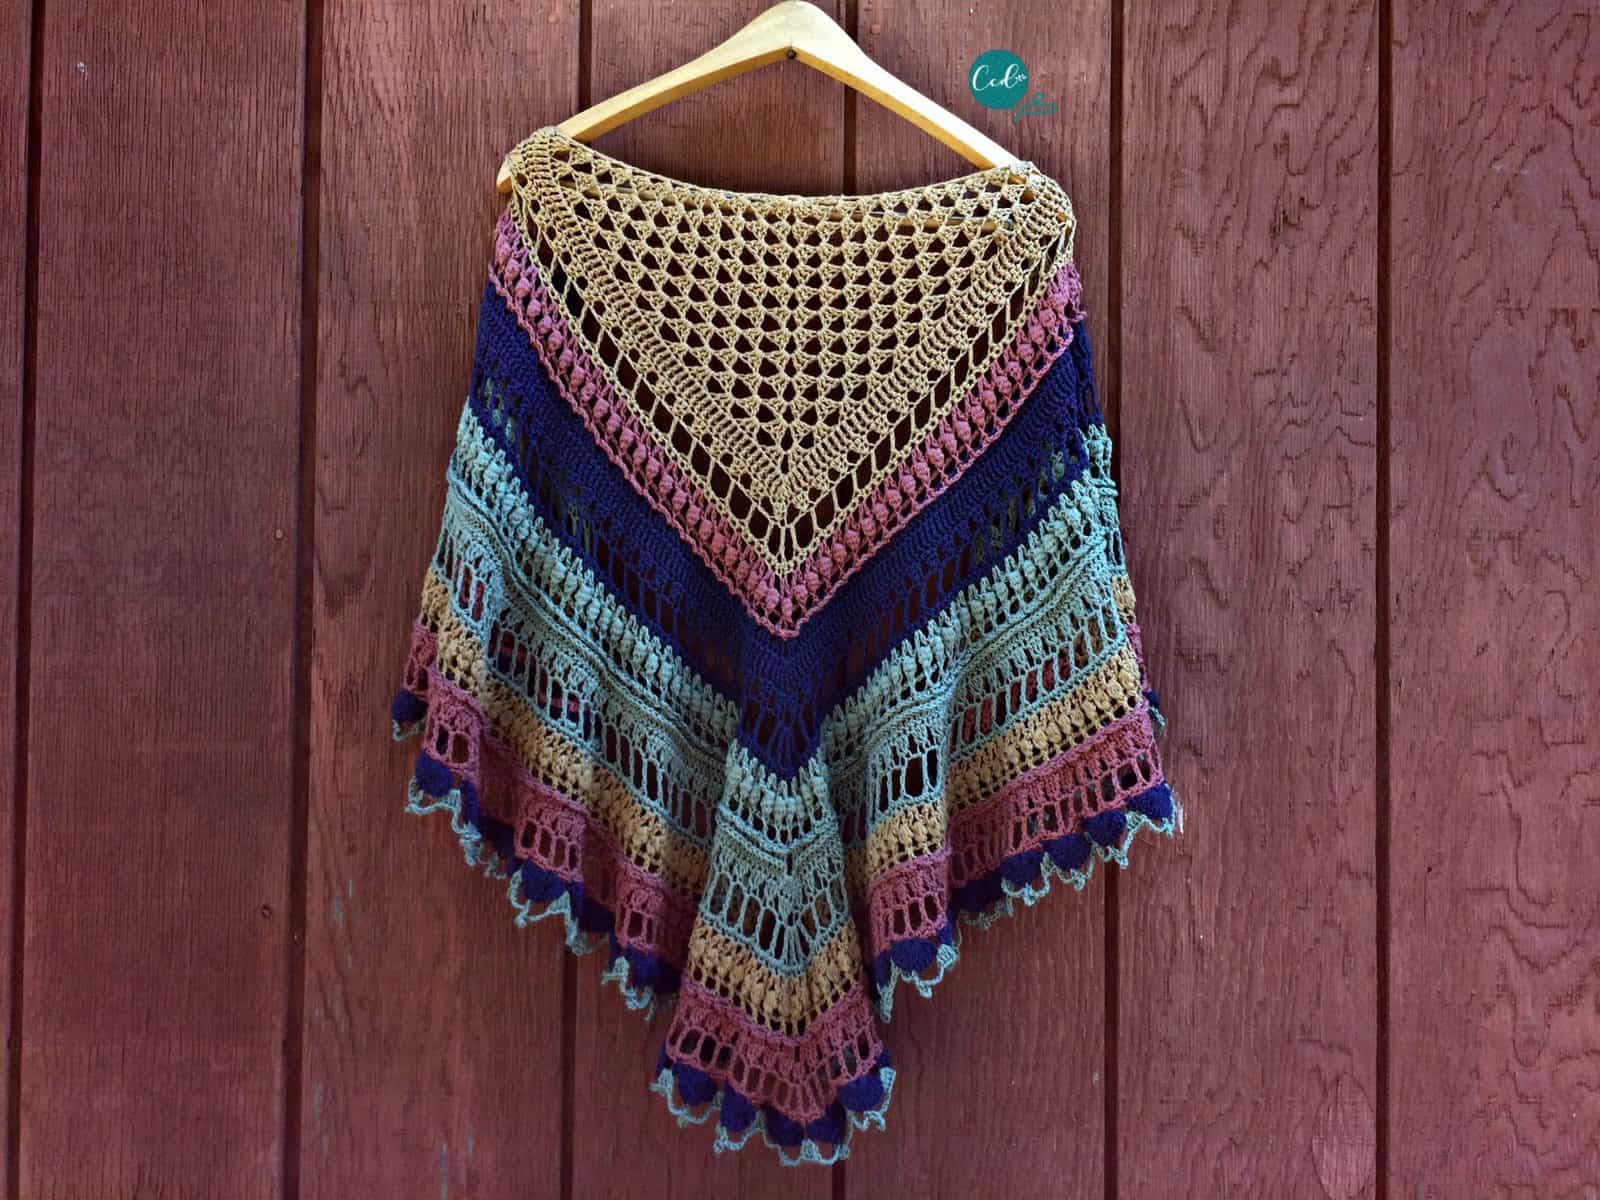
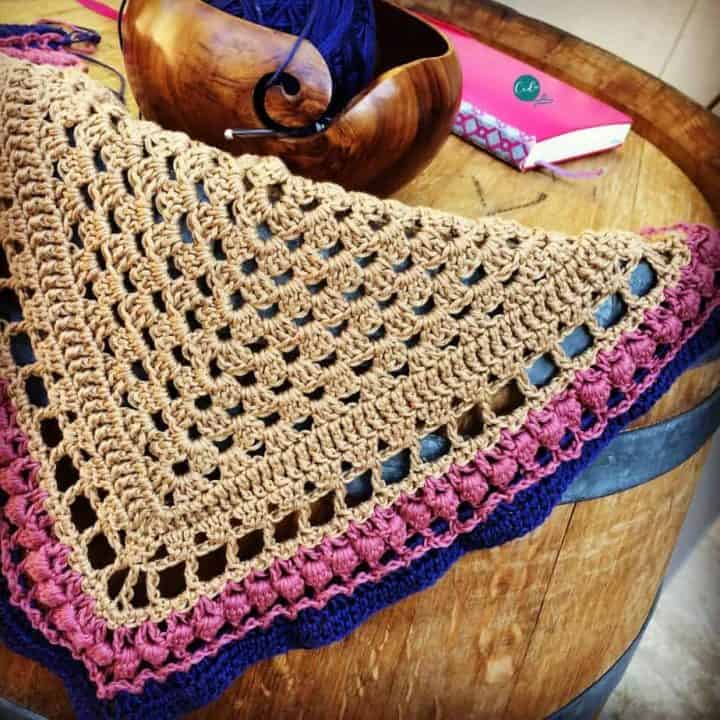
The Ottobre Shawlette is a light and lacy crochet shawl pattern. This small shawl features cotton yarn an a mix of beautiful stitches for a truly unique crochet shawlette.

This post contains affiliate links, I may earn a fee. Read more disclosure policy.
Join the ChristaCoDesign Newsletter
Never miss a pattern!
The Ottobre styles beautifully as a scarf, or small summer shawl. Combine colors to create a modern palette of your favorites.
Crochet shawls are so popular to gift. I created this crochet shawlette as a gift for my sister in law.
Purchase the ad-free, well formatted printable PDF Pattern from my shop. Scroll down for the free pattern!
Purchase My Ad-Free PDF Patterns In Your Favorite Shop Here:
October means chilly mornings and evenings with warm afternoons.The Ottobre Shawlette is perfect for fall or spring, as it’s not too heavy and it’s on the smaller side. It can be worn as a lightweight wrap or a scarf.

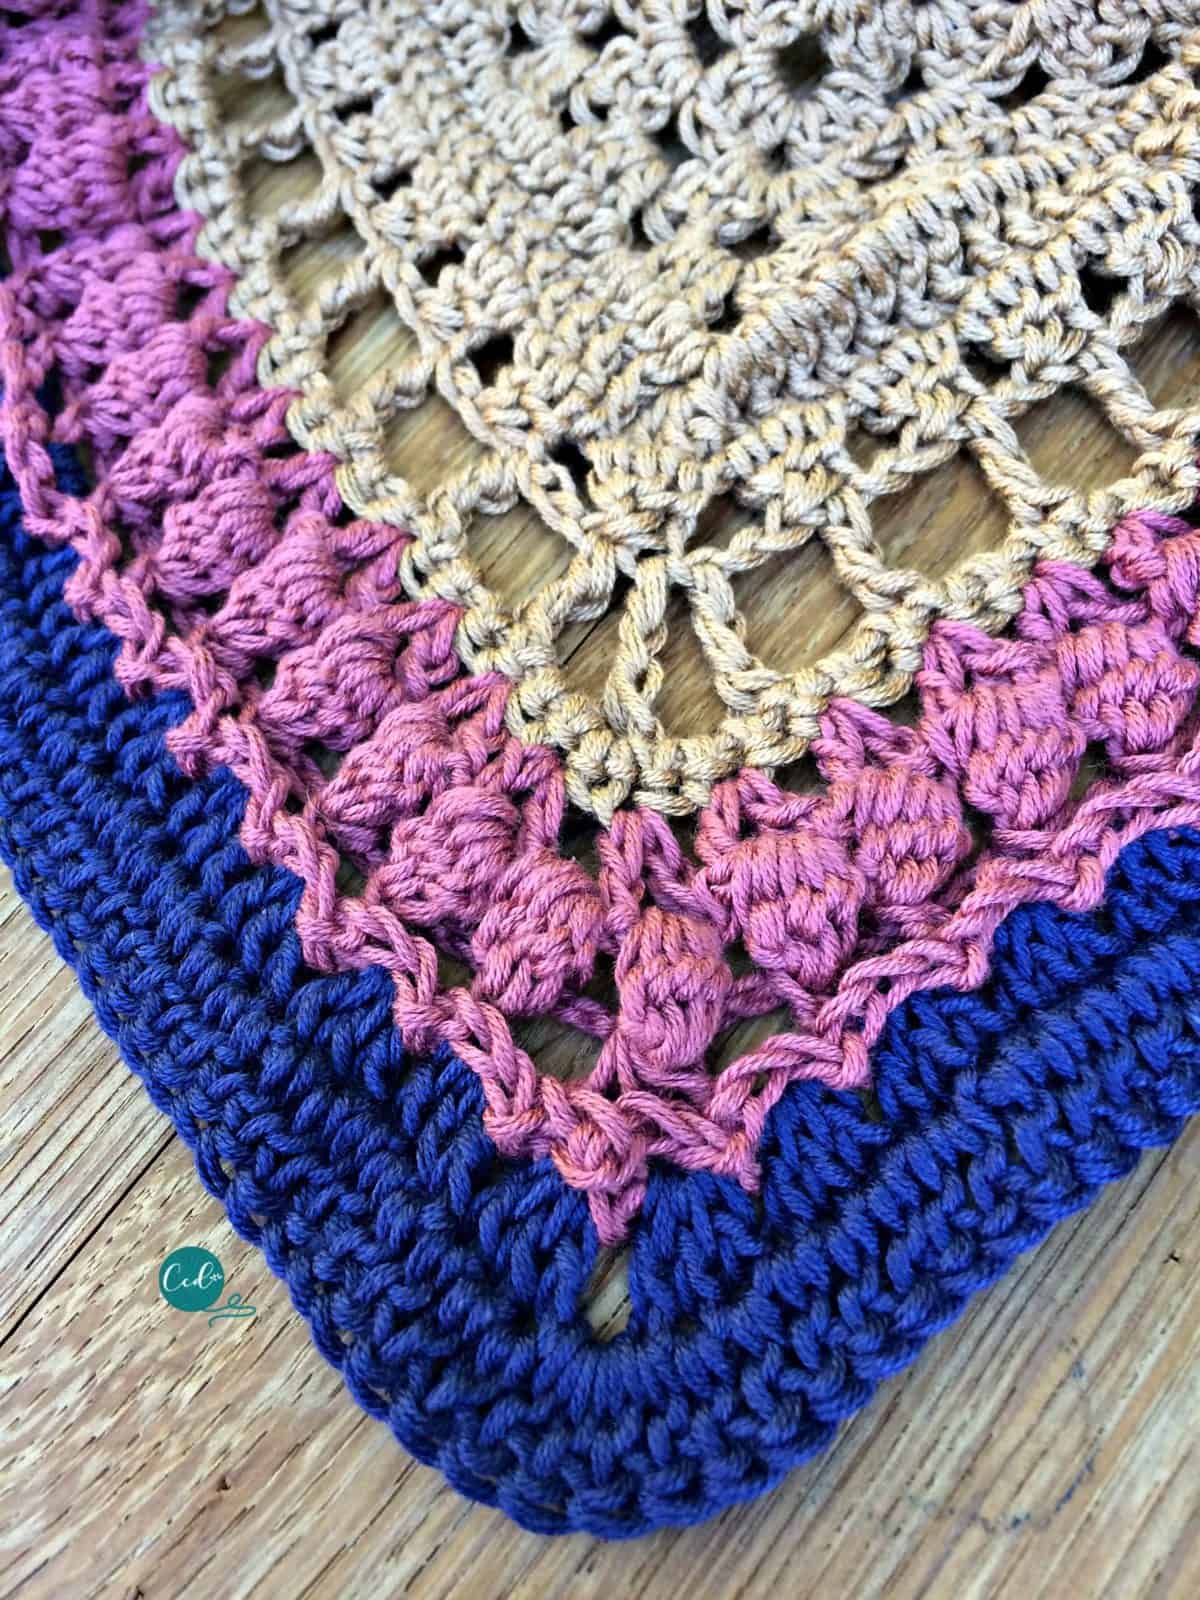
I love how all the textures and open spaces work so well together. I chose four colors to alternate throughout in different size stripes.
I think all the texture in this shawlette would also add interest to a single solid color yarn as well.
Materials
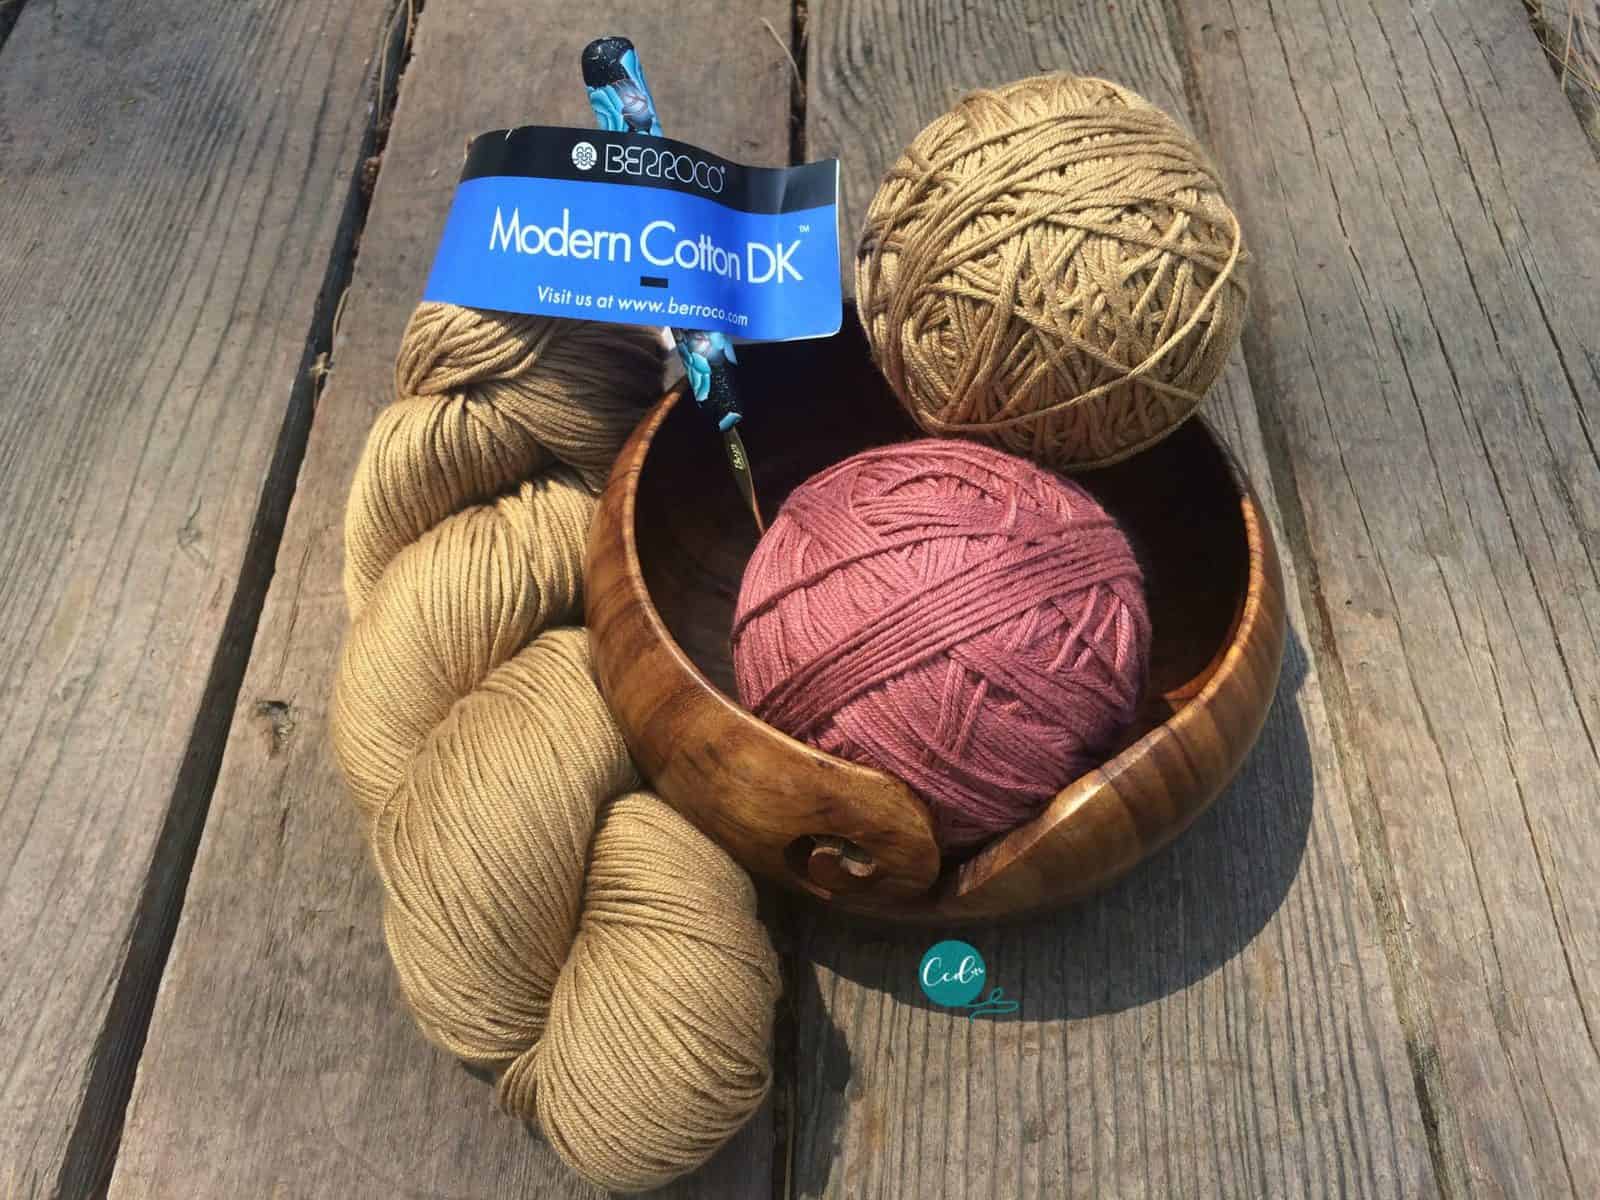
- 1340 yds (1224 m) of Berroco Modern Cotton DK,* a #3 lightweight yarn (60% pima cotton, 40% modal rayon, 335 yd (97 m) per 100 g hank) divided in 4 shades—see more details below. Chepstow (brown), Point Judith (pink), Elms (green) and Hope (blue).
- 3.75 mm (US Size F) crochet hook,* or size needed to meet gauge.
- Yarn needle, measuring tape, scissors, stitch marker(s).
Yarn By Color
Color A (brown) Chepstow—1 hank ~330 yds
Color B (pink) Point Judith—1 hank ~285 yds
Color C (green) Elms—1 hank ~305 yds
Color D (blue) Hope—1 hank ~275 yds
Notes
- Please read through all notes and pattern before you begin.
- Work up a gauge swatch using the provided gauge information. If your gauge matches great, continue on. If not, change your hook size and swatch again. If your stitches are smaller, go up a hook size, if they’re larger, go down a hook size.
- Beginning chains count as stitches unless otherwise stated in the pattern.
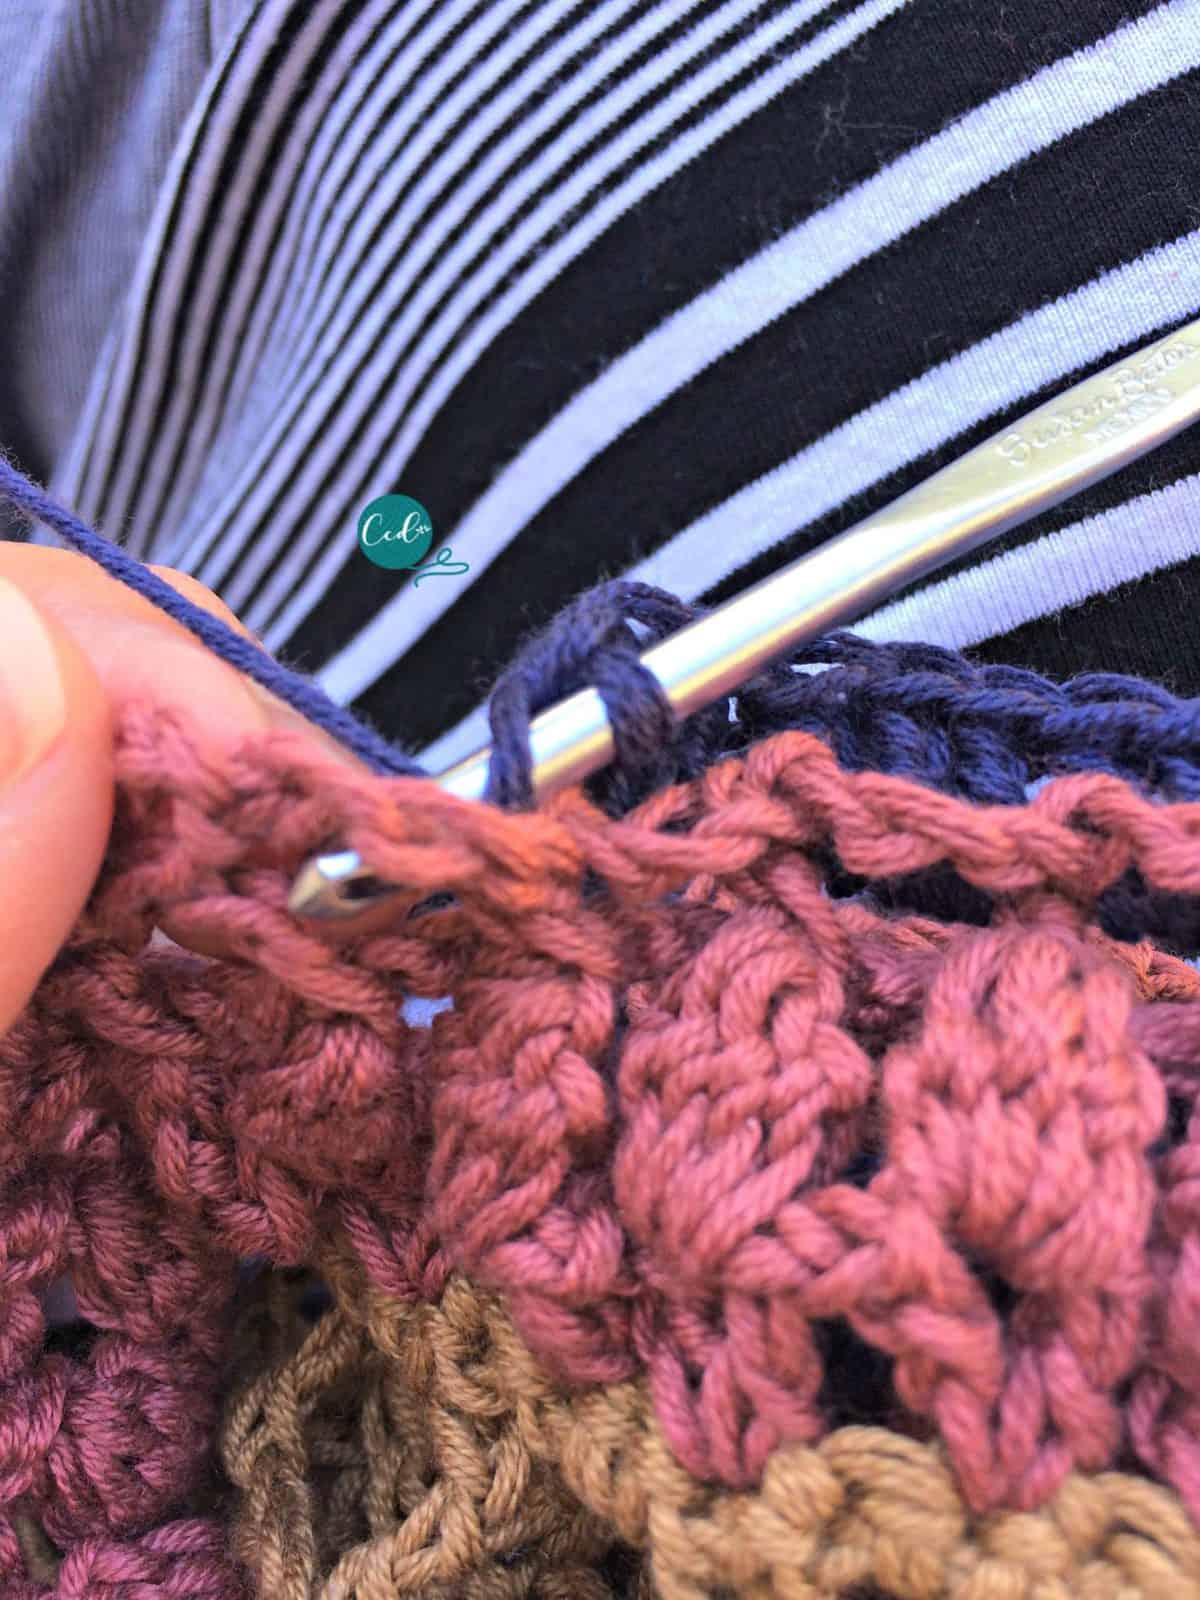
- Color changing tip: before the last movement of last stitch before the color change, drop the first color and pick up the second color, finish the stitch in the new color.
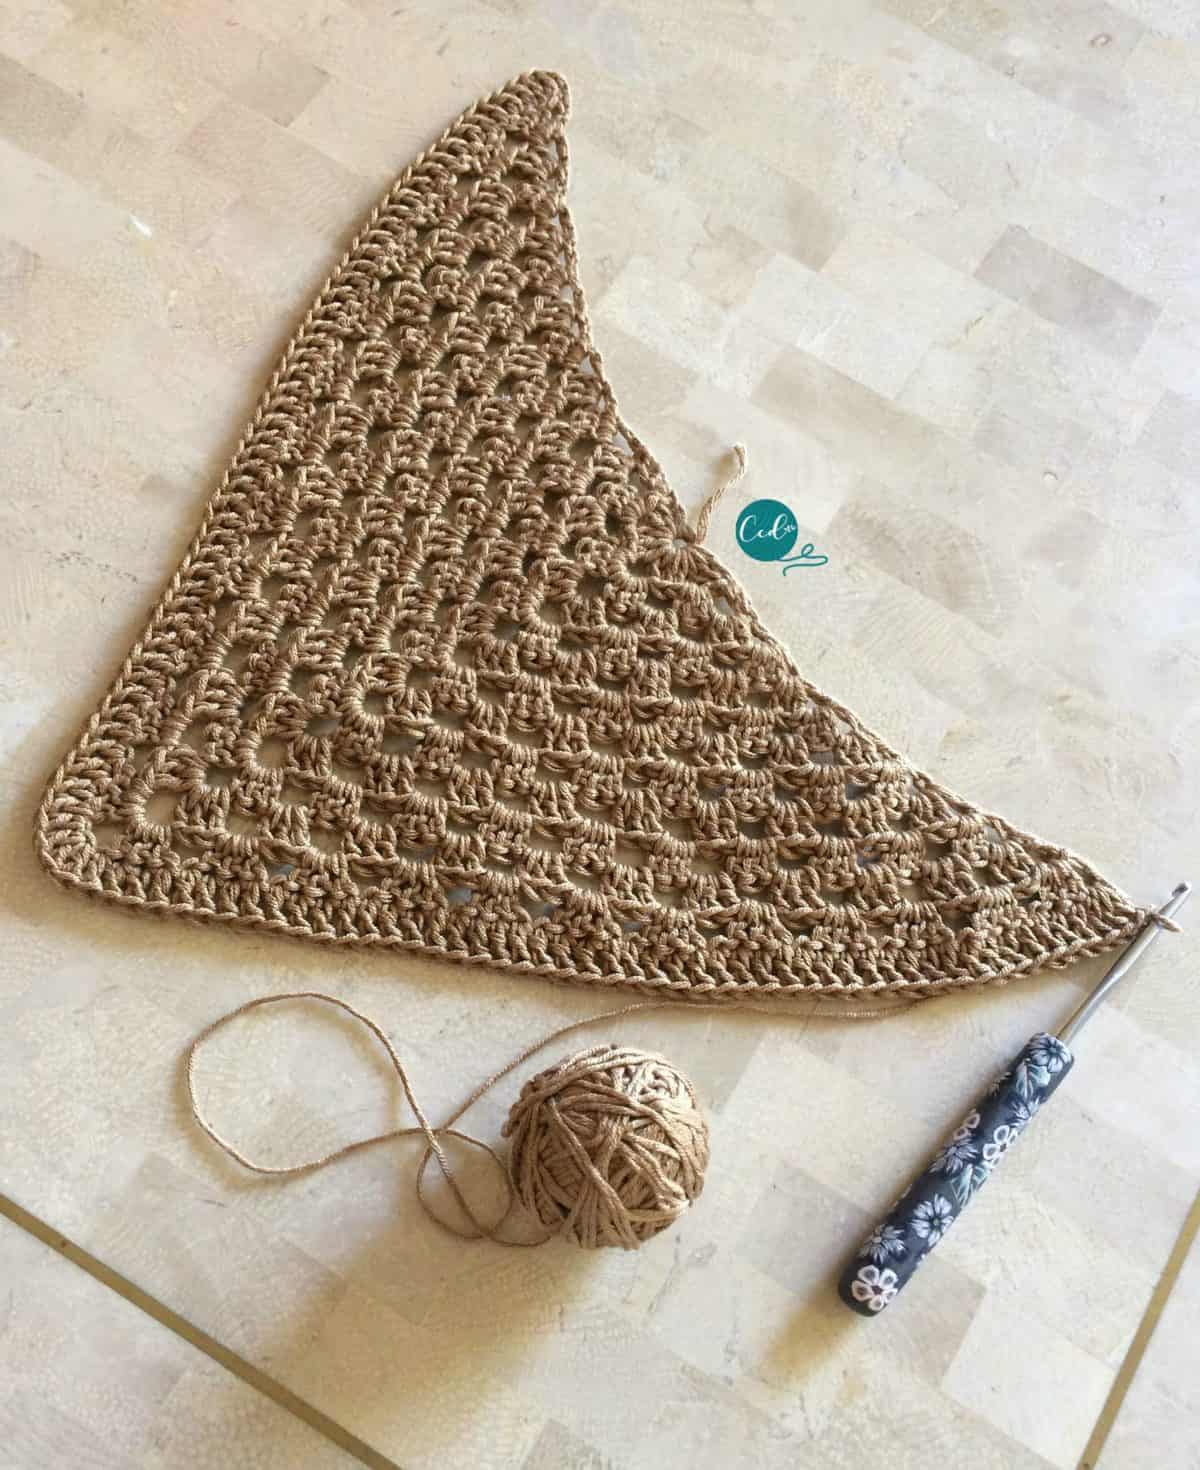
Finished Dimensions
27″ down the spine to the tip & 55″ across the top of the wingspan.
This shawlette can easily be enlarged but requires more yarn: 1-2 more hanks of the suggested yarn should make it a full size shawl.
Gauge:
1″/5 sts x 2 rows (after blocking) to 1” (2.5 cm) measured in dc.
Skill Level
Intermediate
Stitches/Abbreviations
US Terms
ch(s) – chain(s)
hdc – half double crochet
dc – double crochet
rep – repeat
sc – single crochet
sk – skip the indicated stitch
sl st – slip stitch
st(s) – stitch(es)
Special Stitches
bo – bobble stitch
BPdc – back post double crochet
CL – cluster st: dc3tog + ch 2
FPdc – front post double crochet
ldc – long double crochet
p – picot—sc in next st, ch 5, sl st back to sc.
v-st – v-stitch

Pin it for later here:
Don’t forget to pin this for later!
Purchase the ad-free, well formatted printable PDF Pattern from my shop. Scroll down for the free pattern!
Pattern Instructions
Ottobre Shawlette Free Crochet Pattern and Tutorial
A lightweight summer scarf featuring a mix of interesting stitches.
Materials
- 1340 yds of dk weight or #3 light yarn, see details above.
Tools
- 3.75mm US Size F/5 hook
- tapestry needle
- scissors
- measuring tape
Instructions
Color A
Row 1. Start with a mc, or ch 3, sl st to first ch to create a circle. In circle place 3 dc, ch 1, 3 dc, ch 3 (this is the center increase point), 3 dc, ch 1, 3 dc, turn. 16 sts 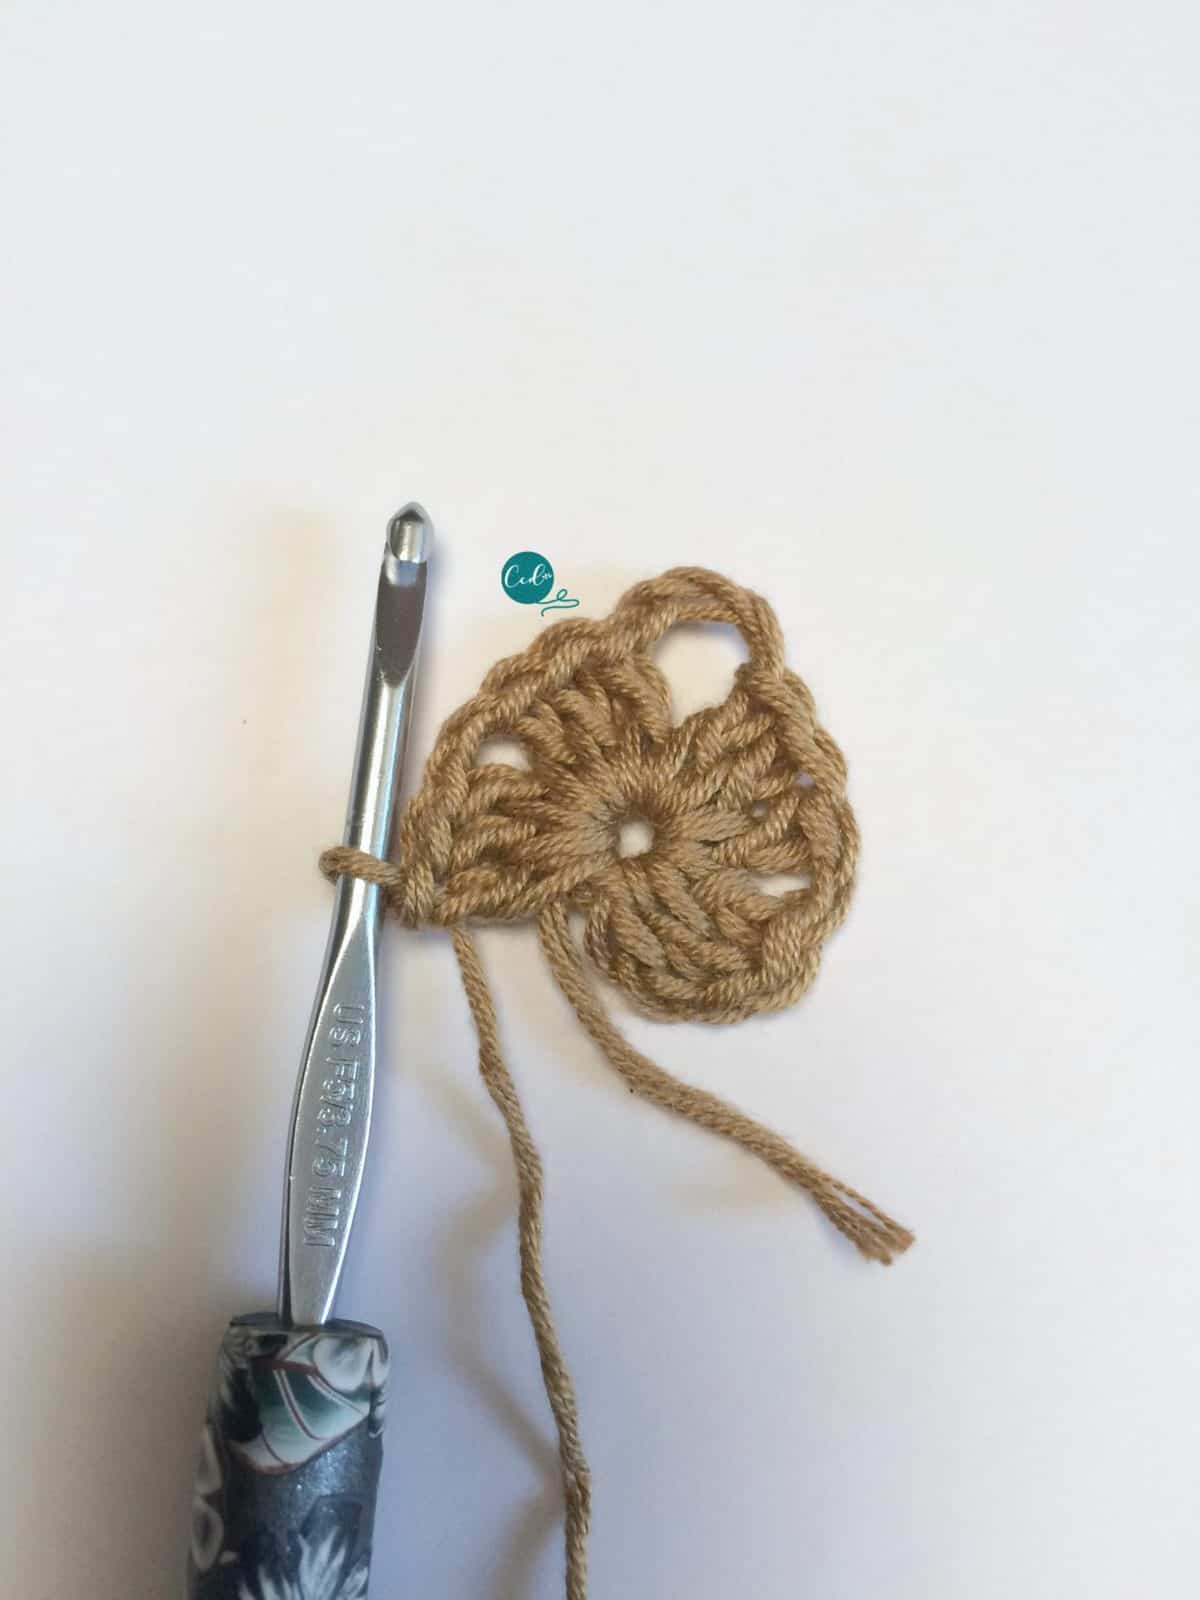
Row 2. (WS) Ch 4 (counts as dc + ch 1 here & throughout), sk next 2 sts, 3 dc in next ch 1 sp, ch 1, sk next 3 sts, place (3 dc, ch 2, 3 dc) in ch 3 sp, ch 1, sk next 3 dc, 3 dc in next ch 1 sp, ch 1, sk next 2 dc, dc in last st, turn. 20 sts
Row 3: Ch 4, 3 dc in next ch 1 sp, ch 1, sk next 3 sts, 3 dc in next ch 1 sp, ch 1, sk next 3 sts, (3 dc, ch 2, 3 dc) in ch 3 sp, ch 1, sk 3 sts, 3 dc in next ch 1 sp, ch 1, sk 3 s ts, 3 dc in last ch 1 sp, dc in last stitch, turn..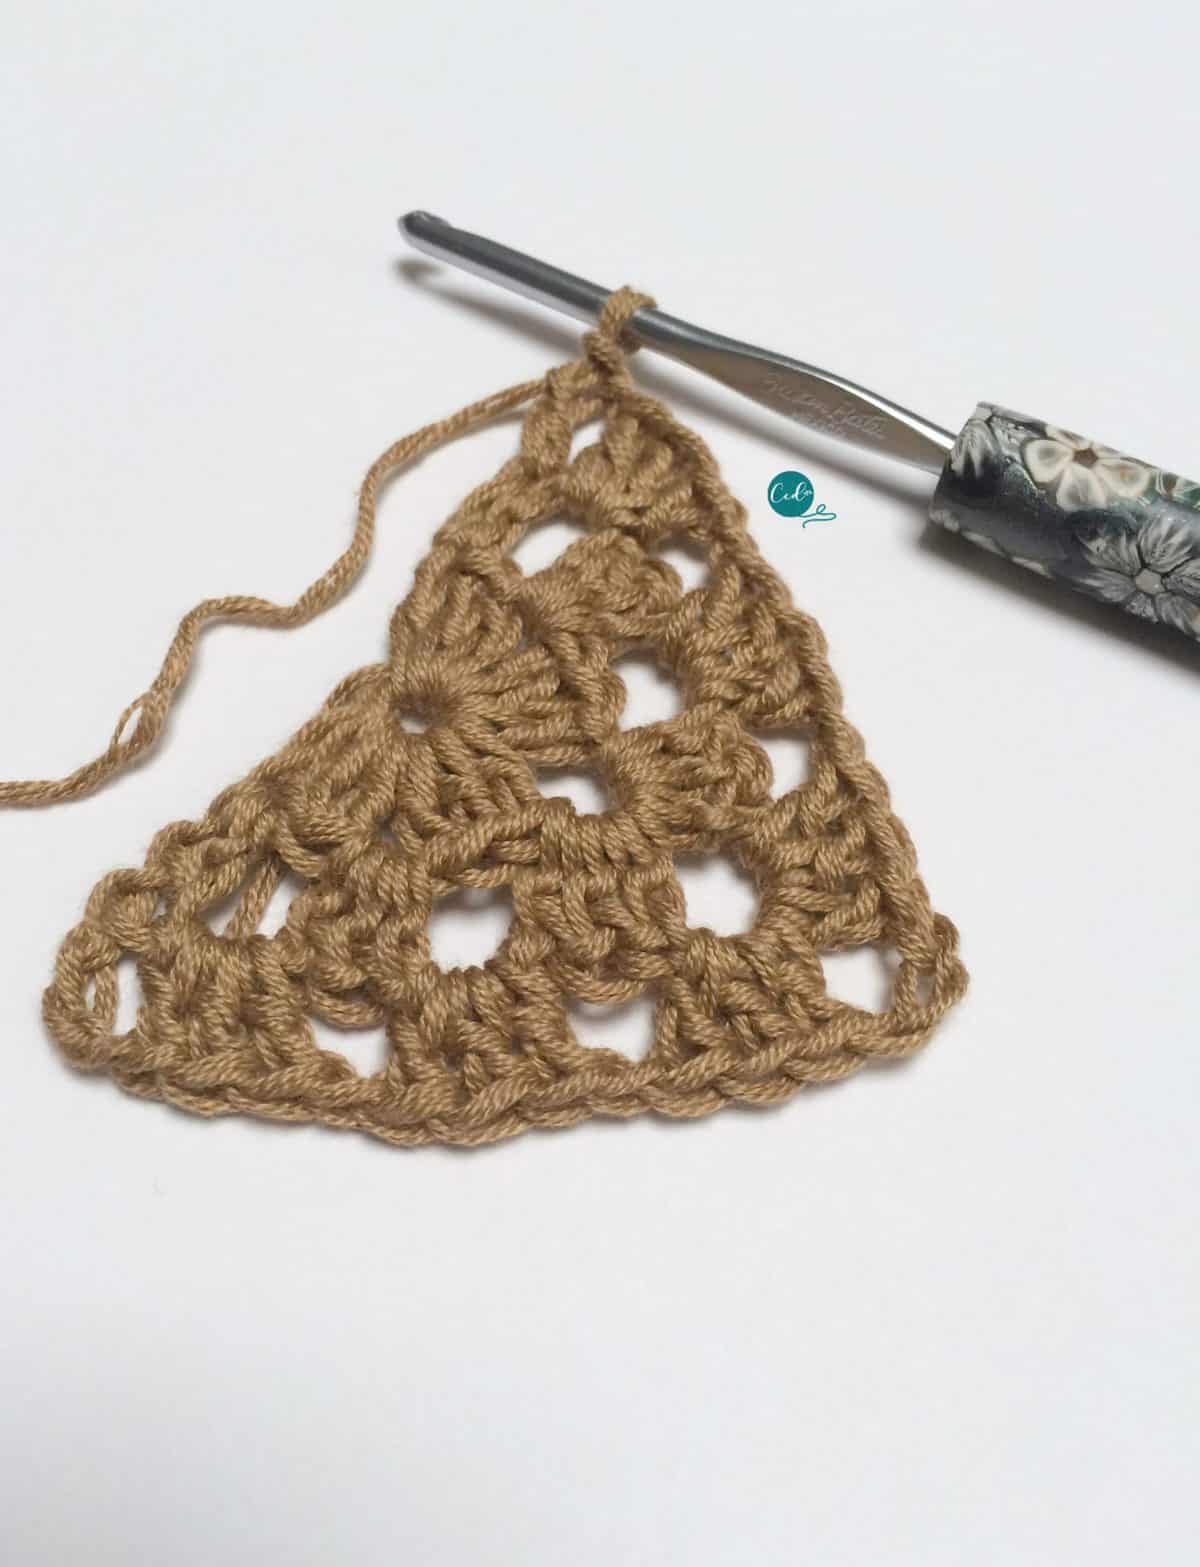 28 sts
Row 4: Ch 4, *3 dc in next ch 1 sp, ch 1, sk next 3 sts; rep * to ch 3 sp, place (3 dc, ch 2, 3 dc) in ch 3 sp, ch 1, sk next 3 sts, rep * to last 2 sts, 3 dc in last ch 1 sp, ch 1, dc in last st, turn. +8 sts [36 sts]
Rows 5 – 11. Rep Row 4. 92 sts 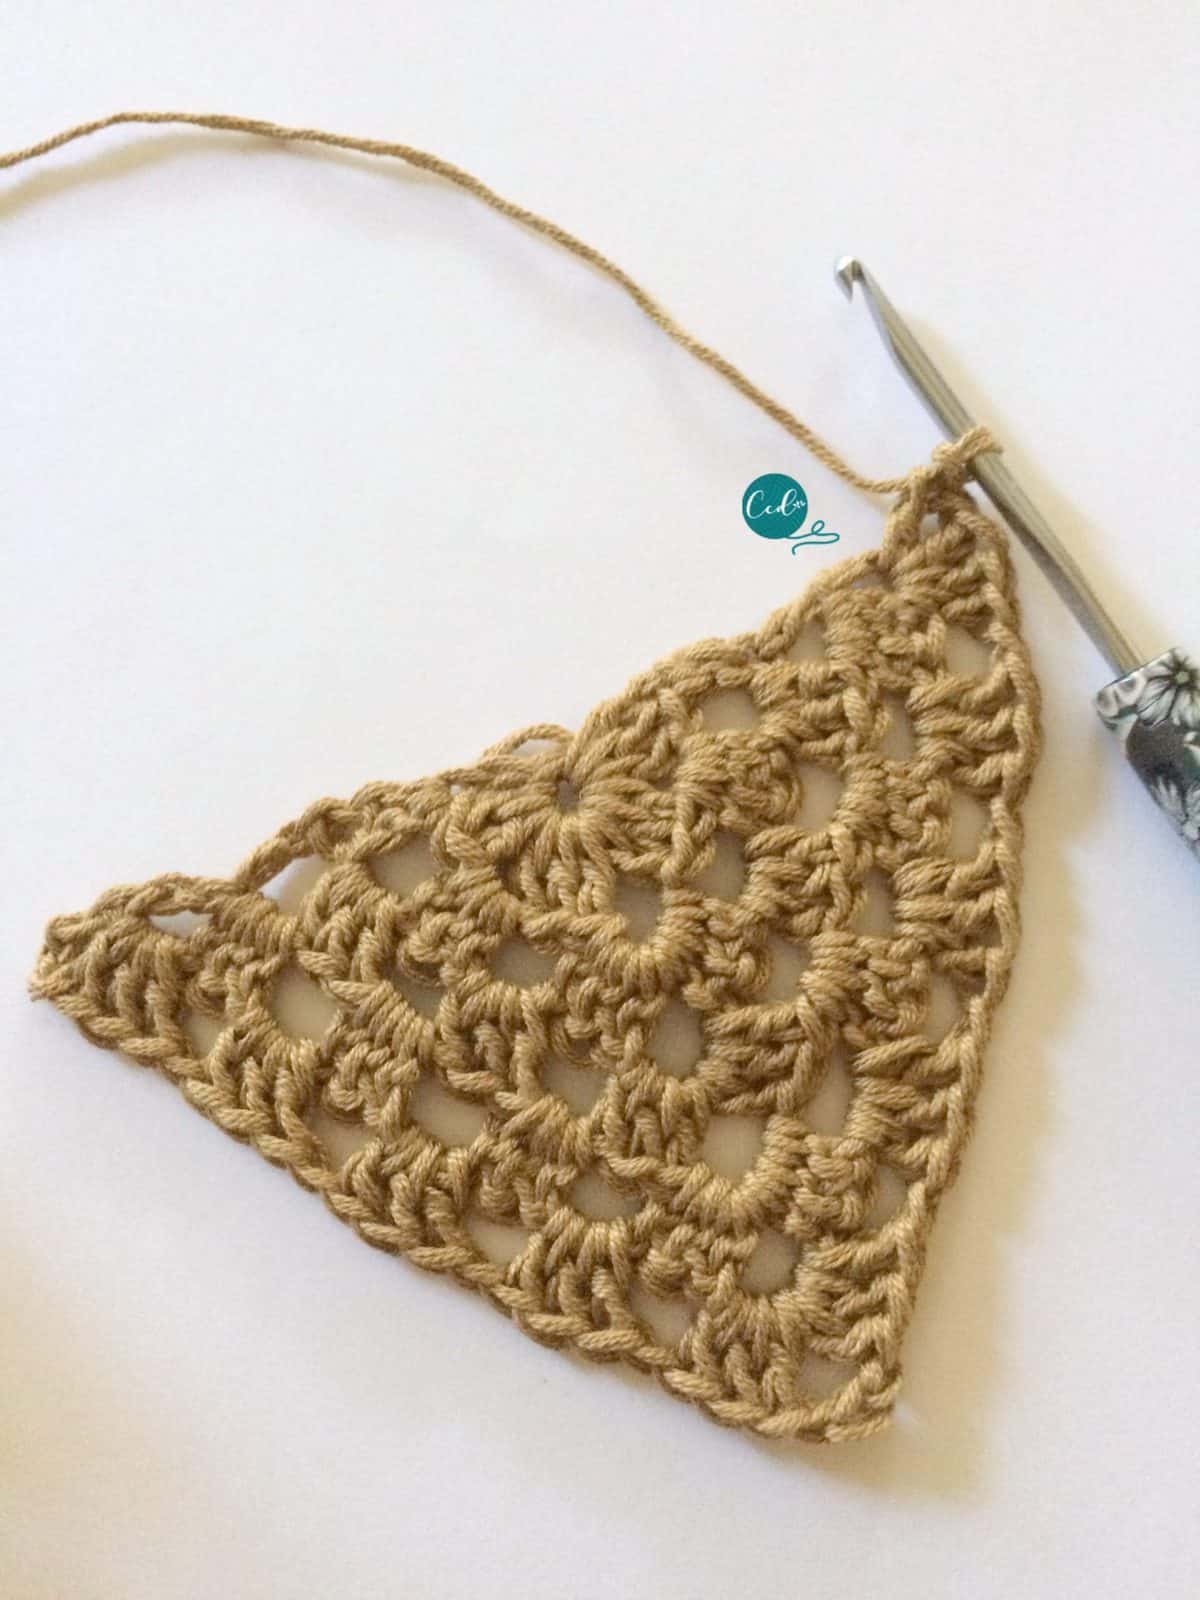
.
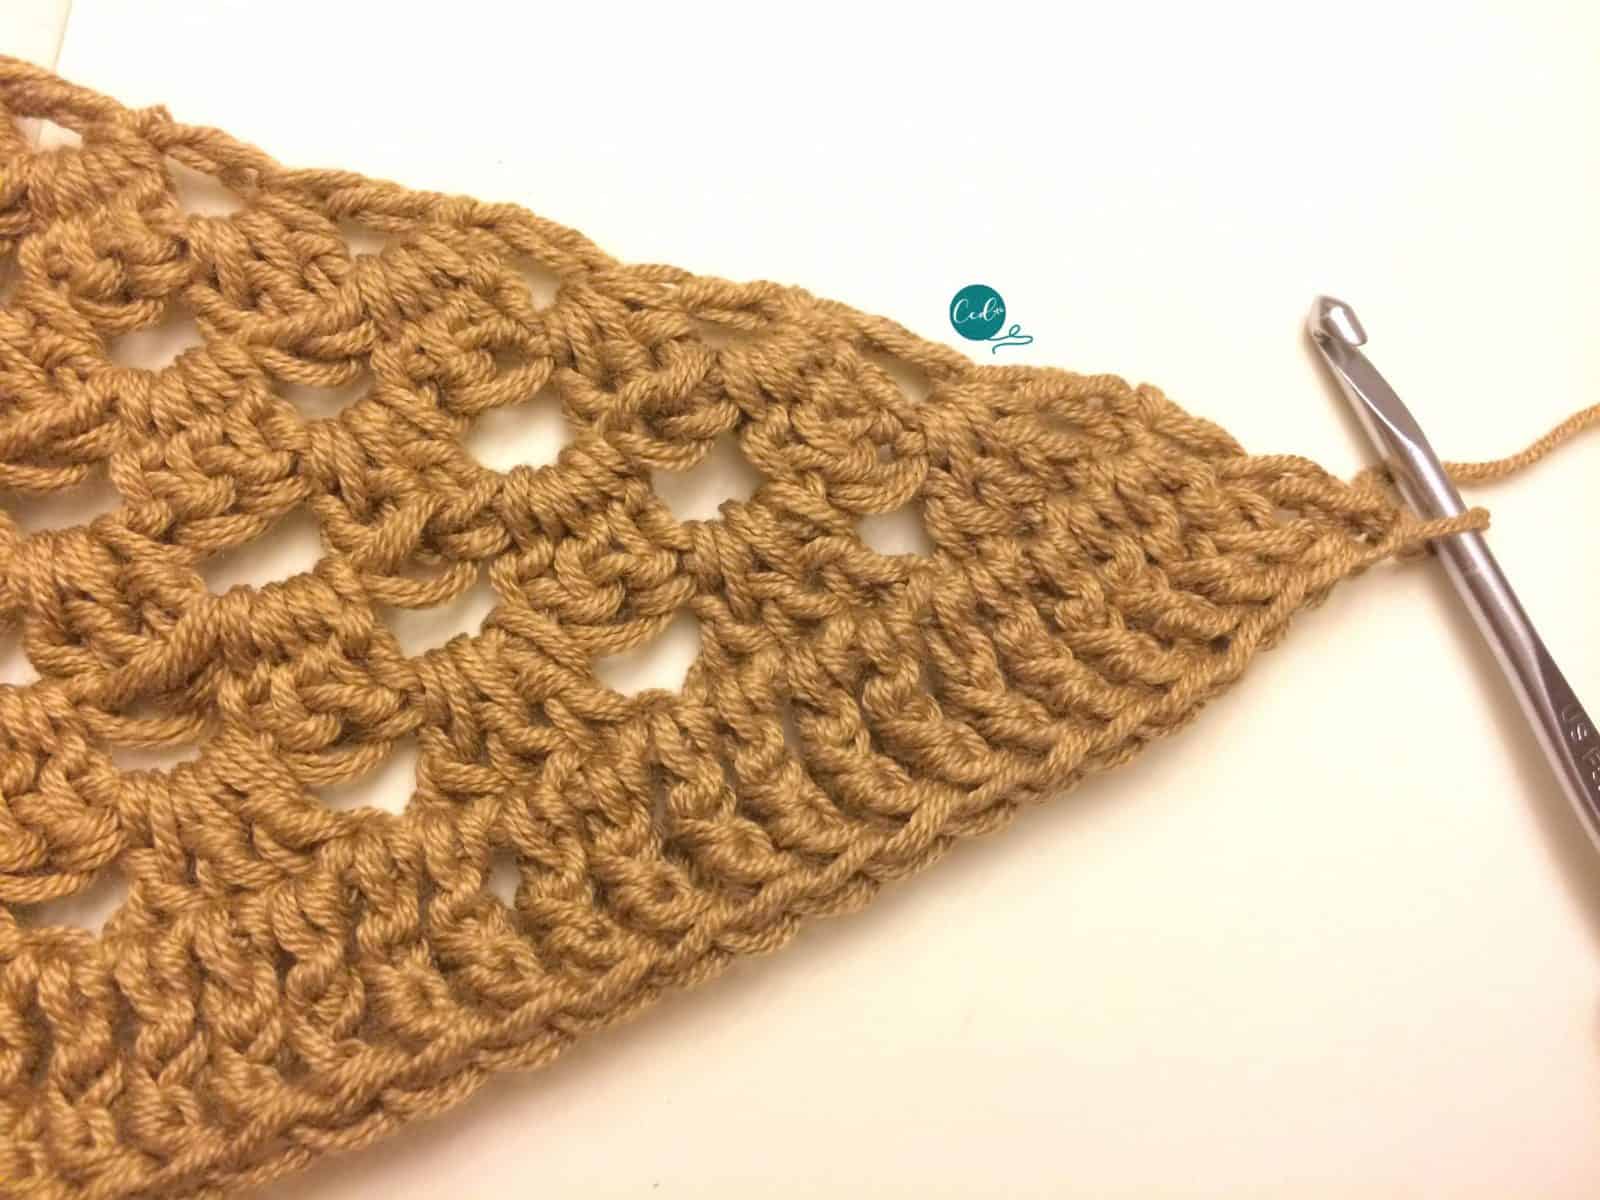
Row 12. Ch 3, 2 dc in next ch sp, dc in each st and ch sp until center, in ch 3 sp place 5 dc in ch 3 sp, place stitch marker in 3rd dc here to easily identify the tip, move it up each row, continue to dc in each st until 2 sts left, 2 dc in next st, dc in last st, turn. 96 sts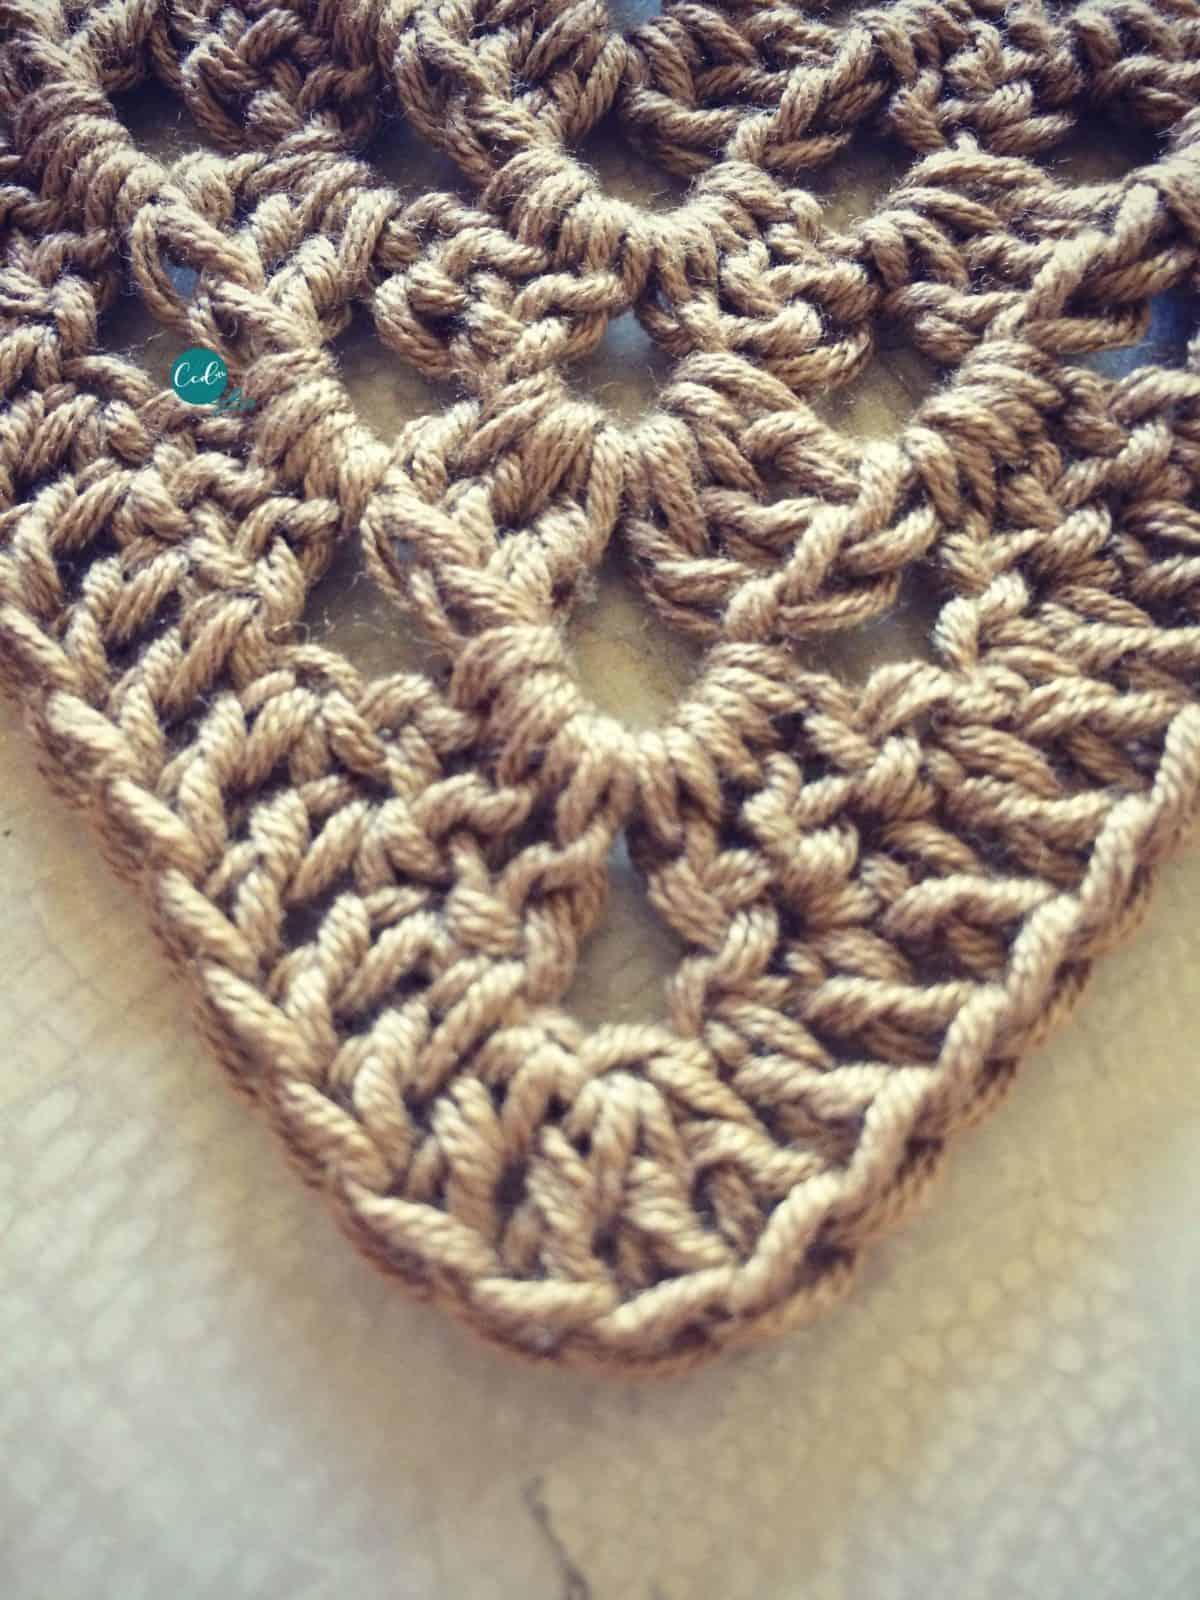
Row 13. Ch 3, BPdc in each st until center, 3 dc in middle stitch of tip (49th st), move st marker to center st, continue to BPdc in each st to the end, turn. 98 sts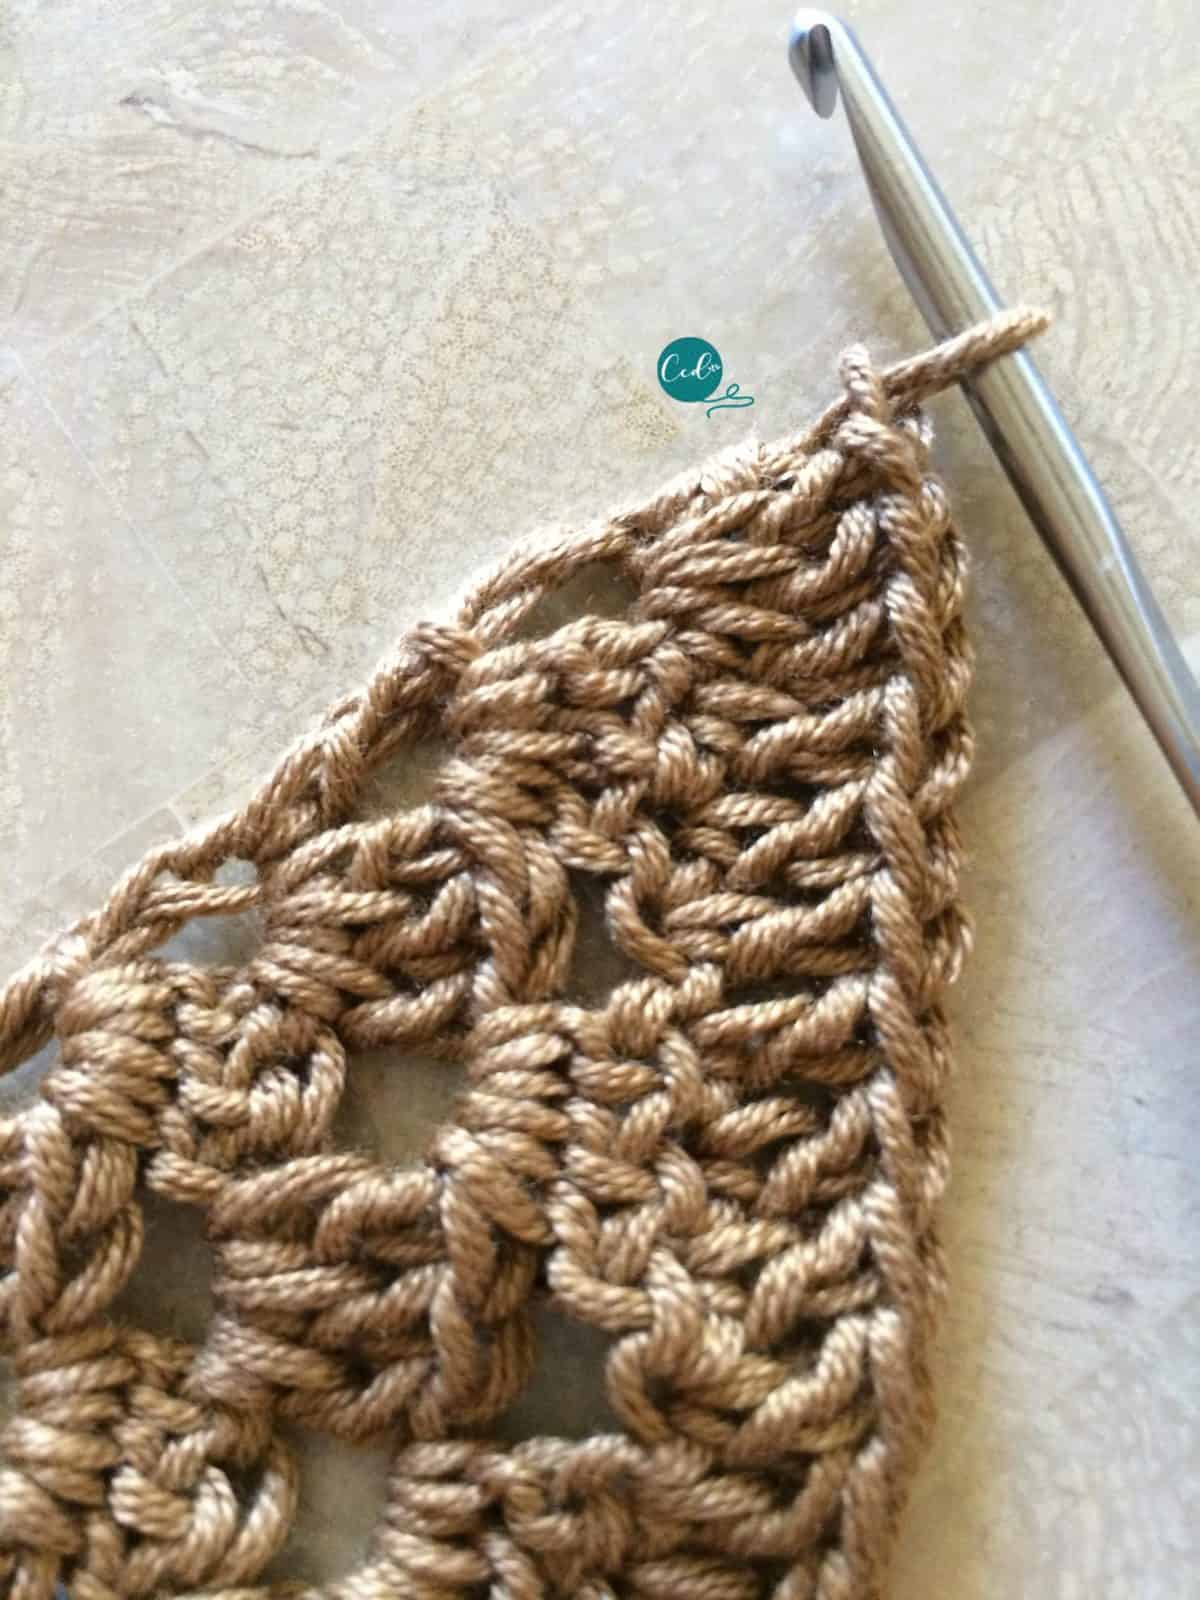
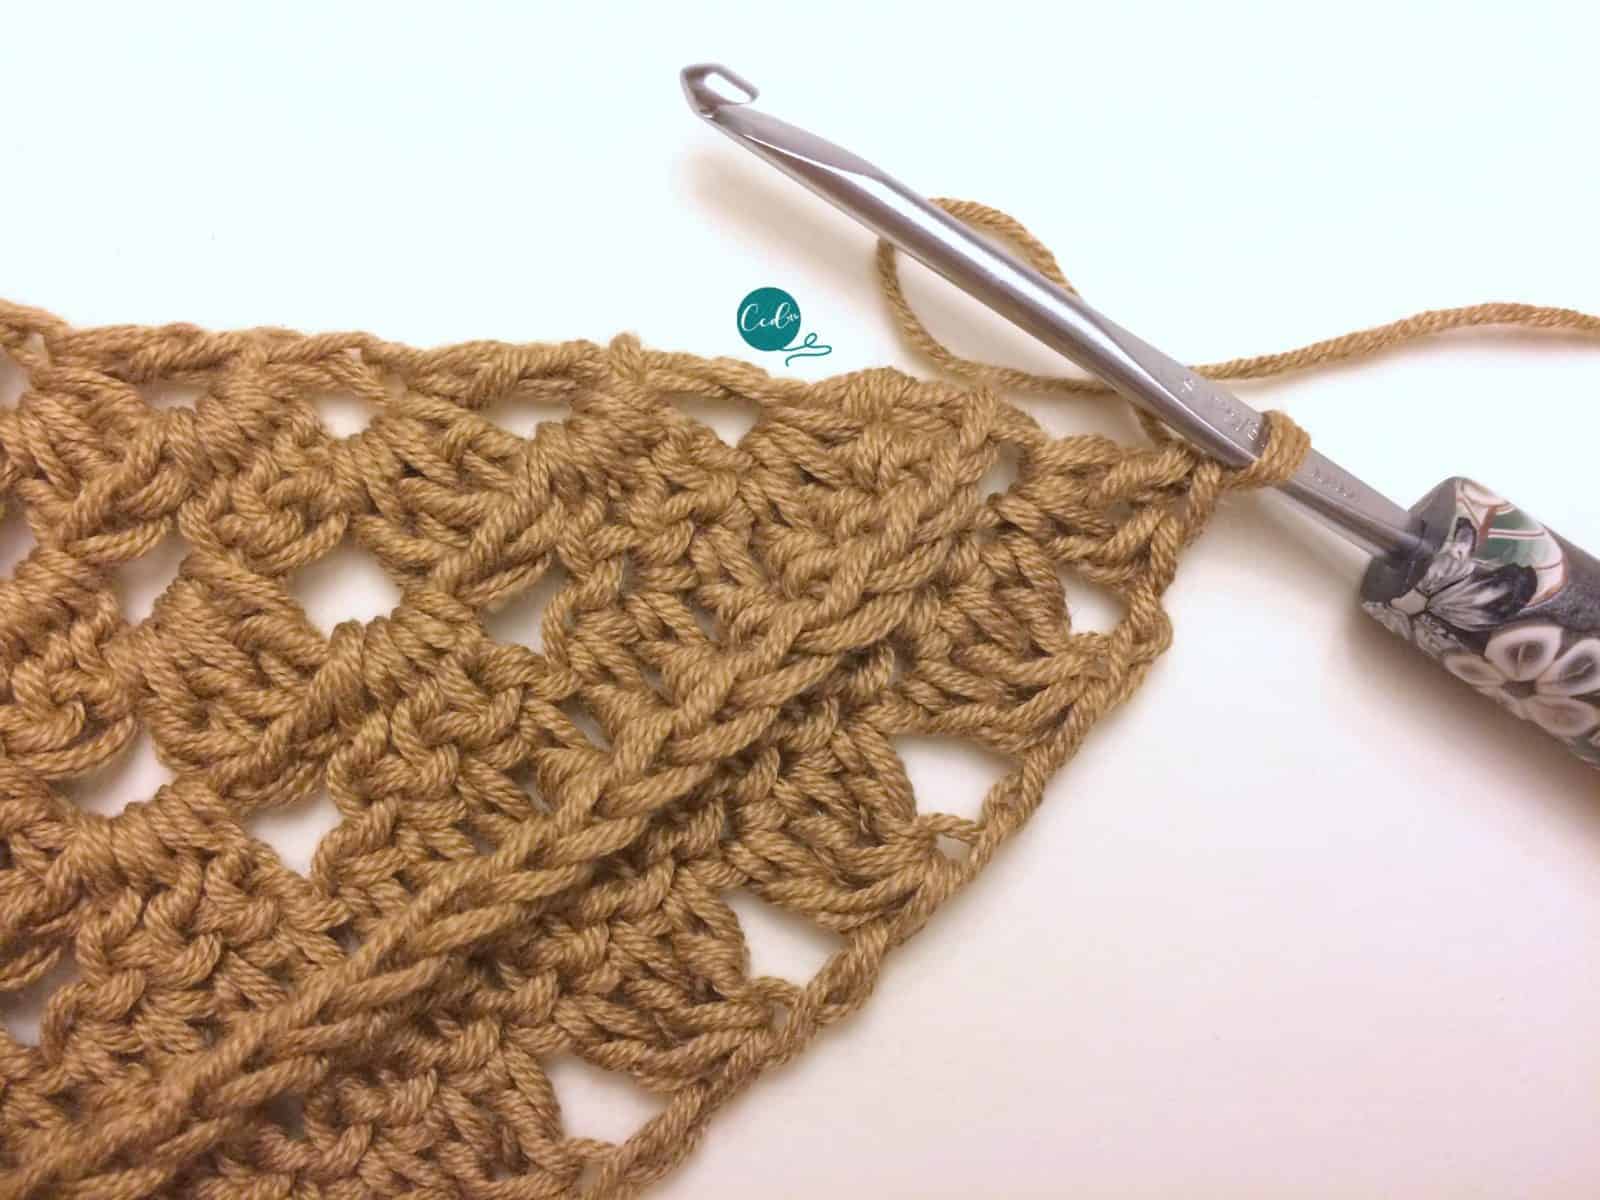
Row 14. Ch 3, dc in same st, CL in each st until marked st, in center st place dc, ch 2, starting in 3rd st of center, continue to CL along the other side until 1 st left, 2 dc in last st, turn. 105 sts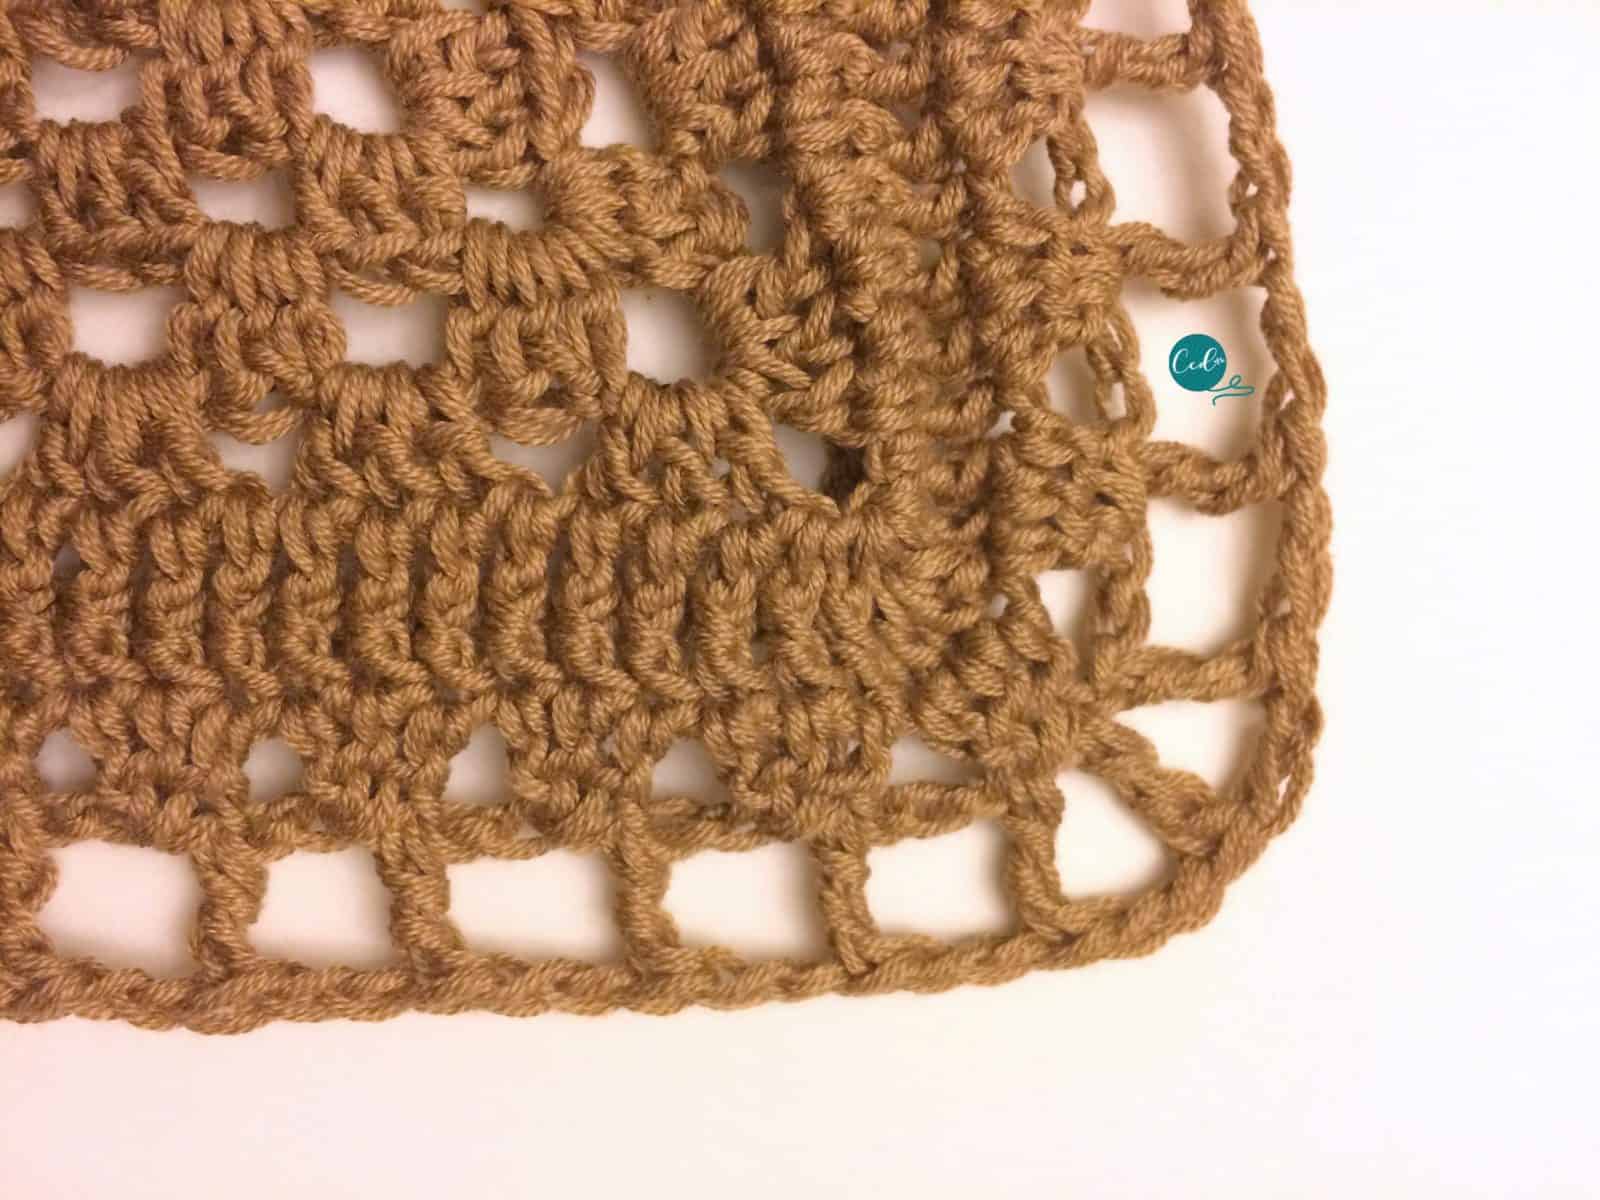
Row 15. Ch 4, 2 tr in same st, ch 2, sk 3 sts, *tr in CL st, ch 2, sk 2 sts; rep * to center, in tip place (tr, ch 2, tr, ch 2, place st marker in center ch 2 sp, tr, ch 2, sk 2 sts), rep * until 1 st left, 3 tr in last st, turn. 114 sts
Row 16. Ch 1 (does not count), sc in same st, 2 sc in next, *sc in each tr st and 2 sc in each ch sp; rep * to center ch 2 sp, place (3 sc in center, mark 2nd sc), rep * until 2 sts left, 2 sc in next st, sc in last st, turn. 118 sts Change to Color B.
Row 17. Ch 3 (counts as dc + ch 1), dc in same st, sk 1, *v–st, sk 1; rep * to center, v–st in center, sk 1, continue to rep * to 1 st left, v–st in last st, turn. 177 sts 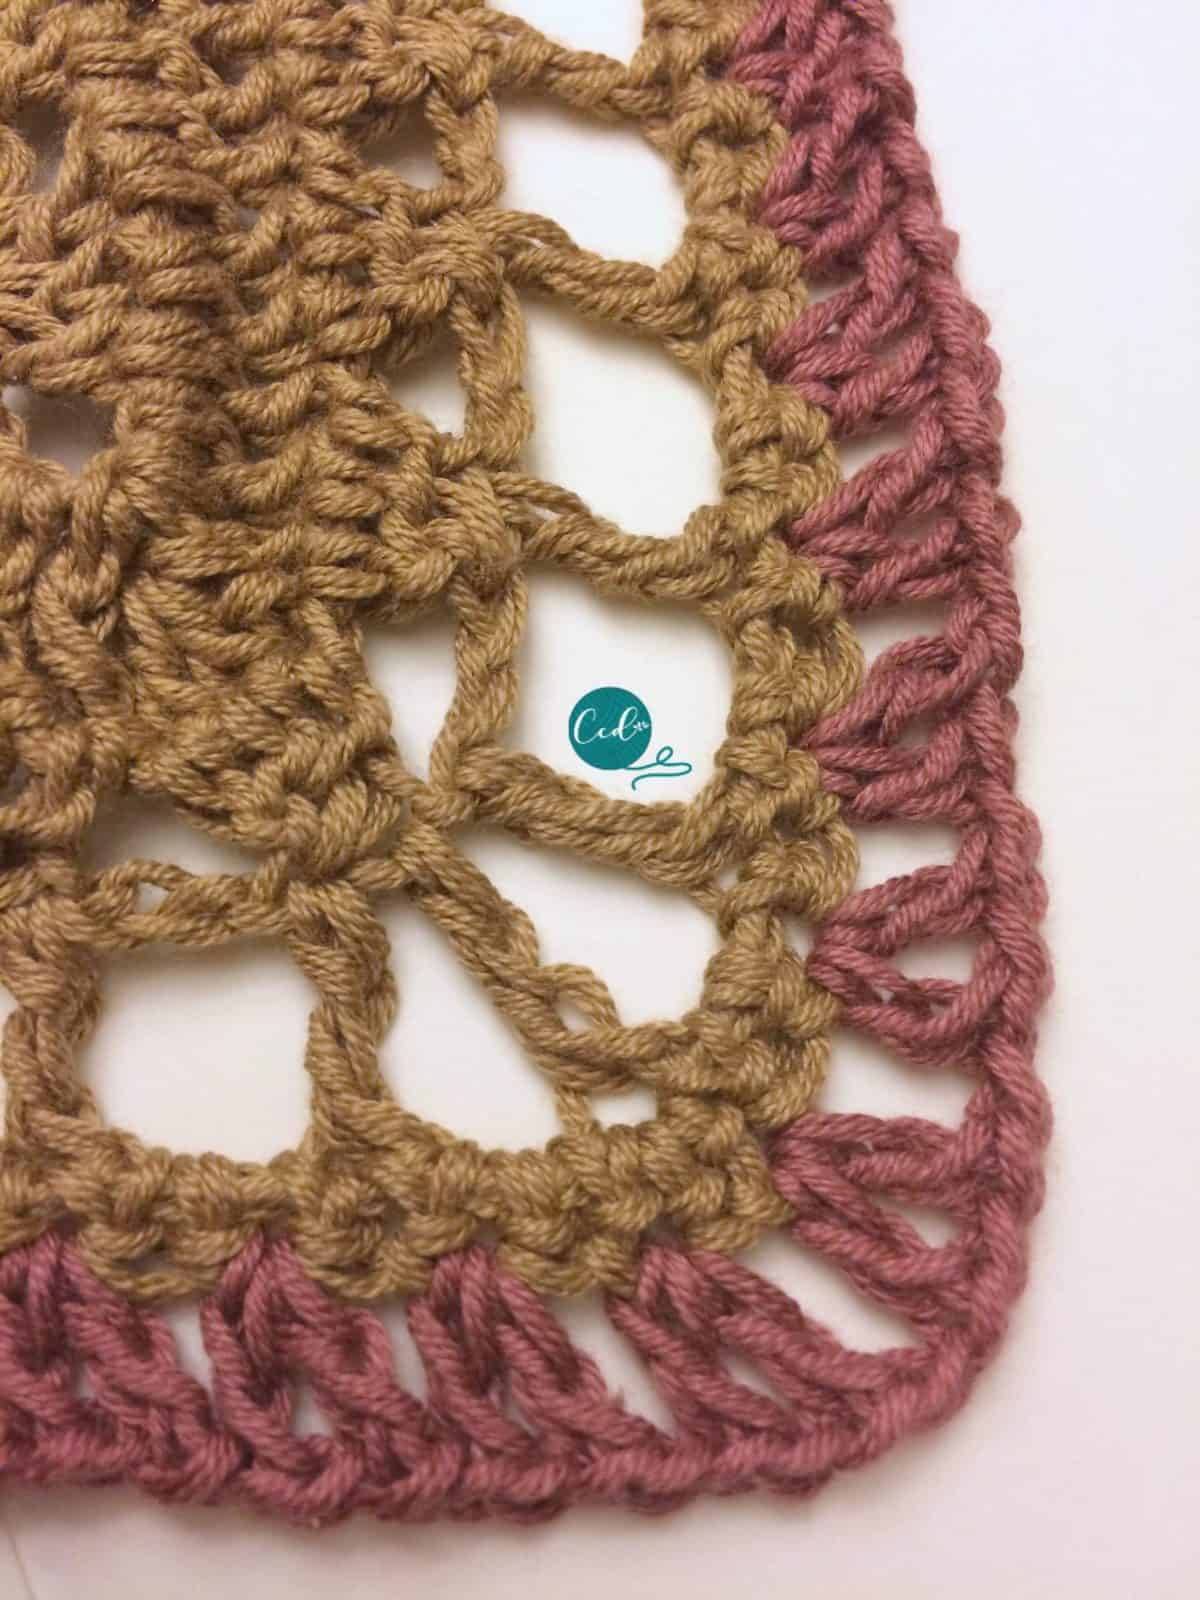
Row 18. Ch 4 (counts as dc + ch 1), bo in ch sp of v–st, ch 1, sk 2 sts, *bo in ch 1 sp of next v–st, ch 1, sk 2 sts; rep * to center, in tip place (bo, ch 1, sk 2 sts), rep * to 1 st left, dc in last st, turn. 120 sts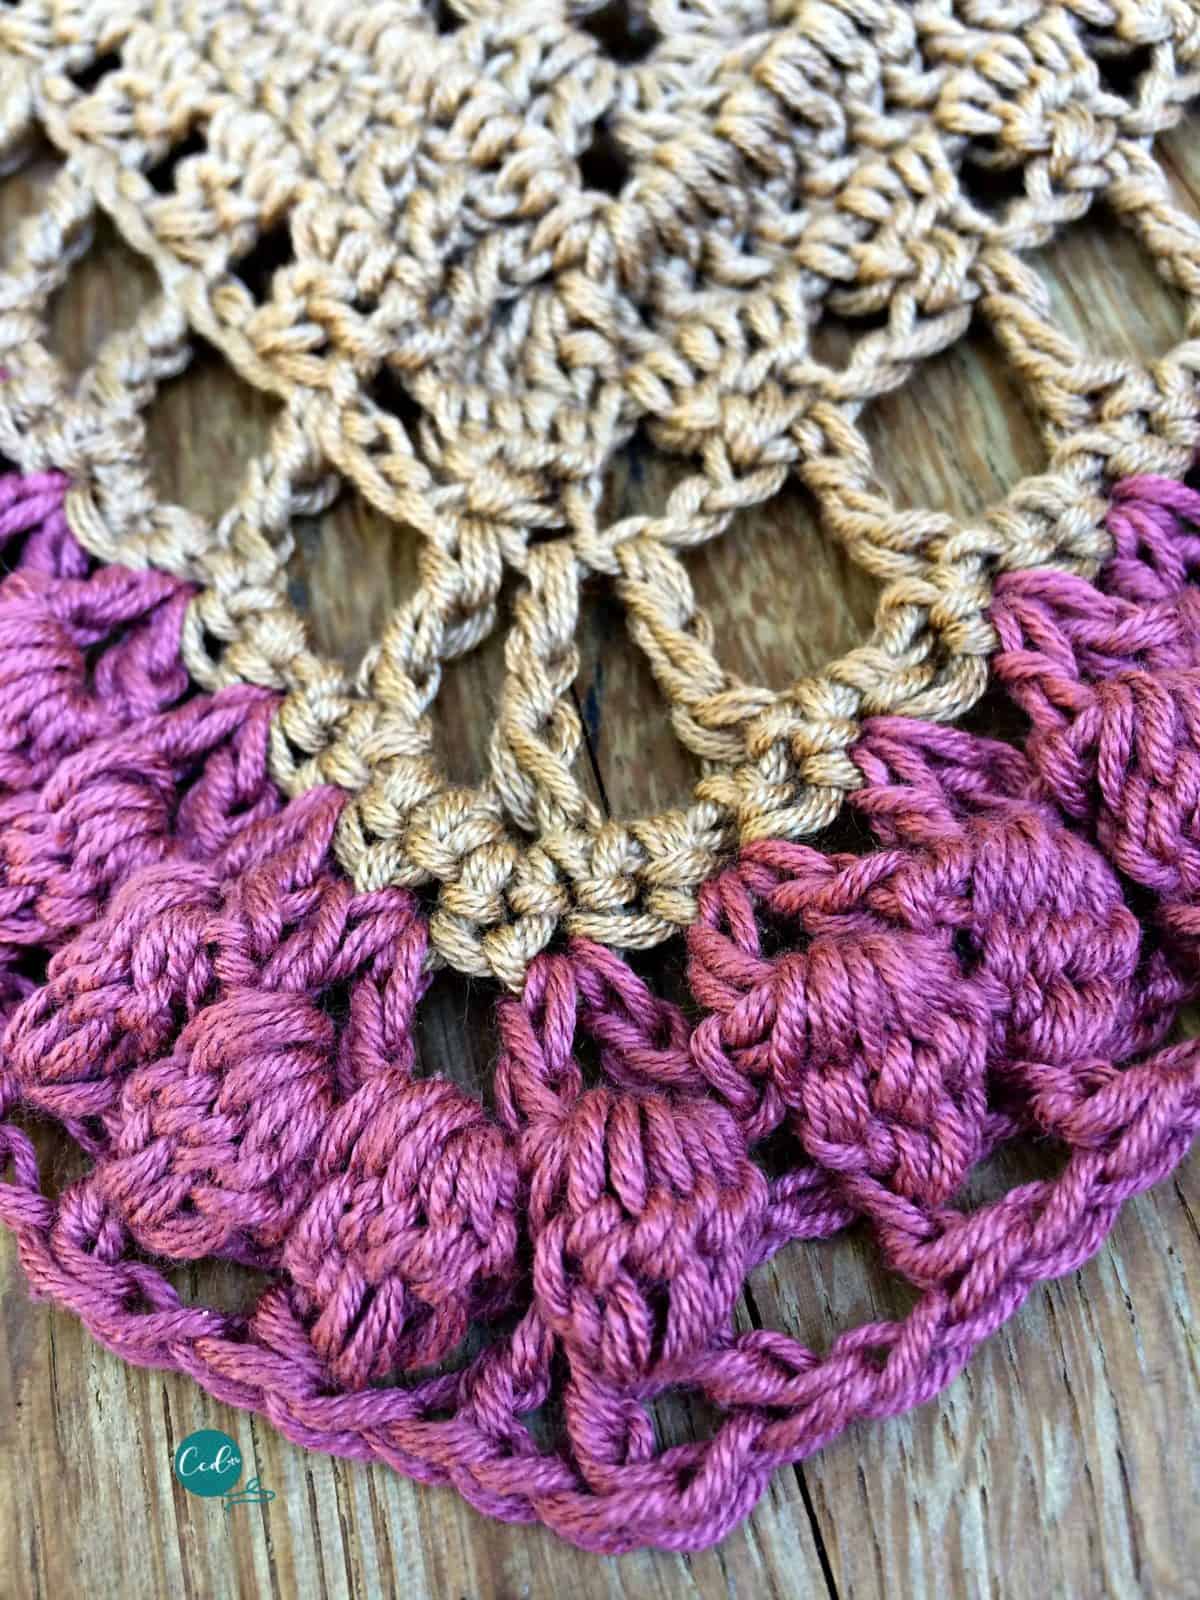
Row 19. Ch 4 (counts as dc + ch 1), *FPdc in next bo, ch 1, sk 1 st; rep* to center, place (dc, ch 1, dc (mark as center), ch 1, dc, ch 1) in top of bo st, sk 1 st, rep * until 3 sts left, sk 2 sts, dc in last st, turn. 125 sts 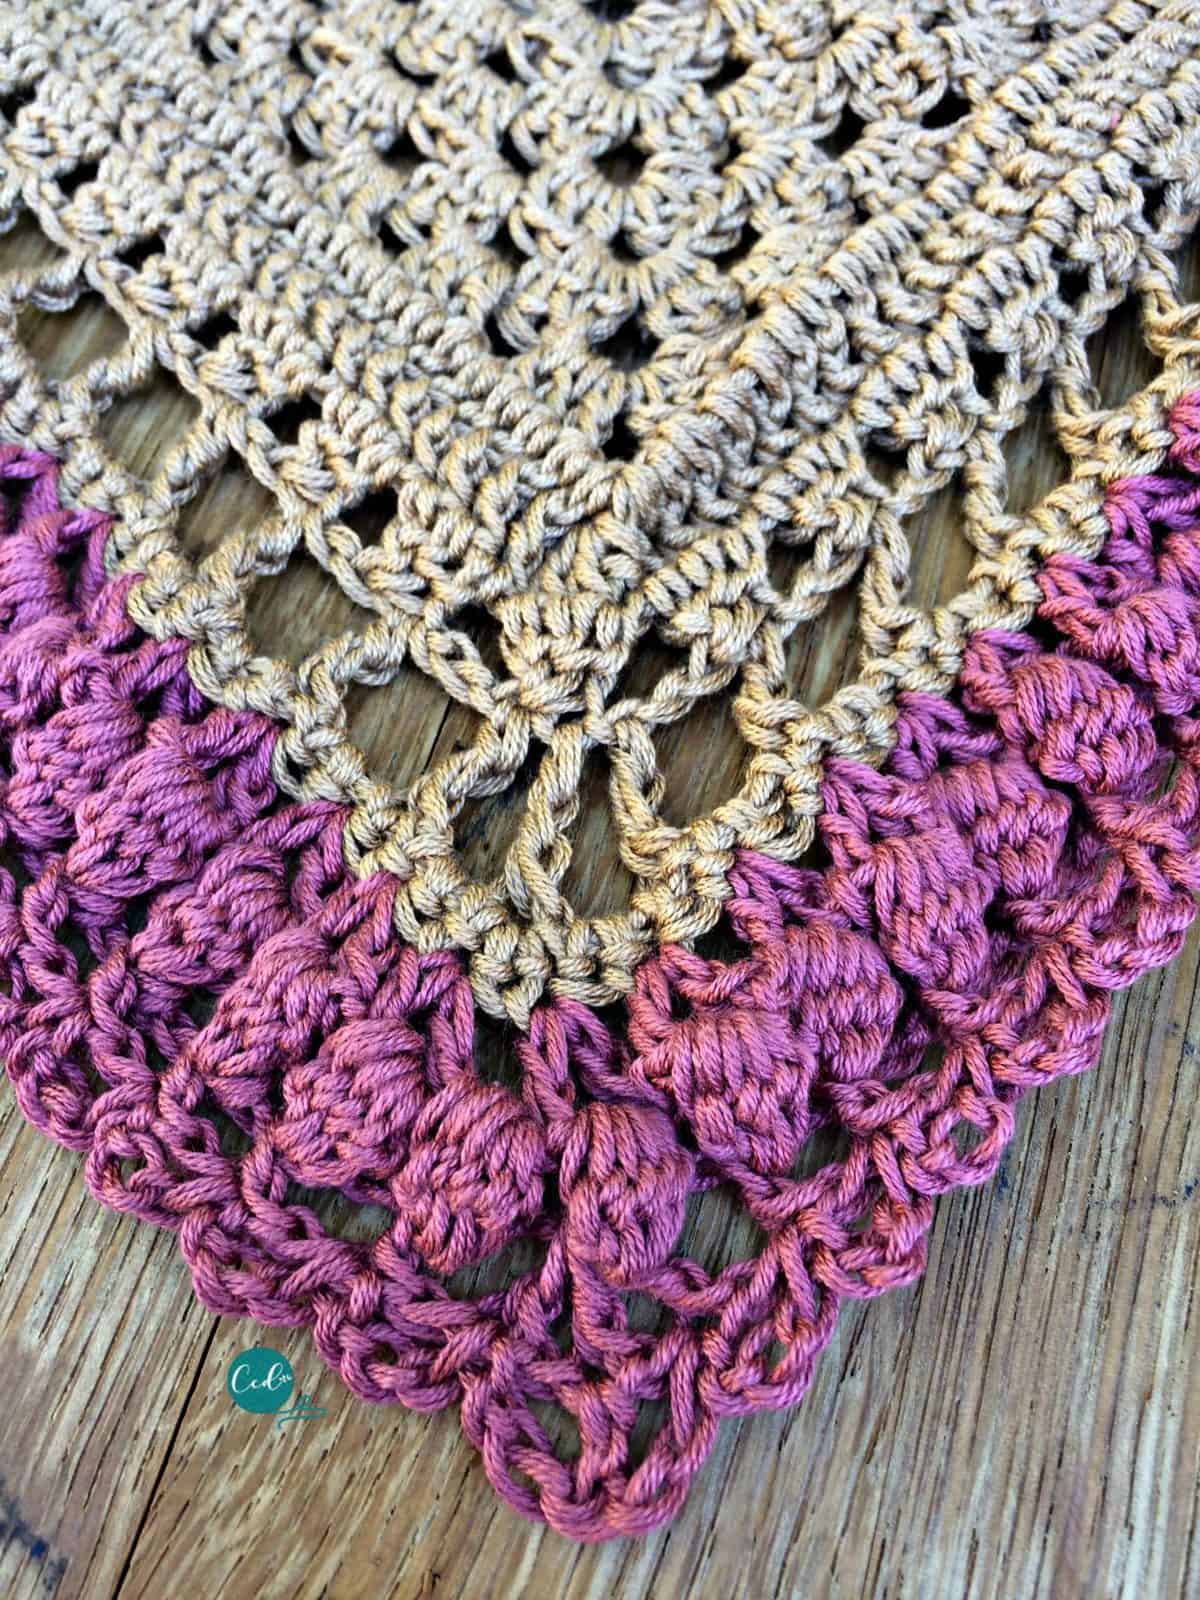
Row 20. Ch 3, sl st to next FPdc, *ch 3, sk 1 st, sl st to next FPdc; rep * to 3 dc in center in tip place (ch 3, sk 1 st, sl st to 1st dc, ch 2, sk 1 st, dc in 2nd dc (mark as center), ch 2, sk 1 st, sl st to 3rd dc), rep * to 2 sts left, sk 1 st, ch 3, sl st to last st, turn. 245 sts Change to Color C.
Row 21. This row is worked around the chain spaces from row 19. To do so, insert your hook behind the ch 3 from row 20 and 3 dc around the ch 1 sp from row 19. Ch 3, *3 dc in each ch 1 space from row 19; rep * to 2 sts before center dc, sk 1 st, place 3 dc in ch 1 sp, ch 2 (mark this for center), sk center dc, 3 dc in next ch sp, rep * until 1 st left, dc in last st, turn. 190 sts 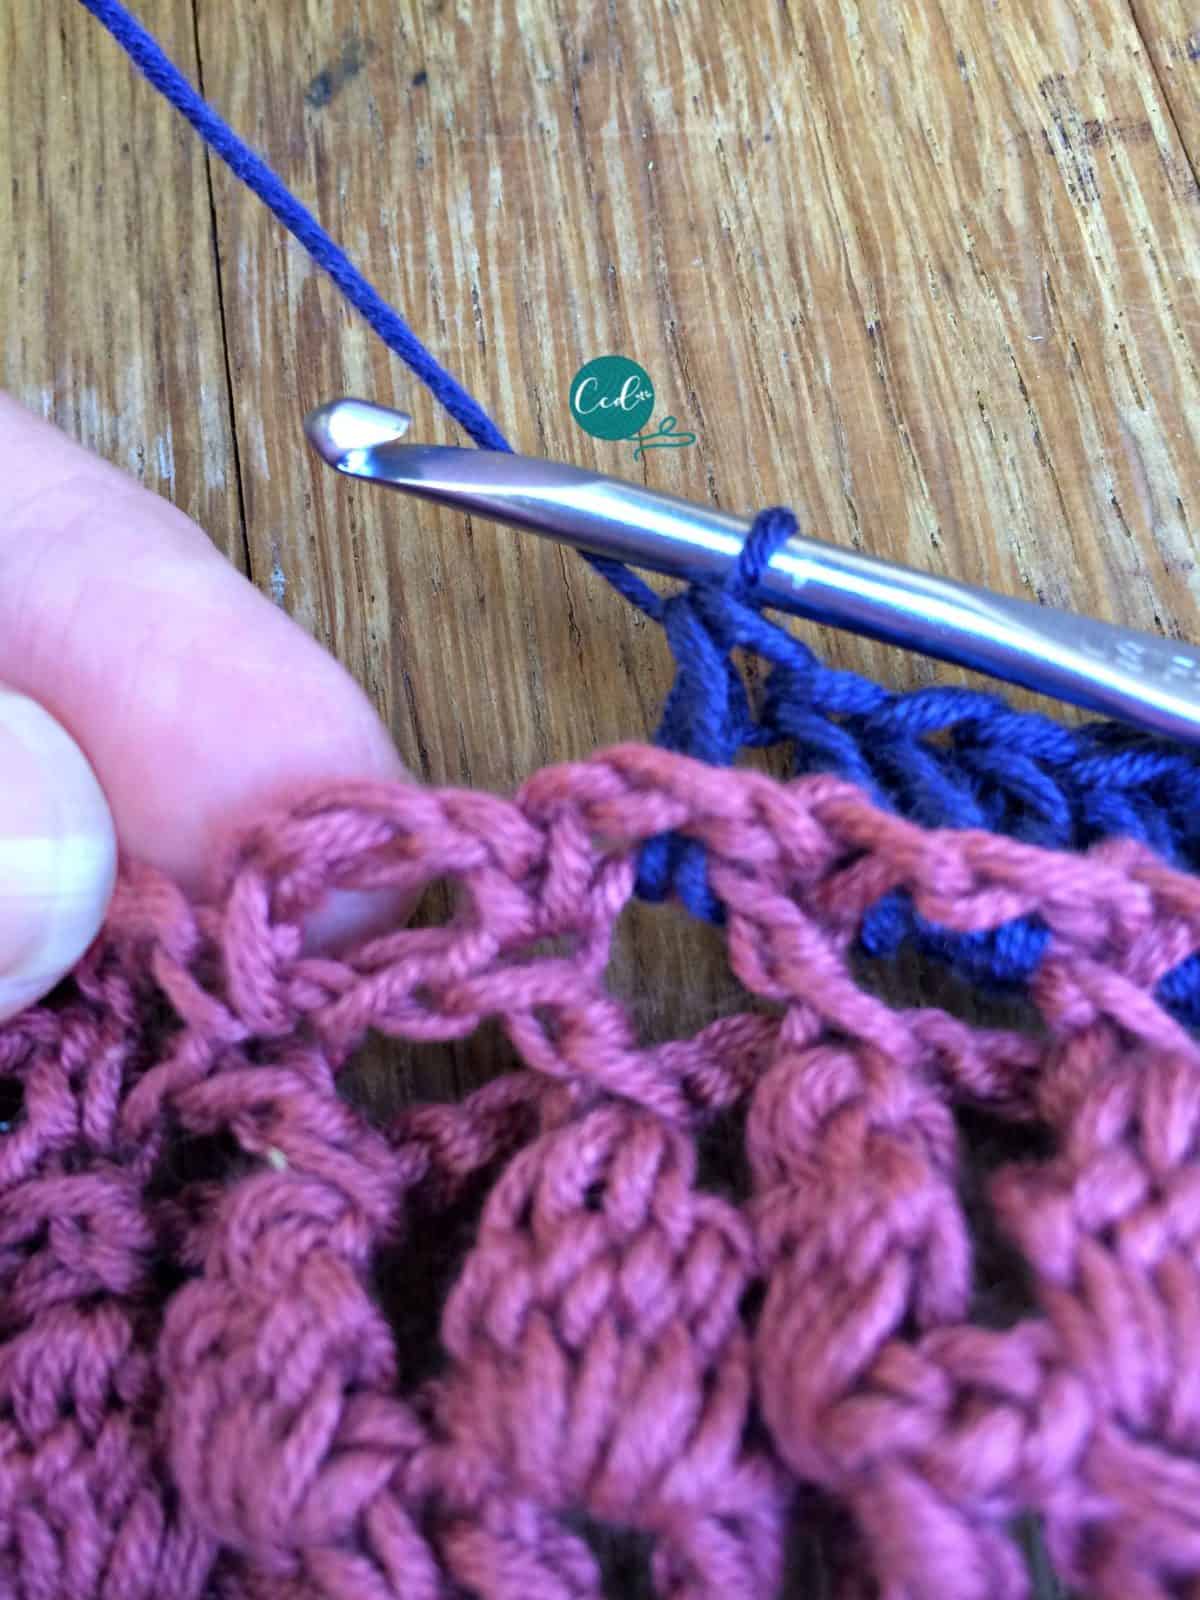
Row 22. Ch 3, 2 dc in next st, *dc in each st; rep* to center, place 3 dc in ch 2 sp, rep * until 2 sts left, 2 dc in next st, dc in last st, turn. 193 sts
Row 23. Ch 3, BPdc in same st, *BPdc in next st; rep * to 1 st before center dc, for the 3 dc in the tip place (BPdc, ch1, BPdc, ch 1, BPdc), rep * to end, turn. 196 sts
Row 24. Ch 3, dc in same st, ch 2, *CL in each st; rep * to 3 sts before center st, dc3tog, ch 3 (mark as center), starting in last st of the first make another dc3tog, ch 2, rep * to 1 st left, 2 dc in last st, turn. 202 sts
Row 25. Ch 4 (counts as tr), tr in same st, ch 2, sk 3 sts, *tr in top of CL st, ch 2, sk 2 sts; rep * to center ch 3 sp, in tip ch sp place (tr, ch 2, tr (mark as center), ch 2, tr, ch 2), rep * to last 2 sts, tr in next st, tr in last st, turn. 210 sts
Row 26. Ch 1 (does not count), sc in same st, *sc in each tr st and 2 sc in each ch sp; rep * to center, in tip place sc in center tr st, rep * to end, turn. 210 sts 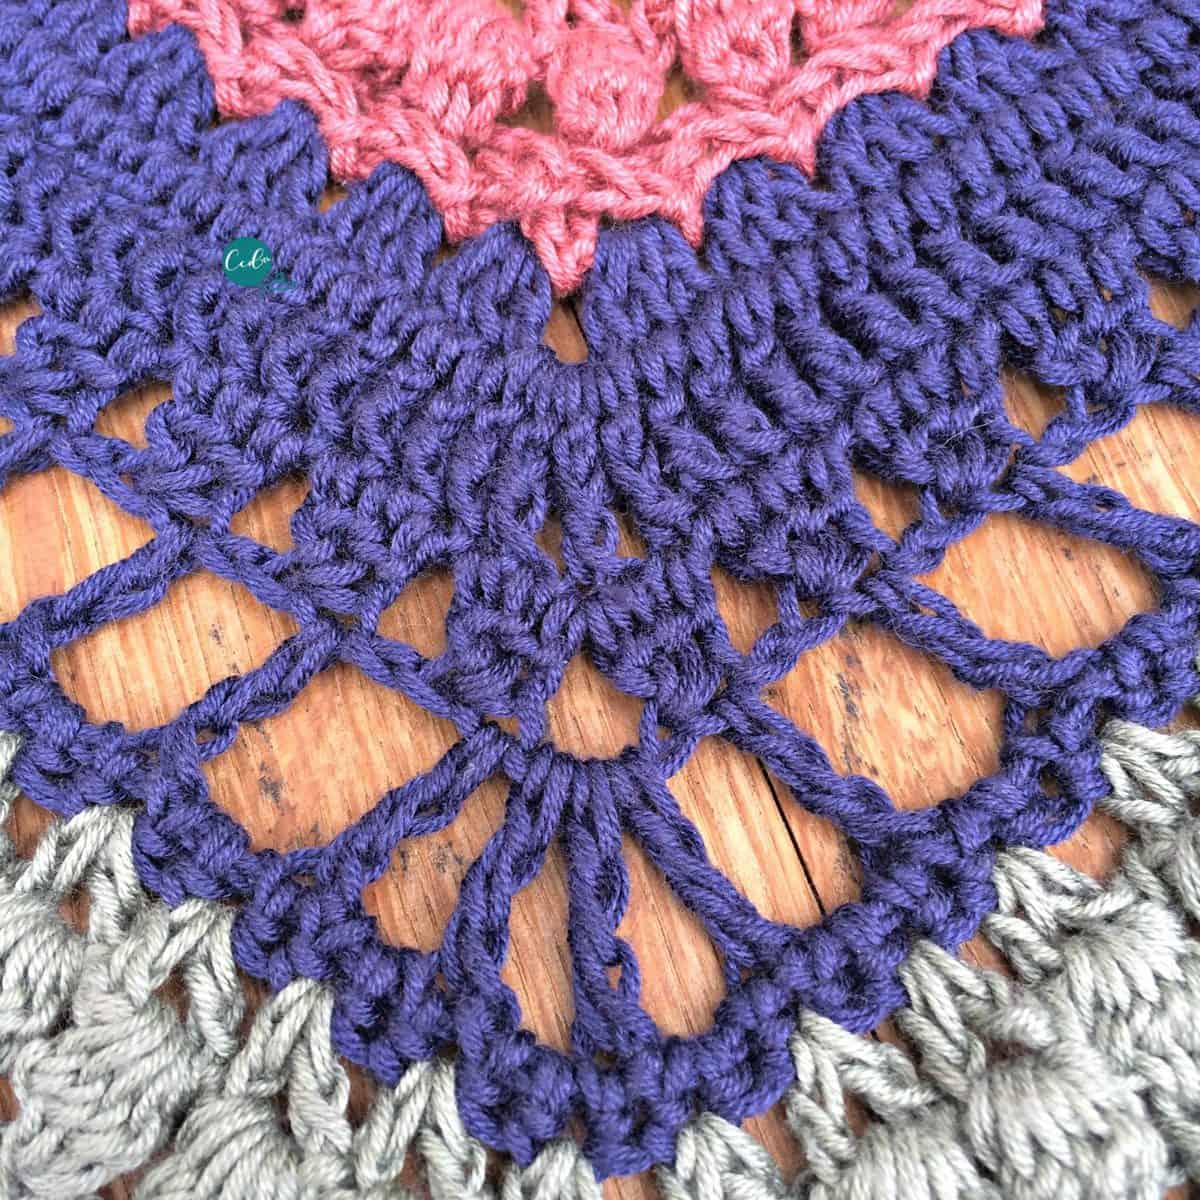 Change to Color D.
Row 27. Ch 4 (counts as dc + ch1), dc in same st, sk 1, *v–st, sk 1; rep * to center, v–st in sc at tip place (v–st, ch 2 (mark as center), v–st, sk 1 st), rep * until 2 sts left, v–st in last 2 sts, turn. 323 sts
Row 28. Ch 4 (counts as dc + ch 1), bo in next ch sp, ch 1, sk 2 sts, *bo in next ch 1 sp, ch 1, sk 2 sts; rep * to 2 sts before center, bo in next st, ch 1, sk 1 st, in tip ch 2 sp place bo, ch 1 (mark as center), sk 1 st, rep * until 2 sts left, bo in next st, ch 1, dc in last stitch, turn. 218 sts
Row 29. Ch 4 (counts as dc + ch 1), *FPdc in next bo, ch 1, sk 1 st; rep * to center, place (dc, ch 1, dc (mark as center), ch 1, dc, ch1) in top of bo st, sk 1 st, rep * to 1 st left, dc in last st, turn. 222 sts
Row 30. Ch 3, sl st to next FPdc, *ch 3, sk 1 st, sl st to next FPdc; rep * to 3 dc in center in tip place (ch 3, sk 1 st, sl st to 1st dc, ch 2, sk 1 st, dc in 2nd dc (mark as center), ch 2, sk 1 st, sl st to 3rd dc), rep * to 2 sts left, sk 1 st, ch 3, sl st to last st, turn. 443 sts
Row 31. This row is worked around the chain spaces from row 29. To do so, insert your hook behind the ch 3 from row 30 and 3 dc around the ch 1 sp from row 29. Ch 3, *3 dc in each ch 1 space from row 29; rep * to 2 sts before center dc, sk 1 st, place 3 dc in ch 1 sp, ch 2 (mark this for center), sk center dc, 3 dc in next ch sp, rep * until 1 st left, dc in last st, turn. 331 sts
Row 32. Ch 3, 2 dc in next st, *dc in each st; rep* to center, place 3 dc in ch 2 sp, rep * until 2 sts left, 2 dc in next st, dc in last st, turn. 334 sts
Row 33. Ch 3, dc in same st, *BPdc in next stitch; rep * to center, in tip place 5 dc (mark 3rd st as center), rep * to end, turn. 338 sts
Row 34. Ch 3, dc in same st, *CL in next st; rep * to 2 sts before center, place next CL in next 3 sts ending with center st (mark ch 2 as center), begin next CL in same st as last st of 1st CL, rep * until 1 st left, 2 dc in last st, turn. 341 sts
Row 35. Ch 4 (counts as tr), 2 tr in same st, ch 2, sk 3 sts, *tr in top of next CL, ch 2, sk 2 sts; rep * to center, in tip place (tr, ch 2, tr (mark as center), ch 2, tr, ch 2), rep * until 3 sts left, tr in next st, ch 2, sk 1 st, 3 tr in last st, turn. 349 sts
Row 36. Ch 1 (does not count), sc in same st, *sc in each tr st and 2 sc in each ch sp; rep * to center, in tip place sc in center tr st, rep * to end, turn. 349 sts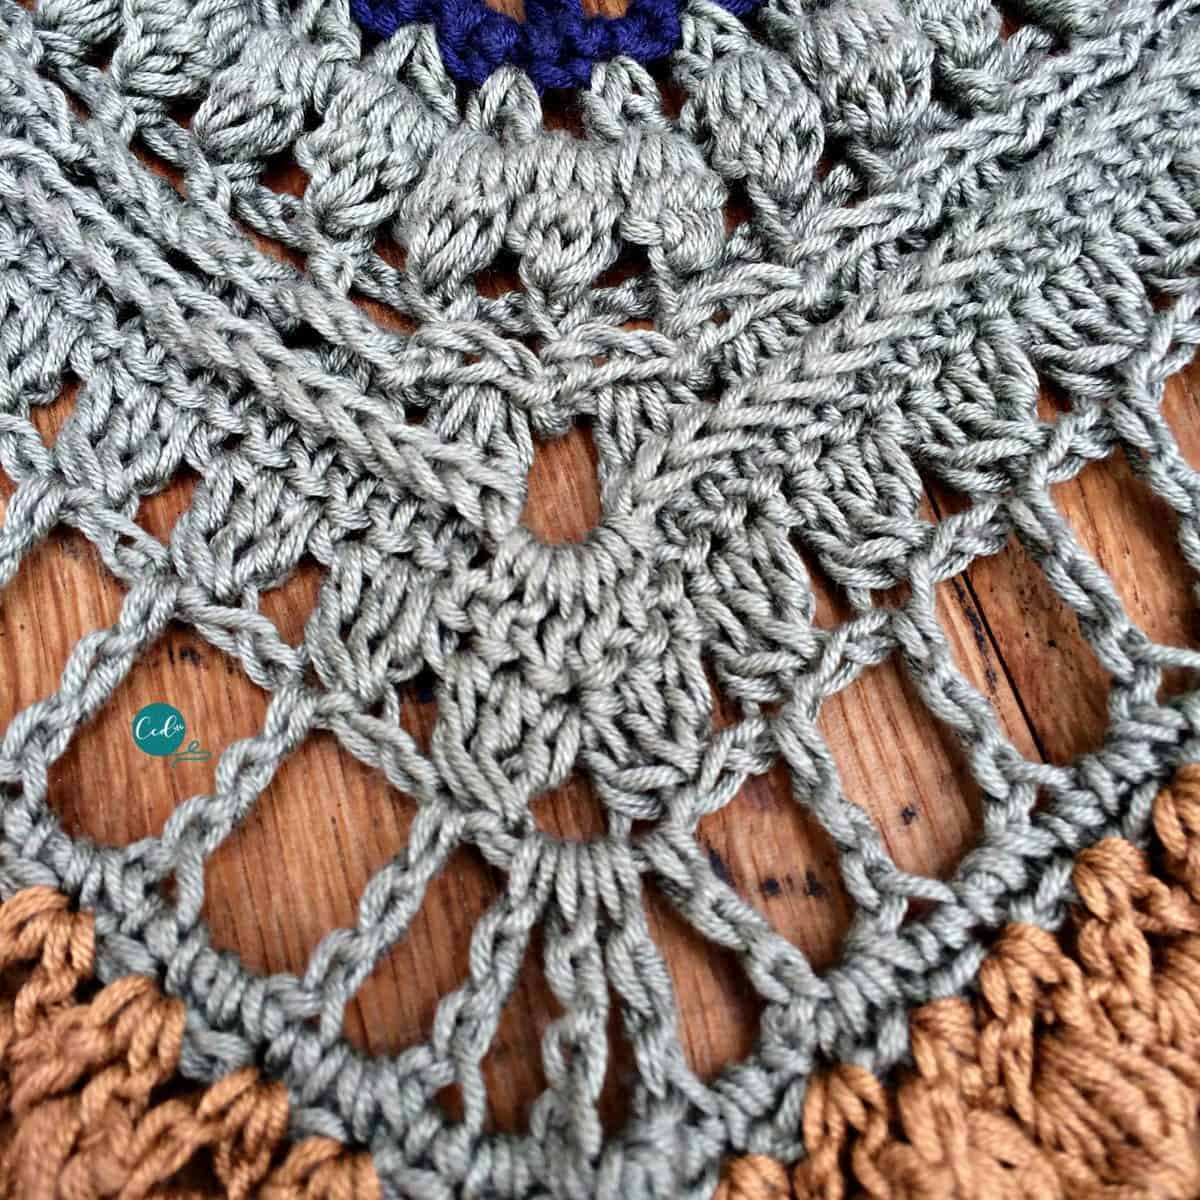 Change to Color A.
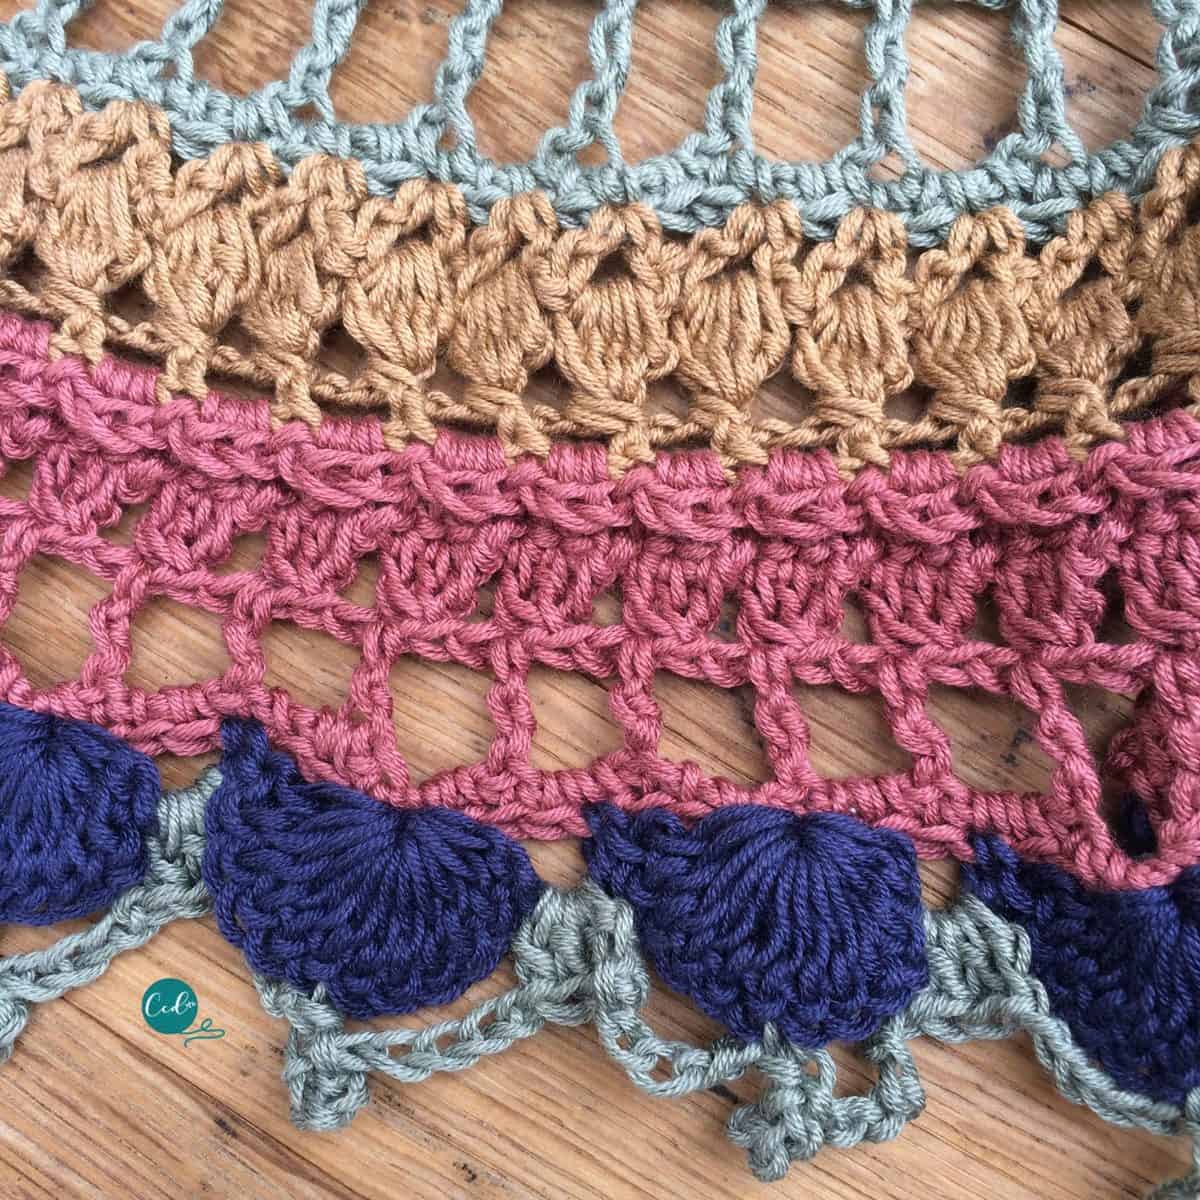
Row 37. Ch 4 (counts as dc + ch1), dc in same st, sk 1, *v–st, sk 1; rep * to center, in sc at tip place (v–st, ch 2 (mark as center), v–st, sk 1 st) rep * until 1 st left, v–st in last st, turn. 542 sts
Row 38. Ch 4 (counts as dc + ch 1), bo in next ch sp, ch 1, sk 2 sts, *bo in next ch 1 sp, ch 1, sk 2 sts; rep * to 2 sts before center, bo in next st, ch 1, sk 1 st, in tip ch 2 sp place bo, ch 1 (mark as center), sk 1 st, rep * until 2 sts left, bo in next st, ch 1, dc in last stitch, turn. 364 sts
Row 39. Ch 4 (counts as dc + ch 1), *FPdc in next bo st, ch 1, sk 1 st; rep * to center, in the tip place FPdc, ch 1, sk 1 st, rep * until 1 st left, dc in last stitch, turn. 365 sts Change to Color B.
Row 40. *Ch 3, sk 1 st, sl st to next FPdc; rep * to center, ch 3, in tip sl st to center FPdc, ch 3, sl st to next st, rep * to end, turn. 730 sts
Row 41. This row is worked around the chain spaces from row 39. To do so, insert your hook behind the ch 3 from row 40 and 3 dc around the ch 1 sp from row 39. Ch 3, *3 dc in each ch 1 space from row 39; rep * to 2 sts before center dc, sk 1 st, place 3 dc in ch 1 sp, ch 2 (mark this for center), sk center dc, 3 dc in next ch sp, rep * until 1 st left, dc in last st, turn. 554 sts
Row 42. Ch 3, dc in same st, *CL in next st; rep * to 2 sts before center, place next CL in next 3 sts ending with center st (mark ch 2 as center), begin next CL in same st as last st of 1st CL, rep * until 1 st left, 2 dc in last st, turn. 557 sts
Row 43. Ch 4 (counts as tr), 2 tr in same st, ch 2, sk 3 sts, *tr in top of next CL, ch 2, sk 2 sts; rep * to center, in tip place (tr, ch 2, tr (mark as center), ch 2, tr, ch 2), rep * until 3 sts left, tr in next st, ch 2, sk 1 st, 3 tr in last st, turn. 565 sts
Row 44. Ch 1 (does not count), sc in same st, *sc in each tr st and 2 sc in each ch sp; rep * to center, in tip place sc in center tr st, rep * to end, turn. 565 sts**If you'd like to add more rows to make it larger, do so here (more yarn will be necessary).
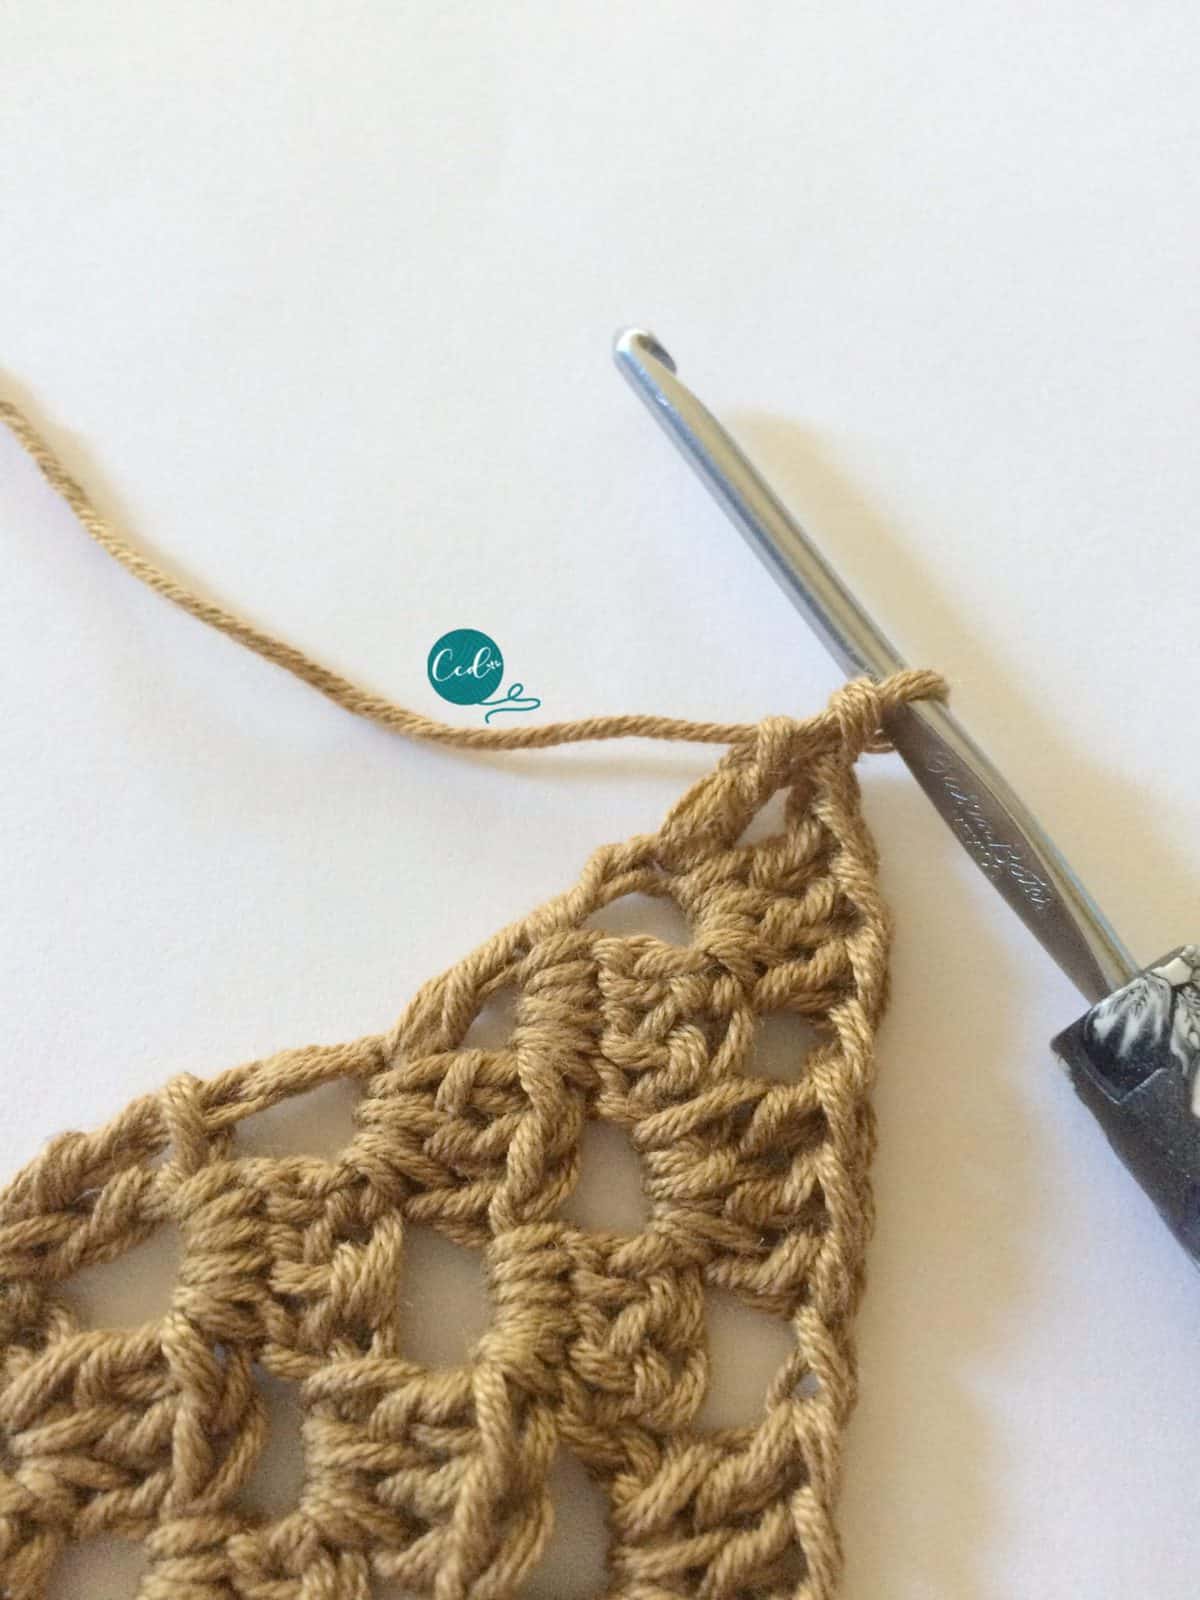
The Edging: Change to Color C.
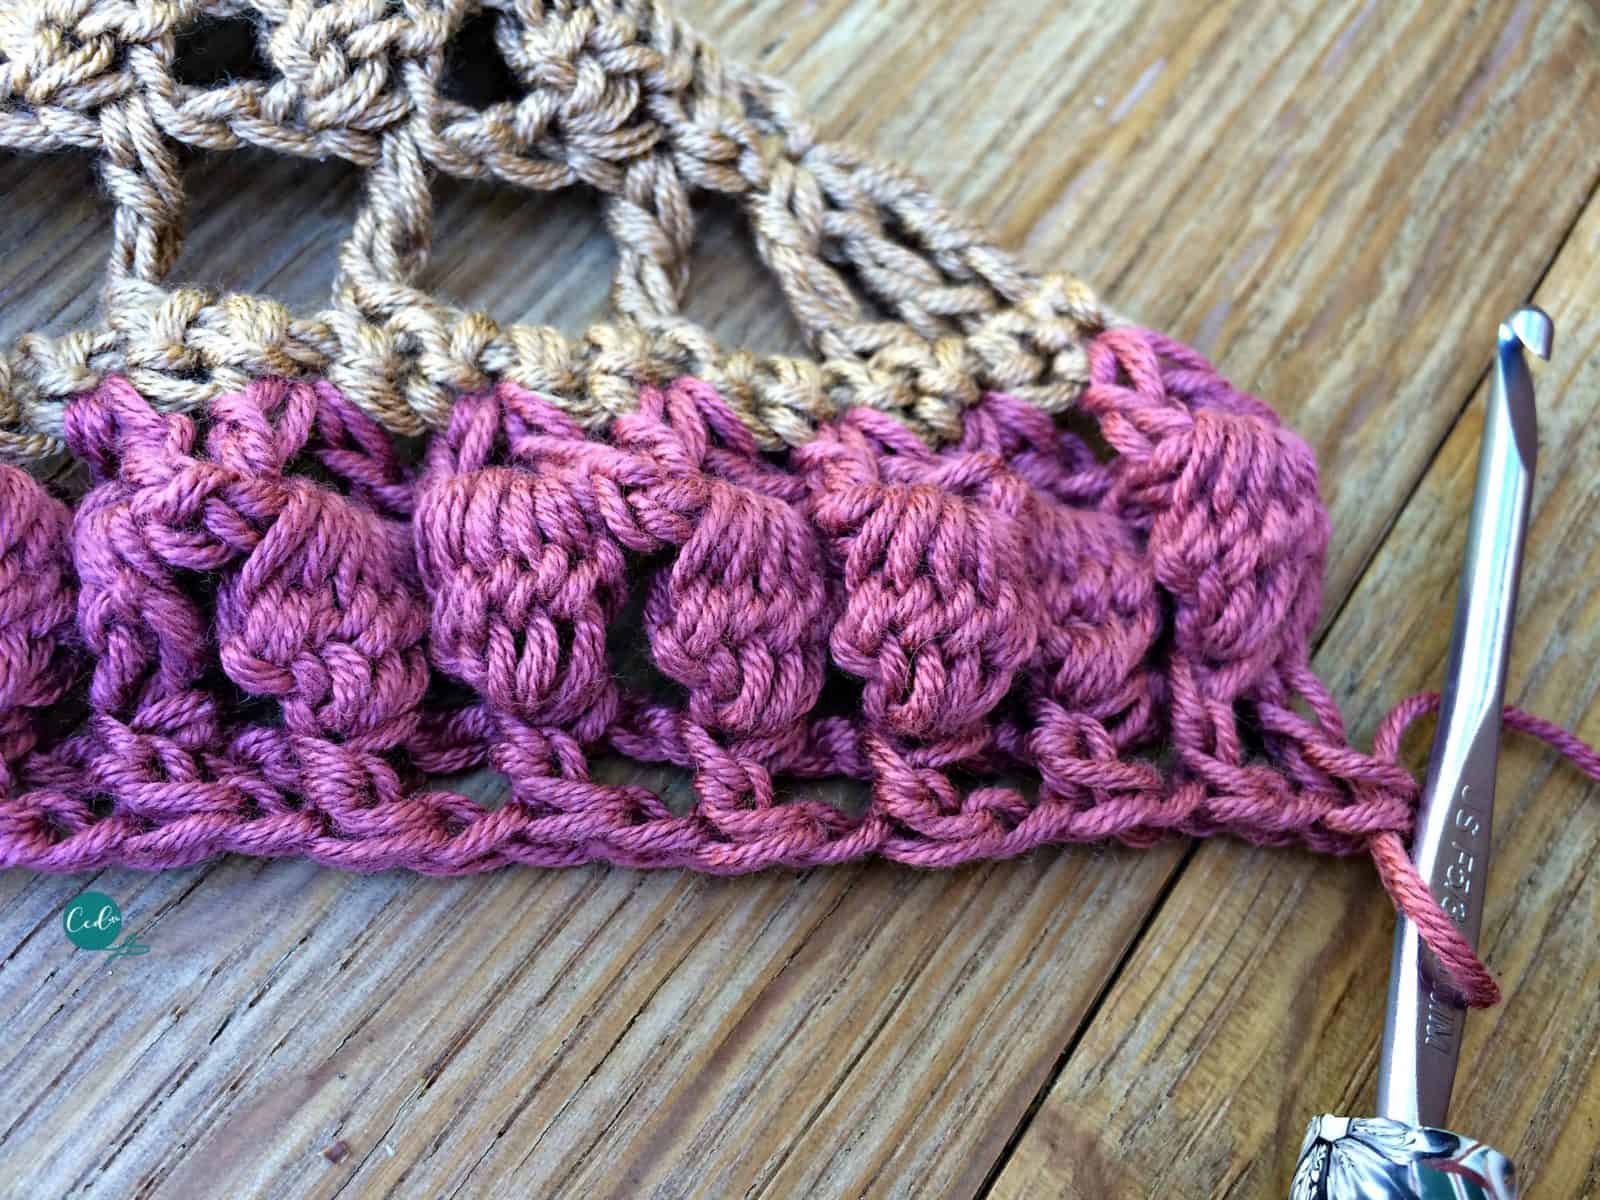
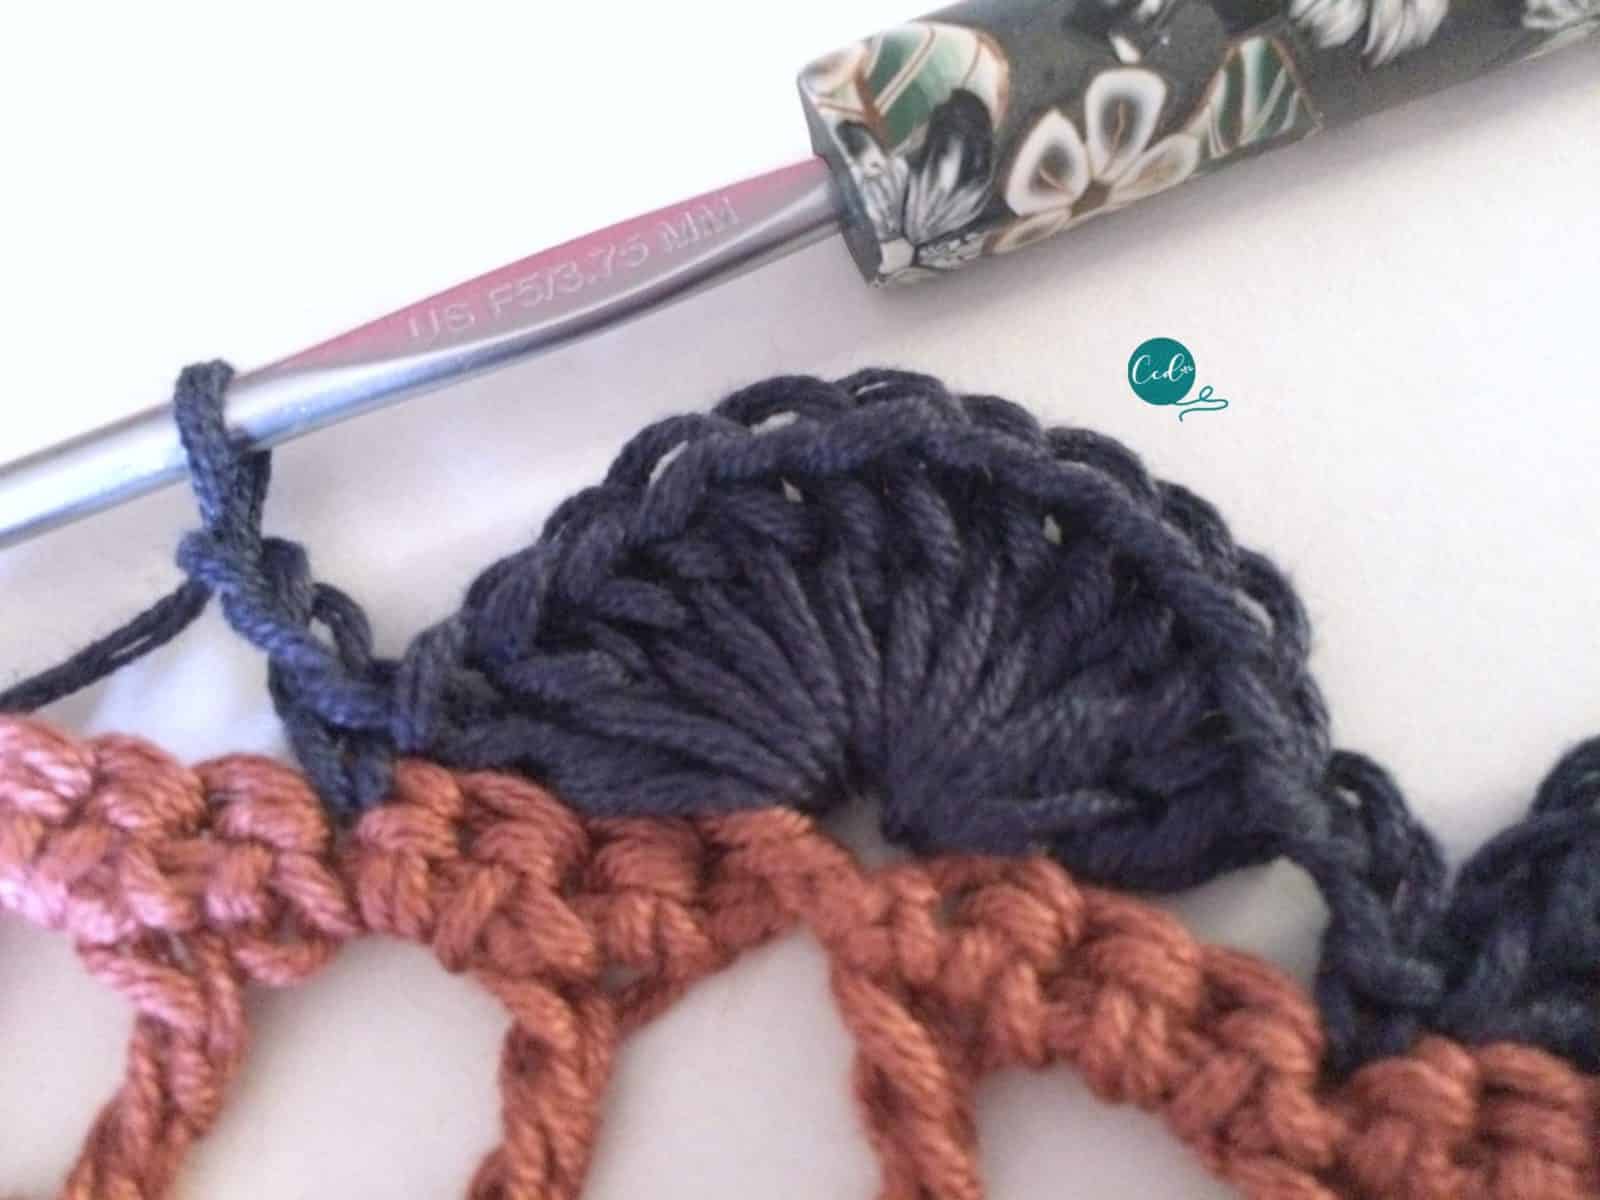 Row 45. Ch 3, sk 3 sts, 12 ldc in next st, sk 3 sts, sc in next st, ch 2; *sk 3 sts, 12 ldc in next st, sk 3 sts, sc in next st, ch 2; rep* around, at center tip continue with rep until 1 st left, dc in last st, turn.
Change to Color D.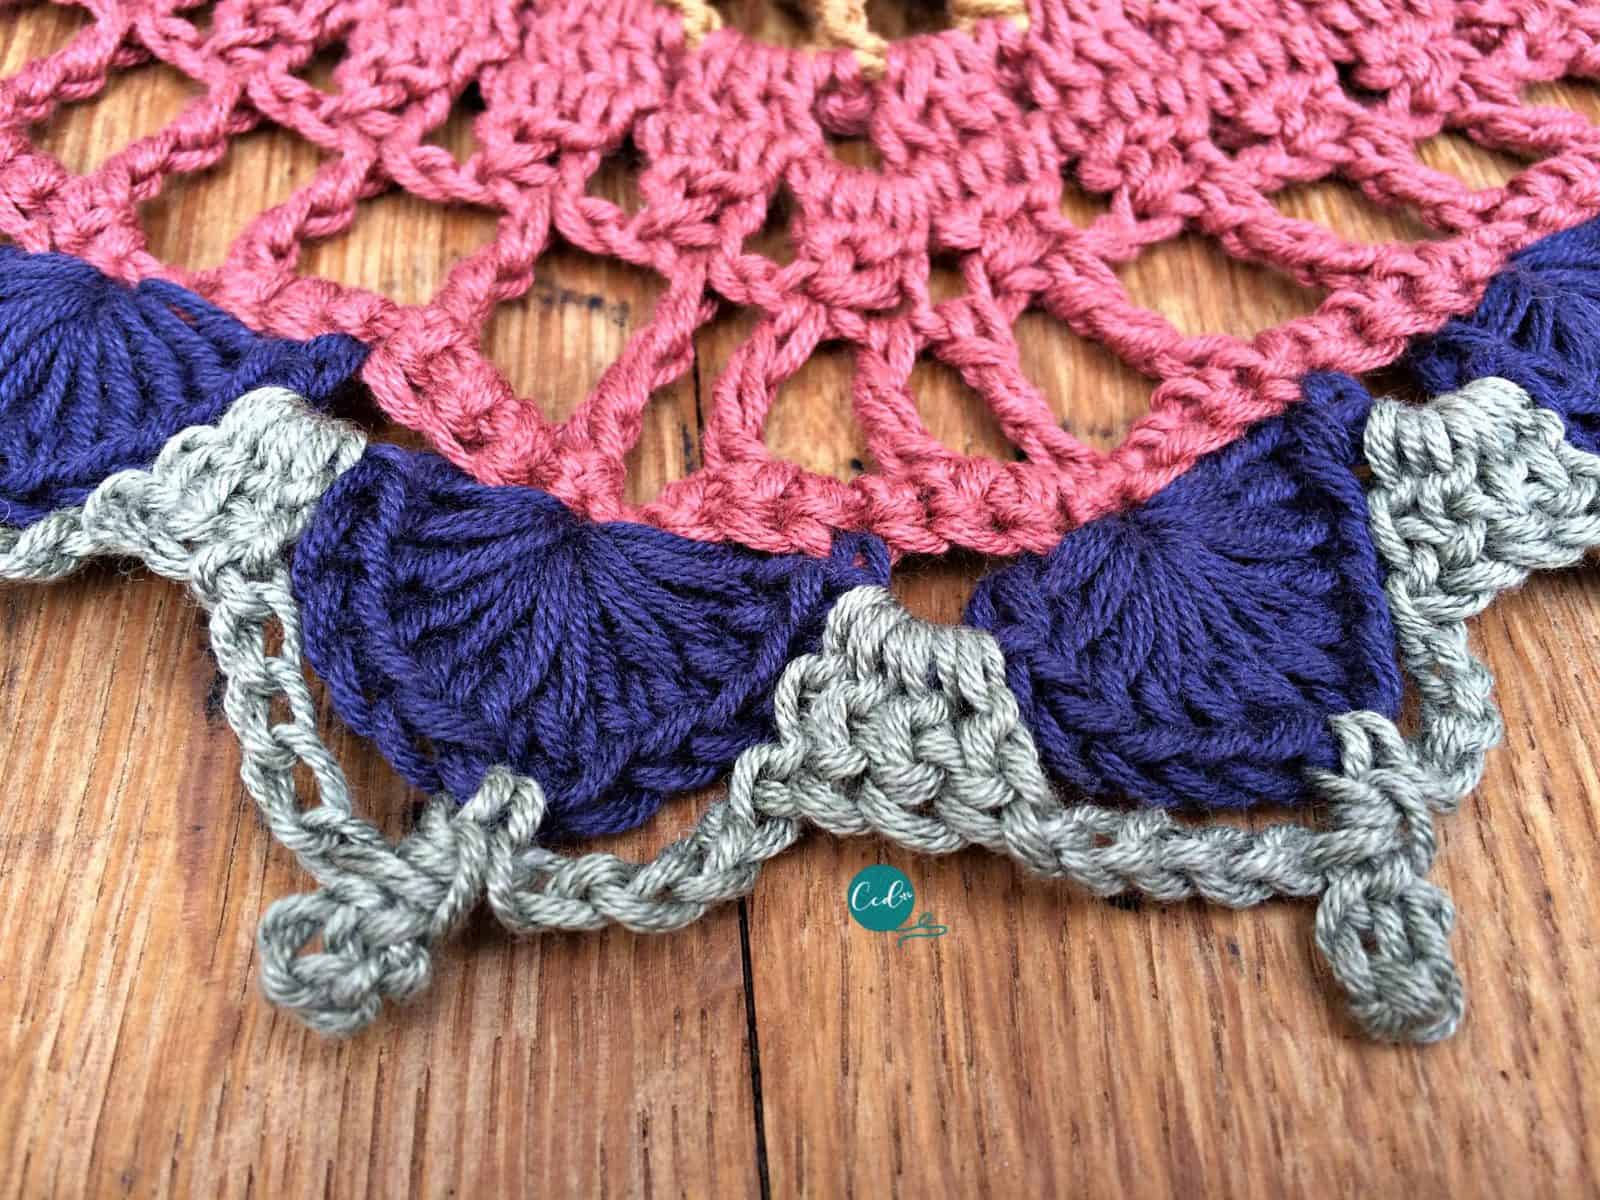
Row 46. Ch 3, 3 dc in same st, *sk sc, ch 5, sc in top of the 6th ldc, p, ch 5, 4 dc in ch 2 sp; rep * around; tip will be 4 dc, end with 4 dc in last ch space. Finish off. Weave in ends.
Block your Shawlette:
Either allow your shawl to soak for 30 mins or spritz it with water until damp. Lay it out on a large, flat surface (towel covered table or bed) that you can stick pins into.Smooth out into shape. Pin along edges to keep in place-every couple of inches. Allow to dry overnight.
Recommended Products
As an Amazon Associate and member of other affiliate programs, I earn from qualifying purchases.


This is so pretty!!
Just found your blog. Beautiful shawl.
Thanks! This one was so much fun to design and I loved working with the Berroco Modern cotton DK yarn.
Thank you, I loved working on it!
Love he colors!!!Inam pinning for alter. I want one of these for myself.
Thank you! The Berroco color selection is amazing! I hope you enjoy the pattern!
This is beautiful! Wondering what your thoughts on sewing the two long edges together to create a poncho. Would that work? Or would the proportions be off?
Hi Diane! That’s a great question. I think it’s too small as is for a poncho, but if you made it larger then that could work. I like that idea!
Do you have an idea of how many yards this actually requires? I have a 1,000 yd. cake that I would like to use, but don’t know if the yardage would be enough.
Hi Donna, thanks for asking. The Berroco hanks are 353 yds each, which is 1340 yds total. I used almost all of each of them, but one-I was able to make a hat and a little toddler bolero with the rest of that one. Also I know someone used a a cake yarn that was less than 700 yds and it turned out a little short but still worked, she just left off the last rows. So I think 1,000 will be enough! Good luck, I’d love to see it if you want share when you’re done!
Thank you!
Thank you so much
You’re welcome, I hope you enjoy the pattern.
I recently saw this pattern and wasn’t to make it. I see it’s from 2018. It doesn’t look like these cookies are available anymore; except for the Hope from yarn.com. I clicked on the affiliate link and didn’t see any of the colors. I found Coboo at Walmart some similar colors, but I really liked the color combination in your pattern. Can you use Modern cotton DK with Coboo yarns?
Thank you,
Kim Locksley
I forgot to mention my birth families last name is Ottobre. I have met my cousins,and aunts and uncles (sadly all are now deceased), and wanted to make this as a gift for my cousins. Will be perfect to present at the next bi-annual family reunion in PA.
Kim Locksley
Correcting some typos from my post *wanted* to make not wasn’t and *colors* not cookies. Trying to find a video on this pattern. Is there one available?
Thank you,
Kim
Hi Kim,
Coboo yarn should work well for this shawl. The best way to check is to work up a gauge swatch to make sure you’re meeting gauge with your yarn and hook. For this pattern the gauge is 1″/2.5 cm x 1″/2.5cm = 5 dc x 3 rows of dc so you just work a small swatch of double crochets to check it. For more details on gauge I have article here https://christacodesign.com/crochet-gauge-what-is-gauge-how-do-you-measure-it/
I hope this helps!
Crystal
That is so cool! What a thoughtful gift. I hope you enjoy making it!
There isn’t a full video tutorial for this pattern, however there a videos for each of the stitches used which are linked up under the “special stitches” section. Hopefully those are helpful for you!
Thank you Christa for replying and for the information you provided. I’m enjoying it so far-I have started the first section and and just completed the first row of cluster stitches. Yes, I found the tutorials and they are very helpful! Using Coboo beige, mauve, steel blue, and lichen currently. I ordered Berroco Modern Color DK wharf, cliff walk, rocky point, and hope from Amazon. Hopefully those will be close to what you used originally as I really liked the color combination you used! Thank you again-I love the pattern!
Kim
That sounds lovely. Thank you, I really like those colors too and wish I had more of them!