Crochet Cat Lovey Pattern | Katerina Kitty Cat Lovey


This crochet cat lovey pattern is a simple amigurumi pattern. The free crochet pattern for this kitty cat in a blanket dress is perfect for little cat lovers.

Join the ChristaCoDesign Newsletter
Never miss a pattern!
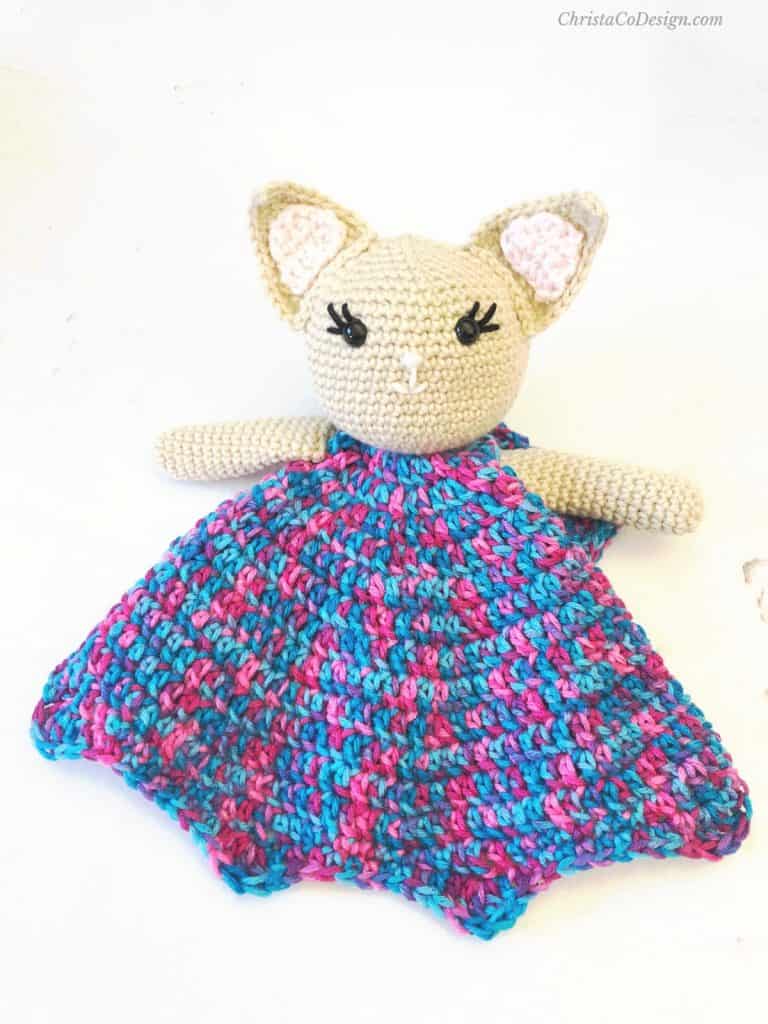
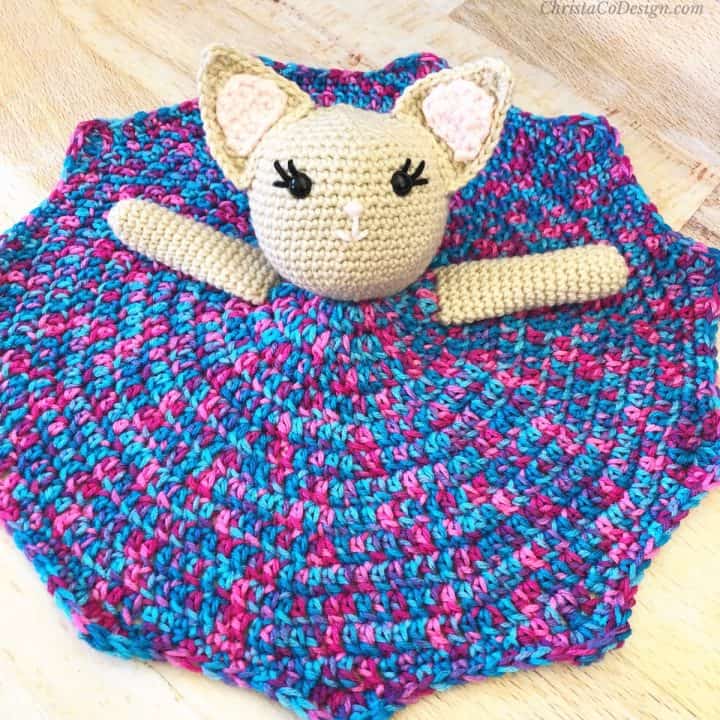
My daughter’s birthday request was a crochet kitty. She loves the pretty, girly stuffies. {If you knew how many cats, unicorns and pink hoofed horses she has!}
So I knew the eyelashes were a must have on her cat’s face. I played around with whiskers too, but felt the eyelashes were more important to her, and I didn’t love both together.

I was finally able to use some of this lovely purple, blue and pink variegated yarn too! My daughter chose this as a Mother’s Day gift.
I’m so glad I could crochet her something special with it. I have some left so I hope to make her something else too.
You can purchase the ad-free, well formatted PDF Pattern in one of my shops. Scroll down for the free pattern!
Yarn
I love how the variegated yarn works up in this dress. It’s always good to find a great way to showcase those colors.
The color is Bonbon from Red Heart Super Saver.* It’s a jumbo skein of 482 yds so I have plenty left for more pretty projects.
All the parts and dress use #4 medium worsted weight yarn. You can substitute any yarn brand or color you like.
Stitch
This pattern is made with simple stitches. All the body parts are single crochet stitches.
For the dress I use primarily double crochets. For the trim there are a few other stitches and I link tutorials for them in the Stitches section.
Add this pattern to your Ravelry queue.
Materials
- #4 med weight yarn, colors divided as:
- 100yds/91m of Color A-beige for body parts
- 25yds/23m Color B-soft pink for inner ears, nose, mouth
- 125yds/114m Color C-variegated blue + pink* for dress
- 10yds/9m Aunt Lydia’s Crochet Thread Fashion 3* or black yarn for eyelashes
- 3.25mm hook for body parts; or hook needed to meet gauge
- 5.5mm hook for dress; or hook needed to meet gauge.
- 2 each 12mm safety eyes,* if using.
- Polyfill for stuffing.*
- pins for sewing pieces on, recommended
- yarn needle
- scissors
- measuring tape
Notes
- Pattern is worked continuously in the round. Do not join.
- Use a stitch marker to mark the first stitch of each round, moving it up as you work.
- Ears are worked flat.
- All pieces are crocheted separately and then sewn together.
- Blanket dress is worked in the round, and joined.
Stitches/Abbreviations
(US Terms)
Inv dec-invisible decrease
mc-magic circle
rep-repeat
Sc2tog-single crochet two together
sk-skip the indicated stitch
sl st-slip stitch
st(s)-stitch(es)
Gauge
1” x 1″= 4 sc x 5 rnds of sc
Rnds 1-8 = 3.75” diameter
Level
Easy
Construction
For this kitty lovey you’ll crochet each of the parts: head, arms, ears, blanket dress, and then sew them together.
Finished Dimensions
14” tall; 15”-17” skirt width
Pin It

Pattern Instructions
How to Crochet an Easy Kitty Lovey
Crochet kitty lovey with blanket dress.
Materials
- #4 med weight yarn, colors divided as:
- 100yds/91m of Color A-beige for body parts
- 25yds/23m Color B-soft pink for inner ears, nose, mouth
- 125yds/114m Color C-variegated blue + pink for dress
- 10yds/9m black yarn for eyelashes
- 2 each 12mm safety eyes, if using.
Tools
- 3.25mm hook for body parts; or hook needed to meet gauge
- 5.5mm hook for dress; or hook needed to meet gauge
- pins for sewing pieces on, recommended
- yarn needle
- scissors
- measuring tape
Instructions
Head
- Rnd 1. Place 6 sc in mc. (6 sts)
- Rnd 2. Place 2 sc in each st around. (12 sts)
- Rnd 3.*{Place 2 sc in next st, 1 sc in next st} rep from * around. (18 sts)
- Rnd 4. *{Place 2 sc in next st, place 1 sc in each of next 2 sts} rep from * around. (24 sts)
- Rnd 5. *{Place 2 sc in next st, place 1 sc in each of next 3 sts} rep from * around. (30 sts)
- Rnd 6. *{Place 2 sc in next st, place 1 sc in each of next 4 sts} rep from * around. (36 sts)
- Rnd 7. *{Place 2 sc in next st, place 1 sc in each of next 5 sts} rep from * around. (42 sts)
- Rnd 8. *{Place 2 sc in next st, place 1 sc in each of next 6 sts} rep from * around. (48 sts) 3.75” diameter here.
- Rnds 9-20. Sc in each st around. (48 sts)
In Color A.
Start with a mc.
Face
- Embroider on eyelashes. First, find where you want to place the eyes. Have your eyelashes start in that spot.
- Once eyelashes are done, add the eyes. If you’re not using safety eyes, you can crochet 6 sc in a mc and finish off.
- If using safety eyes, add them now. I placed mine between Rnds 18-19, about 6 sts apart.
- Embroider nose with pink yarn. I placed mine centered between the eyes on the next round down. I sewed around one st a few times for the nose, then continued with the mouth.
- Embroider the mouth. To do this I sewed one line from under the nose down a few rounds, and then one line out and up to either side.
- Stuff head firmly and continue stuffing as you go.

Rnd 21. *{Inv dec, sc in next 6 sts} rep from * around. (42 sts)
Rnd 22. *{Inv dec, sc in next 5 sts} rep from * around. (36 sts)
Rnd 23. *{Inv dec, sc in next 4 sts} rep from * around. (30 sts)
Rnd 24. *{Inv dec, sc in next 3 sts} rep from * around. (24 sts)
Rnd 25. *{Inv dec, sc in next 2 sts} rep from * around. (18 sts)
Rnd 26. *{Inv dec, sc in next 1 st} rep from * around. (12 sts)
Rnd 27. Inv dec in each st around. (6 sts)
Sew closed hole. Cut yarn.
Arms
Make 2.
In Color A
Start with a mc.
- Rnd 1. Place 6 sc in mc. (6 sts)
- Rnd 2. Place 2 sc in each st around. (12 sts)
- Rnds 3-19. Sc in each st around until arms measure 4” tall. Stuff firmly as you go. I did not stuff the arms for the last few rounds to make sewing them on easier.
- Cut yarn and leave a long tail for sewing on to dress.
Outer Ears
In Color A
Make 2.
- Row 1. FSC 8 or Ch 9 and Sc in 2nd ch and in each ch across. (8 sts)
- Row 2. Sc2tog, sc in 4 sts, sc2tog, turn. (6 sts)
- Row 3. Sc in each st across, turn. (6 sts)
- Row 4. Sc2tog, sc in 2 sts, sc2tog, turn. (4 sts)
- Row 5. Sc in each st across, turn. (4 sts)
- Row 6. Sc2tog, sc2tog, turn. (2 sts)
- Continue from where you are. Sc around the ear, placing a ch 1 + sc in corners. On 2nd ear, ch 1, turn then sc around so they mirror each other.
Cut yarn and leave a long tail for sewing on to head.
Inner Ears
In Color B.
Make 2.
- Row 1. FSC 6 or Ch 7 and sc in 2nd ch and in each ch across, turn. (6 sts)
- Row 2. Sc2tog, sc in 2 sts, sc2tog. (4 sts)
- Row 3. Sc in each st across, turn. (4 sts)
- Row 4. Sc2tog, sc2tog, turn. (2 sts)
- Cut yarn and leave a long tail to sew to outer ear.
Blanket Dress
With 5.5mm hook.
2”x 2” = 6 dc x 4 rnds
These rounds are joined with a slip stitch.
Ch 3 counts as a dc.
In Color C.
Start with a mc.
- Rnd 1. Place 12 dc in mc, join with a sl st. (12 sts)
- Rnd 2. Ch 3, dc in same st, place 2 dc in each st around, join with a sl st. (24 sts)
- Rnd 3. Ch 3, dc in same st, 1 dc in next st *{place 2 dc in next st, 1 dc in next st} rep from * around, join with a sl st. (36 sts)
- Rnd 4. Ch 3, dc in same st, 1 dc in each of next 2 sts *{place 2 dc in next st, place 1 dc in each of next 2 sts} rep from * around, join with a sl st. (48 sts)
- Rnd 5. Ch 3, dc in same st, 1 dc in each of next 3 sts *{place 2 dc in next st, place 1 dc in each of next 3 sts} rep from * around, join with a sl st. (60 sts)
- Rnd 6. Ch 3, dc in same st, 1 dc in each of next 4 sts *{place 2 dc in next st, place 1 dc in each of next 4 sts} rep from * around, join with a sl st. (72 sts)
- Rnd 7. Ch 3, dc in same st, 1 dc in each of next 5 sts *{place 2 dc in next st, place 1 dc in each of next 5 sts} rep from * around, join with a sl st. (84 sts)
- Rnd 8. Ch 3, dc in same st, 1 dc in each of next 6 sts *{place 2 dc in next st, place 1 dc in each of next 6 sts} rep from * around, join with a sl st. (96 sts)
- Rnd 9. Ch 3, dc in same st, 1 dc in each of next 7 sts *{place 2 dc in next st, place 1 dc in each of next 7 sts} rep from * around, join with a sl st. (108 sts)
- Rnd 10. Ch 3, dc in same st, 1 dc in each of next 8 sts *{place 2 dc in next st, place 1 dc in each of next 8 sts} rep from * around, join with a sl st. (120 sts)
- Rnd 11. Ch 3, dc in same st, 1 dc in each of next 9 sts *{place 2 dc in next st, place 1 dc in each of next 9 sts} rep from * around, join with a sl st. (132 sts)
- Rnd 12. Ch 3, dc in same st, 1 dc in each of next 10 sts *{place 2 dc in next st, place 1 dc in each of next 10 sts} rep from * around, join with a sl st. (144 sts)
- Rnd 13. Ch 3, dc in same st, 1 dc in each of next 11 sts *{place 2 dc in next st, place 1 dc in each of next 11 sts} rep from * around, join with a sl st. (156 sts)
- Rnd 14. *{Sc in next 3 sts, hdc in next 2 sts, dc in next 1 st, tr in next 1 st, dc in next 1 st, hdc in next 2 sts, sc in next 3 sts} rep from * around, join with a sl st. (156 sts)
- Cut yarn.
Sewing
Little Green Bear has a great tutorial on sewing amigurumi pieces.
- Sew pink inner ear to beige outer ears.
- Sew ears to head. I lined up the bottom corner of the ear with eye placement. On that round the ear is set about 6 sts back from the eye.
- Sew on blanket dress to bottom of head. I sewed around the bottom of Round 1 to attach it securely.
- Sew arms on to blanket. I set my arms on the 4th round of the blanket.
- Weave in ends.
Recommended Products
As an Amazon Associate and member of other affiliate programs, I earn from qualifying purchases.