Bryce Canyon Cardigan Crochet Pattern for Kids Sizes Toddler thru Teen
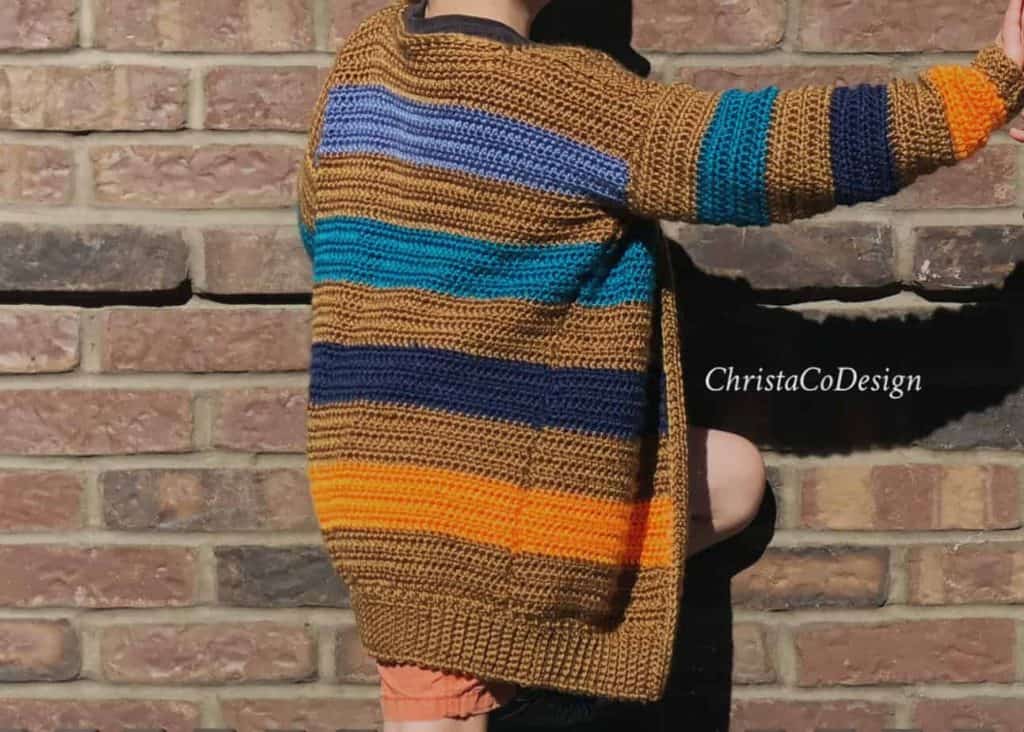
The Bryce Canyon Cardigan is an easy crochet pattern you can make for your kids and grandkids! The open front sweater has a classic fit and look.
The deep v of the front is simply decreases, so it’s easy to crochet. The name for this design is inspired by the gorgeous striations of Bryce Canyon, one of the most majestic places we’ve visited as a family.
This post contains affiliate links, I may earn a fee. Read more disclosure policy.
You can purchase the ad-free, well formatted PDF Pattern in one of my shops. Scroll down for the free pattern!
Adding stripes makes it the perfect piece to customize for your little one’s tastes. The free crochet cardigan pattern is available in sizes 2T-16 so crochet this cardigan for toddlers, children and tweens!
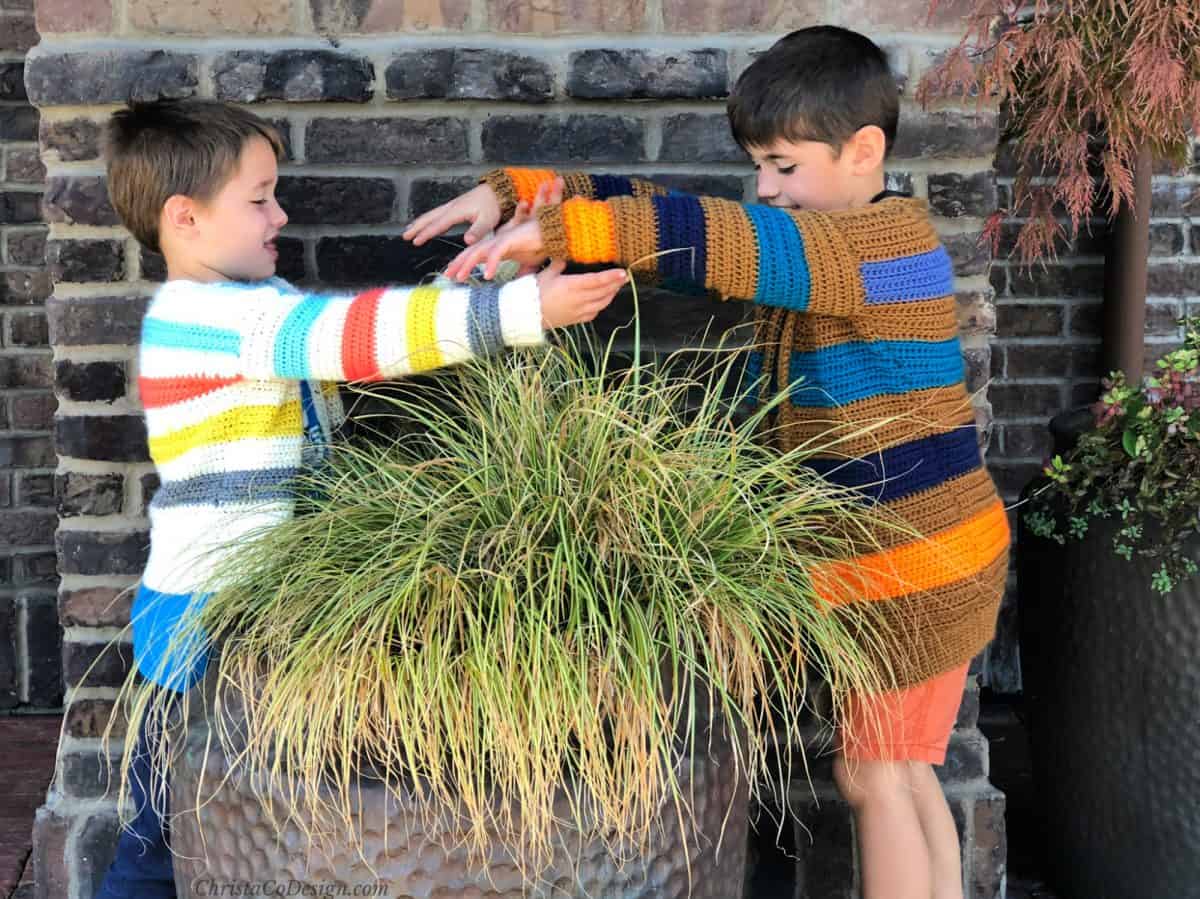
These two. I love how they play together. Listening to their shenanigans is such a joy. Yes, there’s plenty of arguing and what not. But for the most part, they’re the greatest of brothers.
They’re only 16 months apart so it’s easy for them to share interests. There personalities couldn’t be more different though, maybe that’s why they work so well.
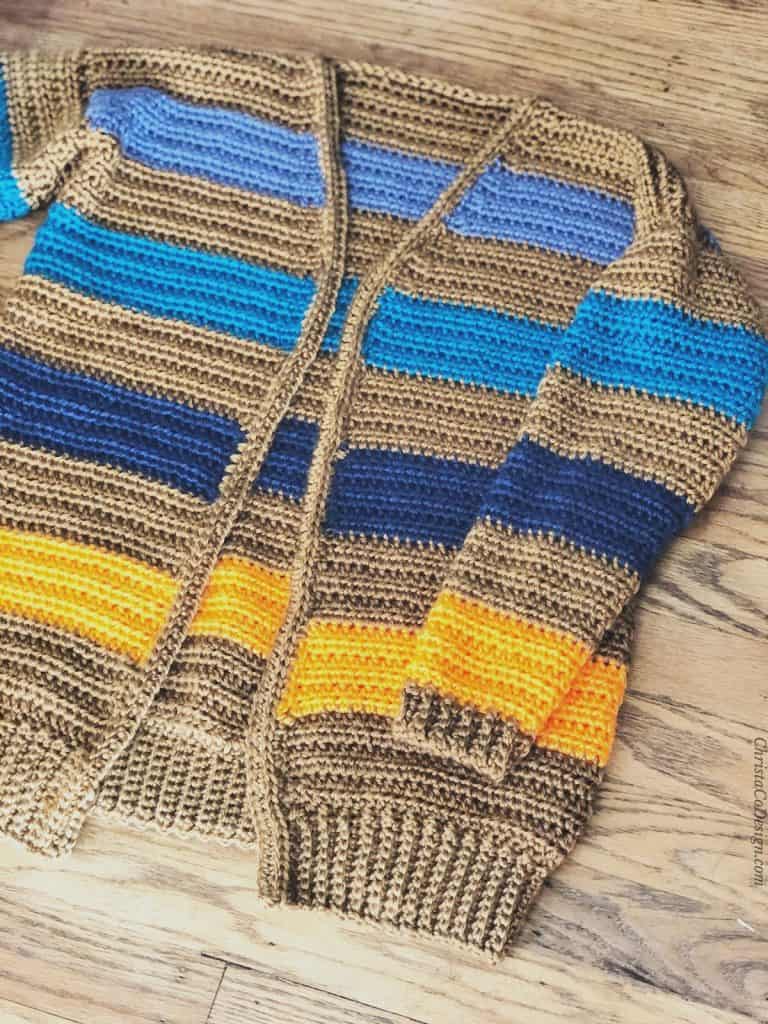
This comfy cardigan is made entirely of half double crochet stitches which makes it the perfect intro into crochet clothing, if you haven’t gone there yet! If that ribbing looks scary-don’t worry you can do it!
Plus I’ve included a photo tutorial and a video tutorial for the ribbing. It comes at the end of the pattern so there’s time to prepare yourself.
The Inspiration
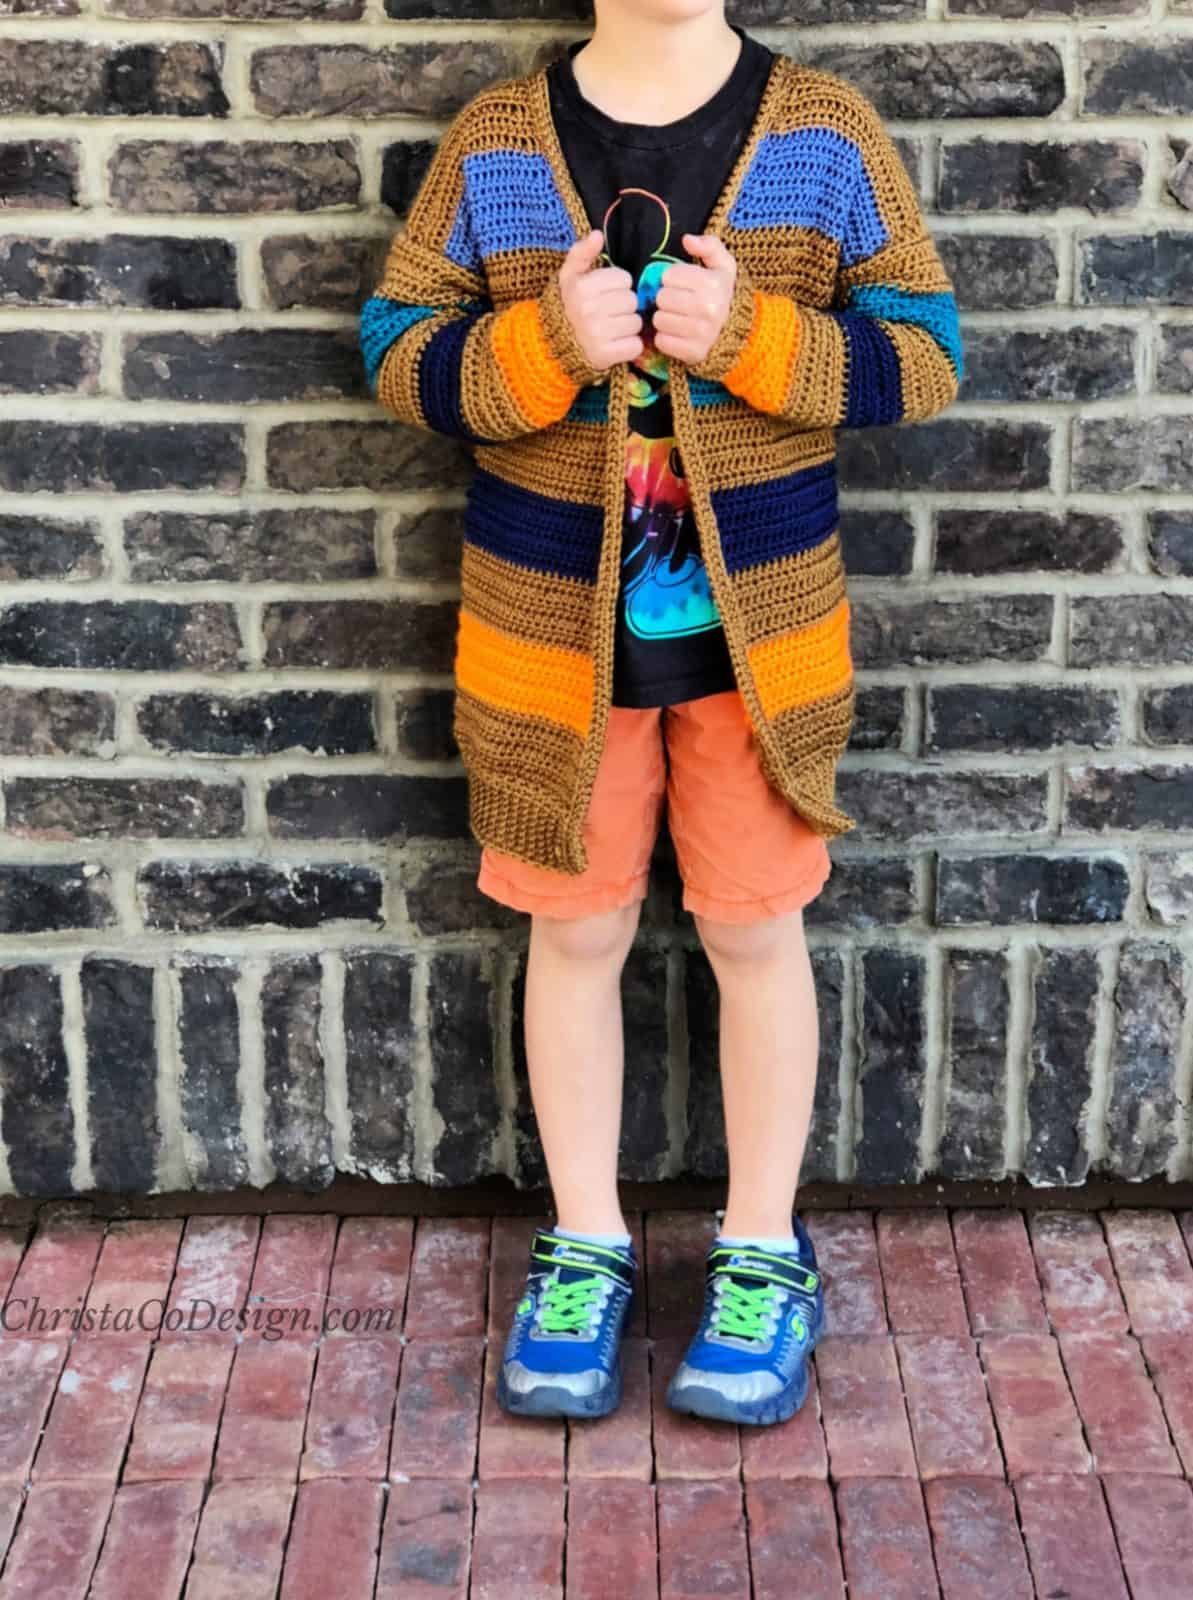
I first created this cardigan over the summer (crazy, I know) for my son’s birthday gift. He loves color and often says “rainbow” is his favorite. I added the stripes in some of his favorites against a neutral backdrop so as not to overwhelm the cardigan with all those colors!
And those of you who have more than one little running around know that once you crochet one cardigan, the others will be requesting their own! I created the second cardigan, shown in brown for my other son, whose favorite color is orange. I love the fall vibe his has with the “cognac” base.
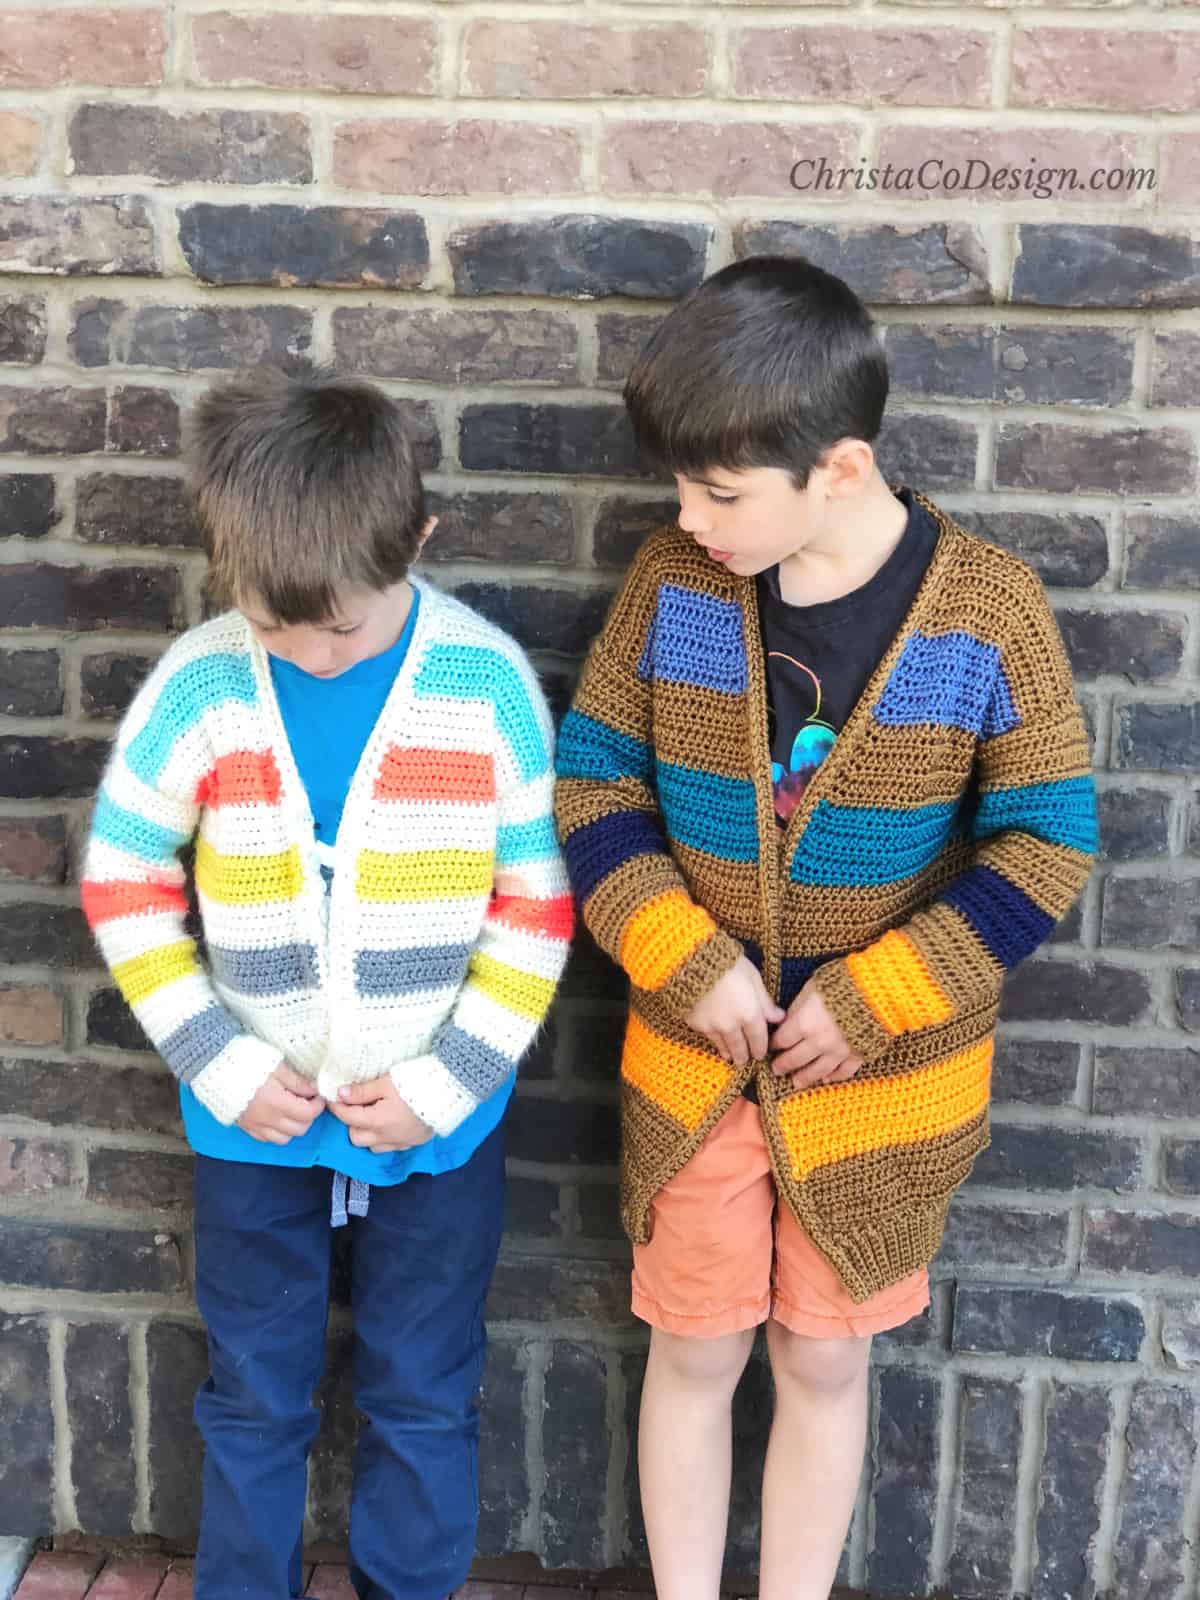
Can I tell you how much these boys love their cardigans? My younger son wears his white one to school and his brother reaches for his first thing in the morning and at bedtime. He’s even been sleeping in it! They know how to keep me making them handmade items!
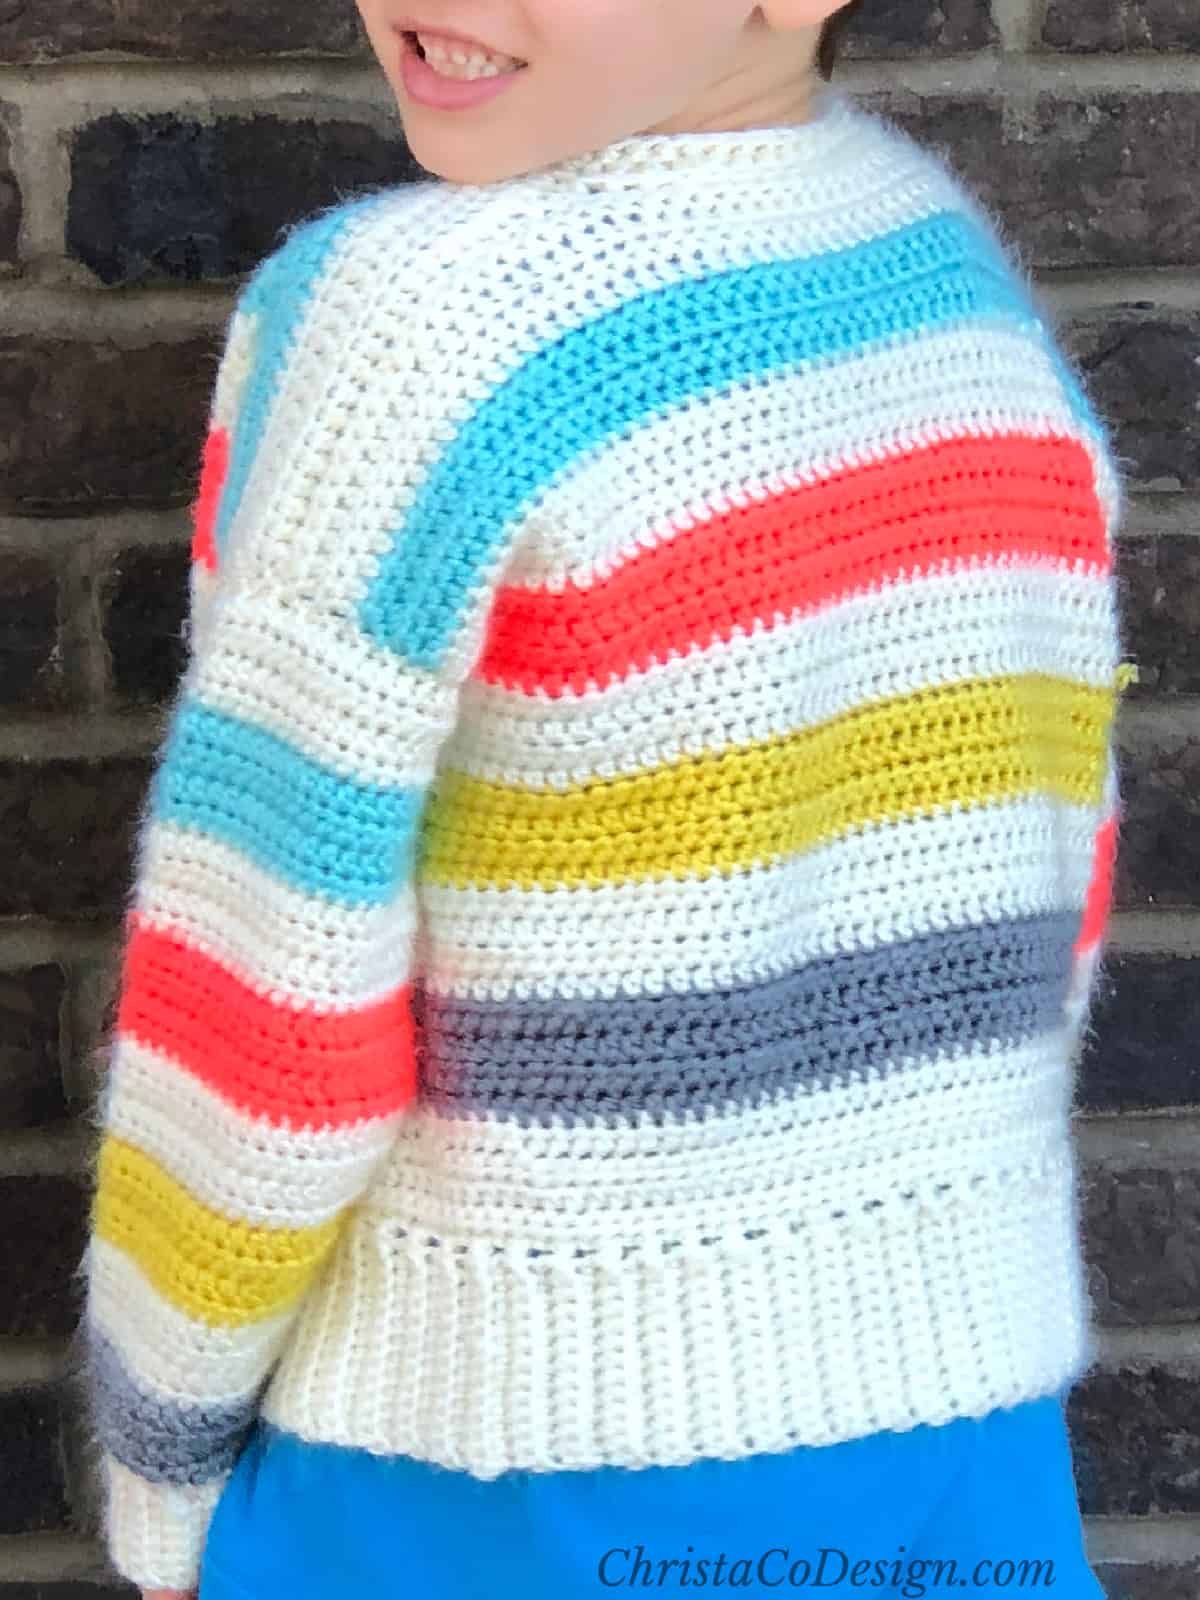
In the pattern you’ll find a chart that makes the stripes easy to follow, plus measurements for each piece. I’ve included plenty of photos for how to put this one together too. Don’t forget you can click on any of the linked stitches to see a video tutorial.
Materials
- 5 mm (H) hook*, or hook necessary to meet gauge.
- #4 medium worsted weight yarn
- I used Caron Simply Soft* for the white cropped cardigan in Off White, Robin’s Egg Blue, Neon Coral, Lemonade, and Heather Grey.
- & Yarn Bee Secret Soft* for the brown full length cardigan
- Optional buttons
- Estimated yardage by size: 2-650 yds in 4 colors (1 main Color A & 3 stripes Colors B-C-D) 4-700, 6-750, 8-775 yds in 5 colors (1 main Color A & 4 stripes Colors B-C-D-E), 10-825, 12-875, 14-900, 16-1000 yds in 6 colors (1 main Color A & 5 stripes Colors B-C-D-E-F)
Notes
- Pattern is written as sizes 2 (4, 6, 8, 10, 12, 14, 16)
- Ch 2 does not count as a stitch.
- Pattern is worked from the bottom up.
- Stripes are 6 rows, or 2” in height. See Stripe Chart for your size for stripe details.
- This pattern is for the longer brown cardigan. Originally I crocheted a cropped version with just 4 rows per stripe as shown in the white cardigan. I kept the tutorial photos from the white cardigan.
Stitches
ch-chain
hdc2tog-half double crochet two together-yarn over and insert your hook into the first stitch to be worked, yarn over and pull up a loop, yarn over and insert your hook into the second stitch to be worked, yarn over and pull up a loop, yarn over and pull through all 5 loops on your hook.
blo-back loop only– insert your hook into the back, or loop that is farthest away from you. Normally you would insert your hook under both top loops, for blo you crochet into only the back loop.
3rd loop hdc-Half double crochet into the 3rd loop (see below)
The 3rd loop is found on the back side of your hdc stitch, marked by the stitch marker in the pictures.
Gauge
2”x 2” 8 hdc x 6 rows
Dimensions
| Size-Chest Size | Back Panel Width” | Front Panel Width” |
| 2-26” | 13 | 6.5 |
| 4-28” | 14 | 7 |
| 6-30” | 15 | 7.5 |
| 8-31.5” | 16 | 7.75 |
| 10-33” | 17 | 8 |
| 12-35” | 18 | 8.5 |
| 14-36.5” | 18.5 | 9 |
| 16-37.5” | 19.5 | 9 |
Stripe Charts
- All stripes are 6 rows = 2.”
- See your size in the charts below for which rows to crochet in each color.
- Size 2 is written for 2” stripes in 4 colors.
- Sizes 4, 6 & 8 are written for 2” stripes in 5 colors.
- Sizes 10, 12, 14 & 16 are written for 2” stripes in 6 colors.
- Not all sizes start or end with the same color.
- Color A is considered to be the neutral and alternated with each of the other colors (B-C-D-E-F).
- Color changes and row # will be the same for back and front panels.
- Sleeves will follow the same color pattern, but the sleeves will not line up with the body of the cardigan, as this is a drop shoulder sweater.
- Crochet over your ends to minimize weaving in tails.
Back & Front Panel Stripe Chart:
| Size 2 | Row # | Size 4 | Row # | Size 6 & 8 | Row # |
| Color A | 1-6 | Color B | 1-6 | Color A | 1-6 |
| Color B | 7-12 | Color A | 7-12 | Color B | 7-12 |
| Color A | 13-18 | Color C | 13-18 | Color A | 13-18 |
| Color C | *19-24 | Color A | 19-24 | Color C | 19-24 |
| Color A | 25-30 | Color D | *25-30 | Color A | 25-30 |
| Color D | 31-36 | Color A | 31-36 | Color D | *31-36 |
| Color A | 37-42 | Color E | 37-42 | Color A | 37-42 |
| Panel Length | 14” | Color A | 43-48 | Color E | 43-48 |
| Panel Length | 16” | Color A | 49-54 | ||
| Panel Length | 18” |
| Size 10 & 12 | Row # | Size 14 & 16 | Row # |
| Color B | 1-6 | Color A | 1-6 |
| Color A | 7-12 | Color B | 7-12 |
| Color C | 13-18 | Color A | 13-18 |
| Color A | 19-24 | Color C | 19-24 |
| Color D | 25-30 | Color A | 25-30 |
| Color A | 31-36 | Color D | 31-36 |
| Color E | *37-42 | Color A | 37-42 |
| Color A | 43-48 | Color E | *43-48 |
| Color F | 49-54 | Color A | 49-54 |
| Color A | 55-60 | Color F | 55-60 |
| Panel Length | 20” | Color A | 61-66 |
| Panel Length | 22” |
Sleeve Stripe Chart:
| Size 2 | Row # | Size 4 & 6 | Row # | Size 8 | Row # |
| Color B | 1-6 | Color B | 1-6 | Color B | 1-6 |
| Color A | 7-12 | Color A | 7-12 | Color A | 7-12 |
| Color C | 13-18 | Color C | 13-18 | Color C | 13-18 |
| Color A | *19-24 | Color A | 19-24 | Color A | 19-24 |
| Color D | 25-30 | Color D | *25-30 | Color D | 25-30 |
| Sleeve Length | 10” | Color A | 31-36 | Color A | *31-36 |
| Sleeve Length | 12” | Color E | 37-42 | ||
| Sleeve Length | 14” |
| Size 10 & 12 | Row # | Size 14 & 16 | Row # |
| Color B | 1-6 | Color A | 1-6 |
| Color A | 7-12 | Color B | 7-12 |
| Color C | 13-18 | Color A | 13-18 |
| Color A | 19-24 | Color C | 19-24 |
| Color D | 25-30 | Color A | 25-30 |
| Color A | 31-36 | Color D | 31-36 |
| Color E | *37-42 | Color A | 37-42 |
| Color A | 43-48 | Color E | *43-48 |
| Sleeve Length | 16” | Sleeve Length | 16” |
You can purchase the ad-free, well formatted PDF Pattern in one of my shops. Scroll down for the free pattern!
Scroll down for the free crochet cardigan pattern for kids!
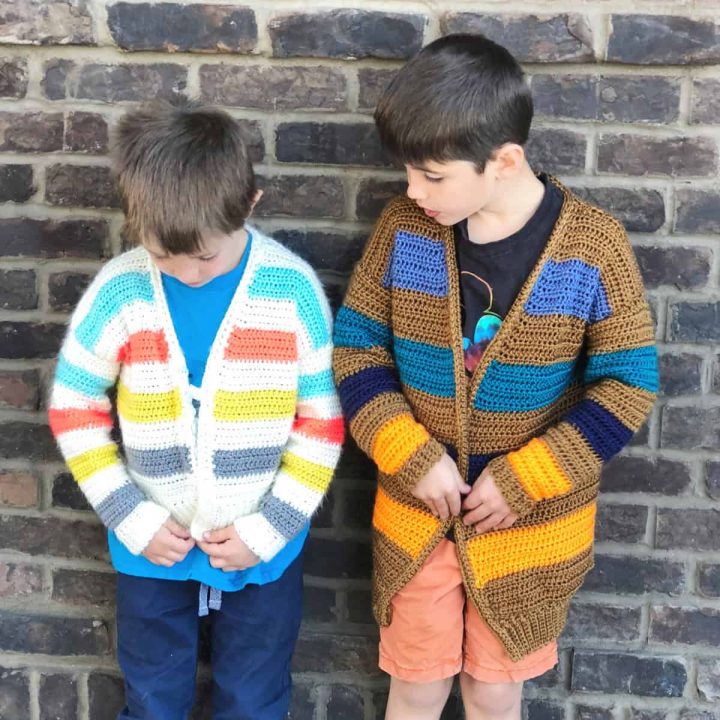
Crochet Cardigan Pattern for Kids: Toddlers thru Teens
The Bryce Canyon Cardigan is an easy crochet pattern you can make for your kids and grandkids! The open front sweater has a classic fit and look.
Materials
- #4 medium worsted weight yarn
- I use Caron Simply Soft for the white cropped cardigan in Off White, Robin’s Egg Blue, Neon Coral, Lemonade, and Heather Grey & Yarn Bee Secret Soft for the brown full length cardigan.
- Estimated yardage by size:
- Sizes 2-6 are divided in 4 colors (half yarn in 1 main Color A & half yarn divided evenly in 3 stripes Colors B-C-D)
- 2 - 650 yd/594m
- 4 - 700 yd/640m
- 6 - 750 yd/686m
- Sizes 8-14 are divided in 5 colors (half yarn in 1 main Color A & half yarn divided evenly in 4 stripes Colors B-C-D-E):
- 8 - 775 yd/709m
- 10 - 825 yd/755m
- 12 - 875 yd/800m
- 14 - 900 yd/823m
- Size 16 is divided in 6 colors (half yarn in 1 main Color A & half yarn divided evenly in 5 stripes Colors B-C-D-E-F):
- 16 - 1000 yd/914m
Tools
- 5 mm US Size H hook, or hook necessary to meet gauge.
- Optional buttons
- yarn needcle
Instructions
Size 2 (4, 6, 8, 10, 12, 14, 16)
Back Panel
Size 2 start in Color A
Size 4 & 6 start in Color B
Size 8 start in Color A
Sizes 10 & 12 start in Color B
Sizes 14 & 16 start in Color A.
See chart above for more info.
Ch 54 (58, 62, 66, 70, 74, 76, 80)
Row 1. Hdc in the 3rd ch from your hook (2 skipped chs don’t count as a st), hdc in each ch across, turn. (52, 56, 60, 64, 68, 72, 74, 78 sts)
Row 2. Ch 2 (doesn’t count), hdc in the same st and in each st across, turn. (52, 56, 60, 64, 68, 72, 74, 78 sts) *See Stripe Chart above for when to change colors for striping similar to the one pictured.
Rep row 2 for 40 (46, 46, 52, 58, 58, 64, 64) more rows, changing colors every 6 rows according to the chart above. (52, 56, 60, 64, 68, 72, 74, 78 sts)
Finish off but leave a long tail for sewing on front panels at shoulder seams.
Front Panel 1
Size 2 start in Color A
Sizes 4 & 6 start in Color B
Size 8 start in Color A
Sizes 10 & 12 start in Color B
Sizes 14 & 16 start in Color A.
See chart above for more info.
Ch 28 (30, 32, 33, 34, 36, 38, 38)
Row 1. Hdc in the 3rd ch from your hook (2 skipped chs don’t count as a st), hdc in each ch across, turn. (26, 28, 30, 31, 32, 34, 36, 36 sts)
Row 2. Ch 2 (doesn’t count), hdc in the same st and in each st across, turn. (26, 28, 30, 31, 32, 34, 36, 36 sts)
*See Stripe Chart above for when to change colors for striping similar to the one pictured.
Row 3-18 (24, 24, 30, 36, 36, 42, 42) Rep row 2, continuing to change colors every 6 rows, according to your size in the chart above. (26, 28, 30, 31, 32, 34, 36, 36 sts)
Now you will begin decreasing once every other row on one side of the first front panel. This will create the deep v of the front. Remember to change to color indicated in chart for your size-every 6 rows, the same as the back panel.
***
Row 19. (25, 25, 31, 37, 37, 43, 43) Ch 2, hdc in the same st, hdc2tog in next two st, hdc in the next st and in each st across. (25, 27, 29, 30, 31, 33, 35, 35 sts)
Row 20. (26, 26, 32, 38, 38, 44, 44) Ch 2, hdc in the same st and in each st across, turn. (25, 27, 29, 30, 31, 33, 35, 35 sts)
***
Row 21-42. (27-48, 27-48, 33-54, 39-60, 39-60, 45-66, 45-66) Rep the last two rows between the *** continuing to change colors every 6 rows. (14, 16, 18, 19, 19, 21, 24, 24 sts)
Finish off, but leave a long tail for sewing shoulders on to back panel.
Front Panel 2
The second panel is made in the same way as the first, but your decreases will be on the opposite end of your work.
Size 2 start in Color A
Sizes 4 & 6 start in Color B
Size 8 start in Color A
Sizes 10 & 12 start in Color B
Sizes 14 & 16 start in Color A. See chart above for more info.
Ch 28 (30, 32, 33, 34, 36, 38, 38)
Row 1. Hdc in the 3rd ch from your hook (2 skipped chs don’t count as a st), hdc in each ch across, turn. (26, 28, 30, 31, 32, 34, 36, 36 sts)
Row 2. Ch 2 (doesn’t count), hdc in the same st and in each st across, turn. 26 (26, 28, 30, 31, 32, 34, 36, 36 sts)
*See Stripe Chart above for when to change colors for striping similar to the one pictured.
Rows 3-18 (24, 24, 30, 36, 36, 42, 42) Rep row 2, continuing to change colors every 6 rows, according to your size in the chart above. (26, 28, 30, 31, 32, 34, 36, 36 sts)
***
Row 19. (25, 25, 31, 37, 37, 43, 43) Ch 2, hdc in the same st, and in each st across until the last three stitches, hdc2tog over the next two sts, hdc in the last, turn. (25, 27, 29, 30, 31, 33, 35, 35 sts)
Row 20. (26, 26, 32, 38, 38, 44, 44) Ch 2, hdc in the same st and in each st across, turn. (25, 27, 29, 30, 31, 33, 35, 35 sts)
***
Row 21-42. (27-48, 27-48, 33-54, 39-60, 39-60, 45-66, 45-66) Rep the last two rows between the *** continuing to change colors every 6 rows. (14, 16, 18, 19, 19, 21, 24, 24 sts)
Finish off, but leave a long tail for sewing shoulders on to back panel. Set panels aside for seaming later.
Sleeves
The sleeves are worked flat in rows from the wrist up, with increases every other row until it’s reached armhole width.
Note that the sleeve stripe pattern does not exactly match the one pictured. I took out the last color stripe since that same color will drop over the shoulder from the body panels.
The sleeves are also not long enough to warrant as many stripes as the body.
The sleeve edges are added after sewing so you may adjust the length to meet your fit needs.
Make 2
Sizes 2, 4, 6, 8,10, & 12, all start in Color B.
Sizes 14 & 16 start in Color A. See chart above for more info.
Ch 22 (25, 26, 29, 31, 33, 36, 38)
Row 1. Hdc in the 3rd ch from your hook (2 skipped chs don’t count as a st), hdc in each ch across, turn. (20, 23, 24, 27, 29, 31, 34, 36 sts)
Starting width of sleeves: 5.5” (6, 6.5, 7, 7.5, 8, 8.5, 9)”
Row 2. Ch 2 (doesn’t count), hdc in the same st and in each st across, turn. (20, 23, 24, 27, 29, 31, 34, 36, sts)
Row 3. Ch 2 (doesn’t count), hdc in the same st, 2 hdc in the next st, hdc in each st until the last two st, then 2 hdc in the next st, hdc in the last st, turn. (22, 25, 26, 29, 31, 33, 36, 38 sts)
***
Row 4. Ch 2 (doesn’t count), hdc in the same st and in each st across, turn. (22, 25, 26, 29, 31, 33, 36, 38 sts)
Row 5. Ch 2 (doesn’t count), hdc in the same st and in each st across, turn. (22, 25, 26, 29, 31, 33, 36, 38 sts)
Row 6. Ch 2 (doesn’t count), hdc in the same st, 2 hdc in the next st, hdc in each st until the last two st, then 2 hdc in the next st, hdc in the last st, turn. (24, 27, 28, 31, 33, 35, 38, 40 sts)
***
*See Stripe Chart above for when to change colors.
Rows 7-22 (21, 24, 24, 27, 32, 33, 36) Rep Rows 4-6 (increasing every 3rd row), changing colors every 6 rows-according to the chart. (34, 37, 40, 43, 47, 53, 56, 60 sts)
Finished width of sleeves: 8.5” (9.25, 10, 10.75, 11.75, 13.25, 14, 15)”
Rows 23-30 (22-36, 25-36, 25-42, 28-48, 33-48, 34-48, 37-48): Ch 2 (doesn’t count), hdc in the same st and in each st across, turn. Change colors every 6 rows-according to the chart. (34, 37, 40, 43, 47, 53, 56, 60 sts)
Finish off sleeves but leave a long tail for sewing on to the cardigan body.
Seam
You can watch the video on how to seam with the mattress stitch here.
With wrong sides together, sew front panels to back panel at shoulders, with deep v sides facing into the center. Use the long tails you left and yarn needle. See the dotted lines in the next picture.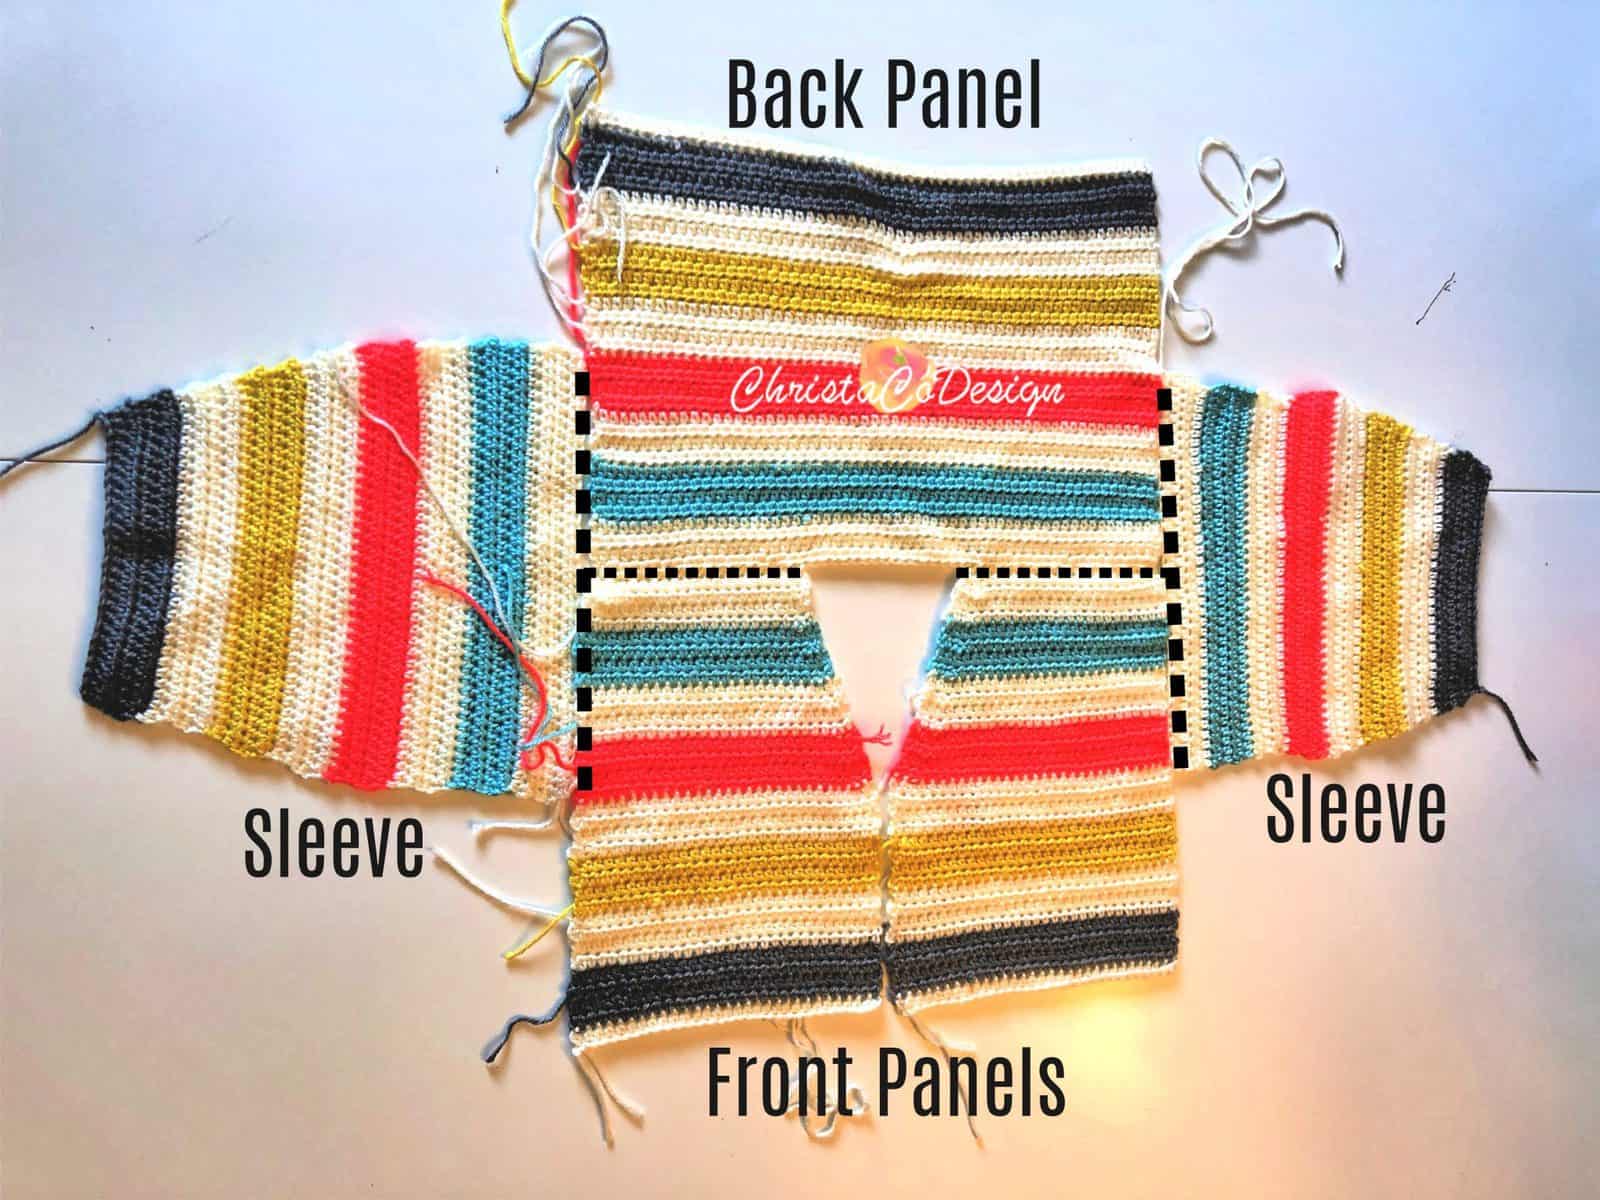
With the cardigan body laid out flat, lay the sleeves out flat on either side of the cardigan (wrong side up for seaming). Center the widest end of the sleeve with the shoulder seam. Sew sleeves on to cardigan body with long tails you left and yarn needle. See dotted line in the picture.
Fold the cardigan in half, as it will appear when finished. Sew up the side seams from the bottom up to the armpit and down the sleeve. See the dotted line in the next picture.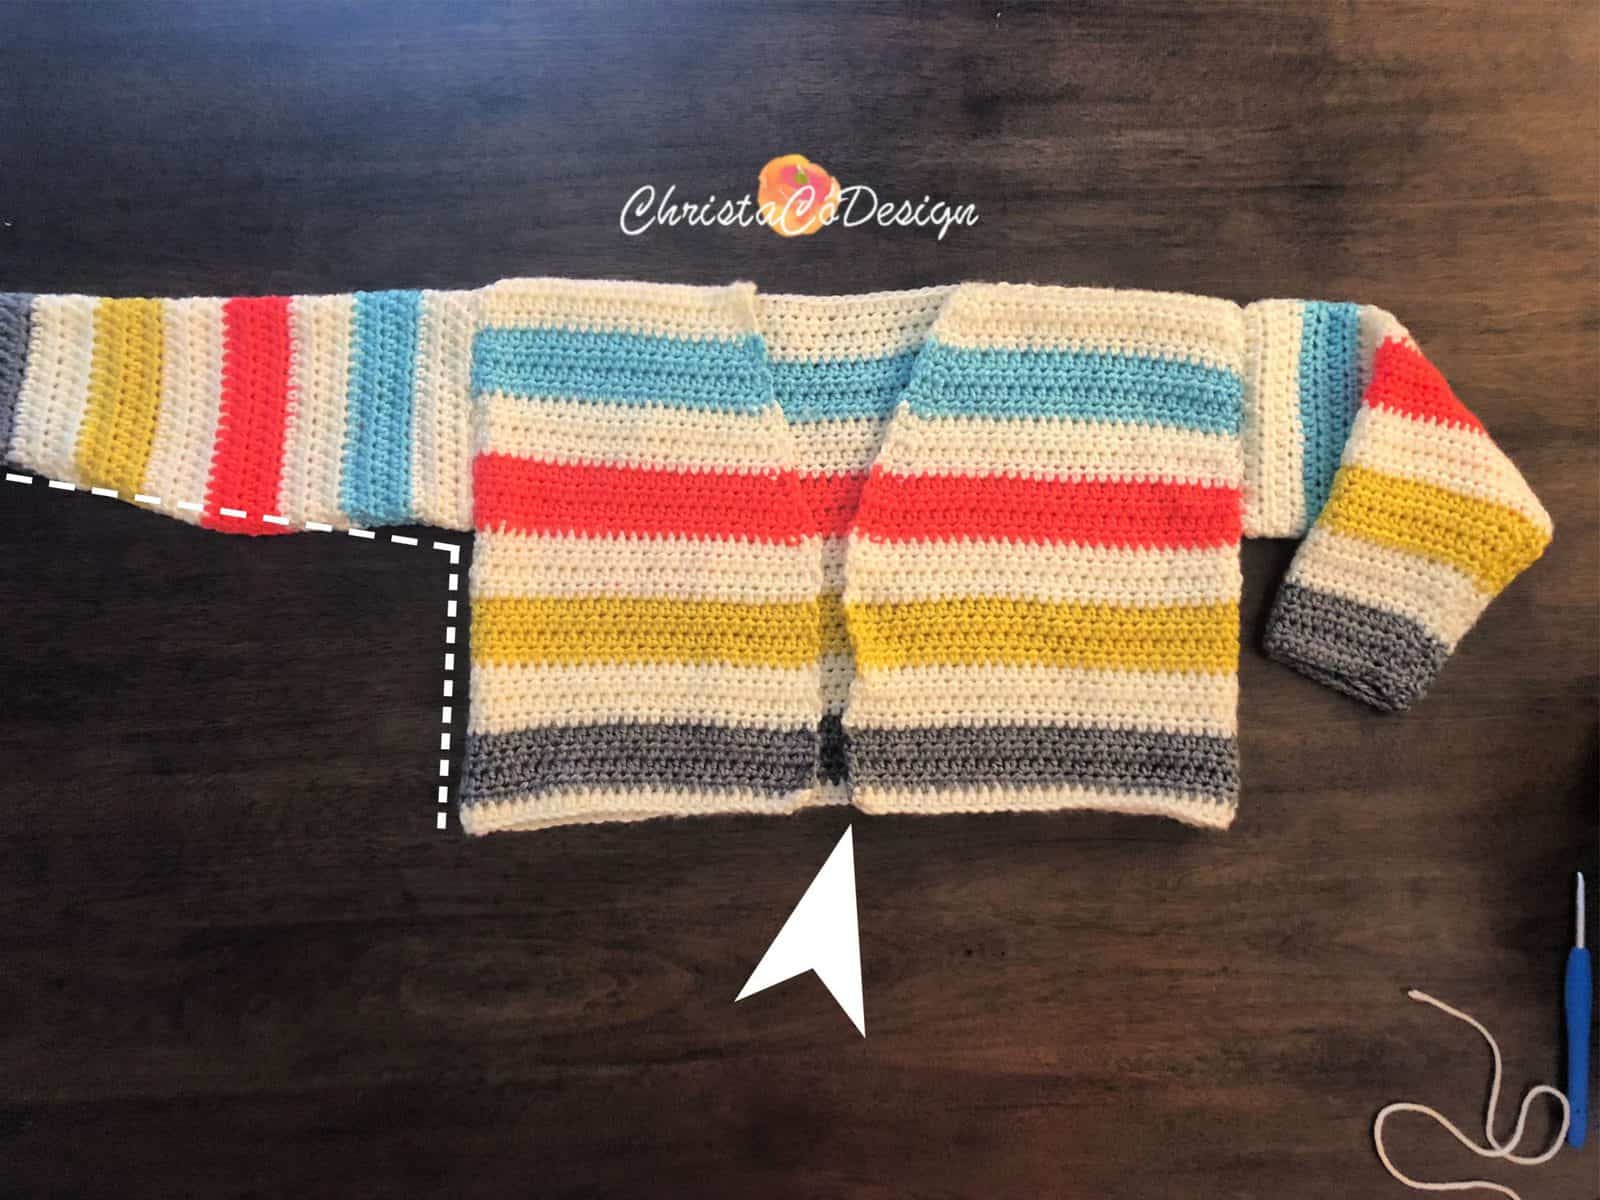
Ribbing
Check out the tutorial (with video) here for how to add ribbing.
First you will add ribbing to the bottom hem of the sweater.
Attach yarn in Color A to the bottom lapel corner (right where the arrow is pointing in the above picture).
The edging is easy to customize, just chain to the length you want. For the white cardigan I added 2 3/4” of bottom ribbing, for the brown I only added 2″. See the tutorial below for details. Note the tutorial ribbing pictured is shorter.
*You may consider using a smaller hook, as I did for the brown cardigan.
For 2″ (2 3/4”) ribbing:
1. Chain 10 (14). (or to desired length)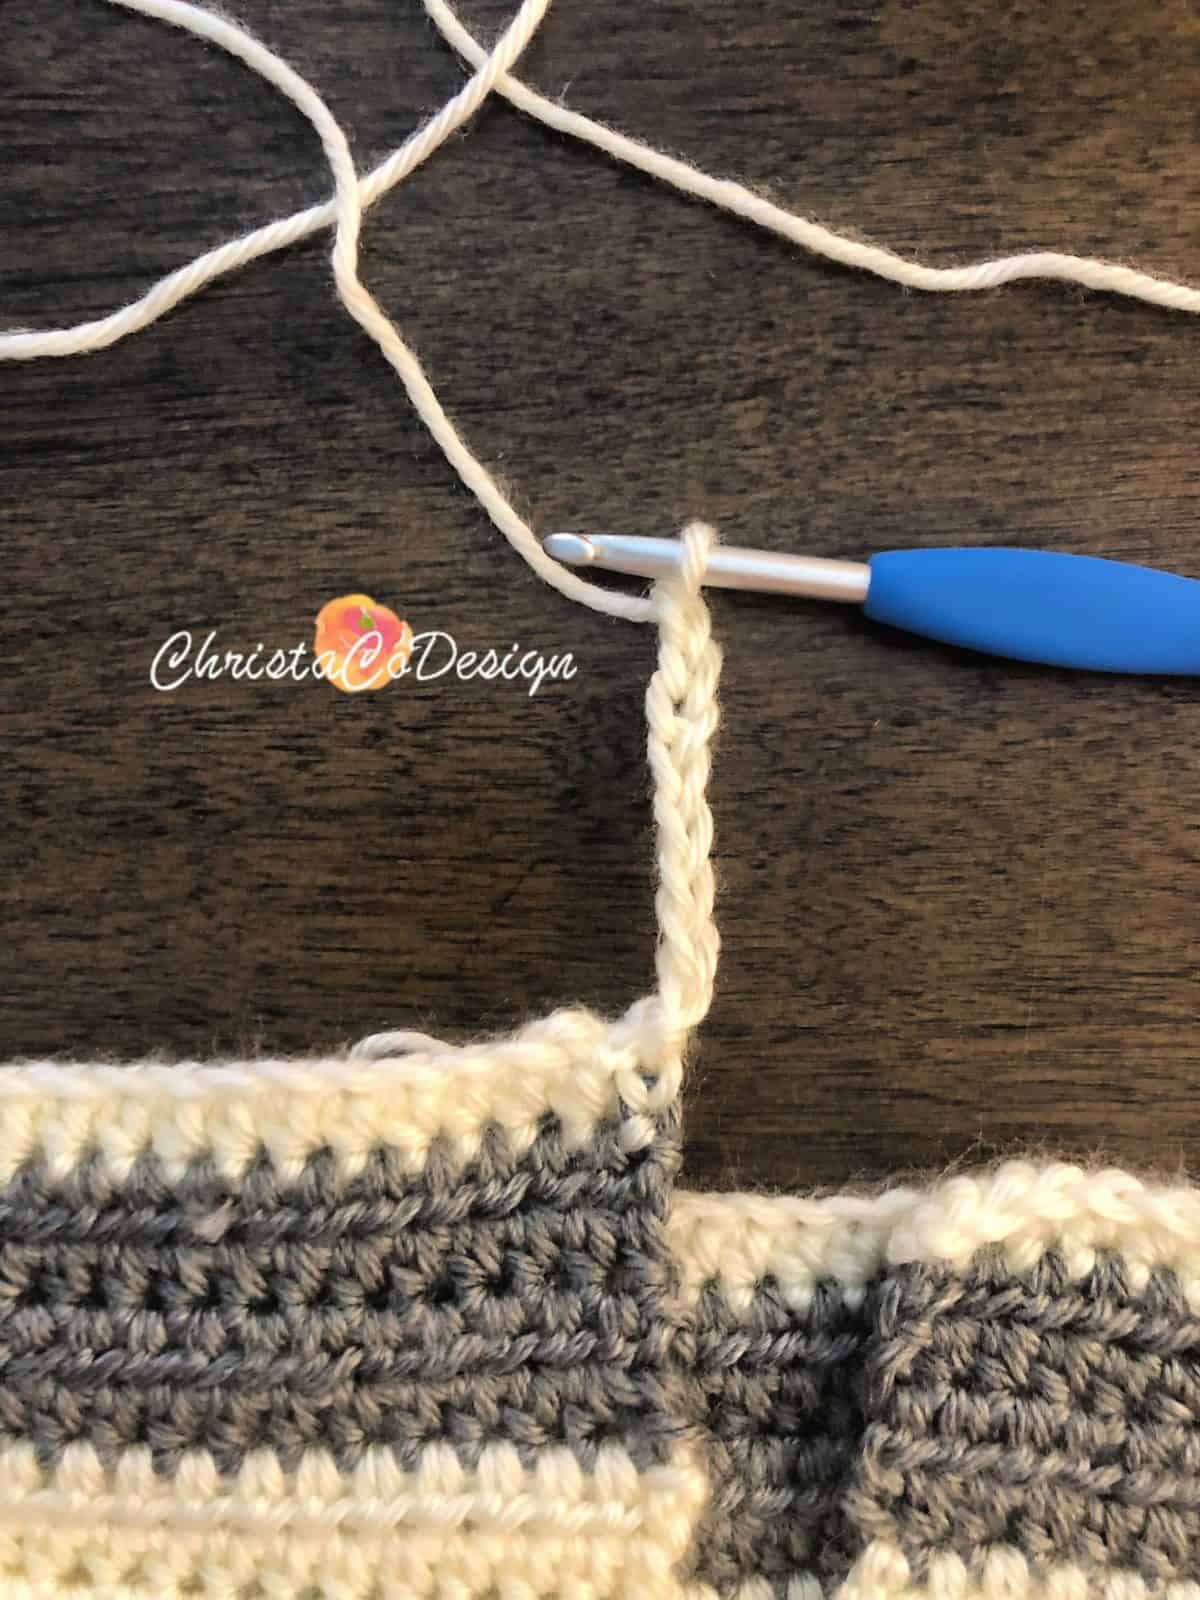
2. Hdc in the 3rd ch from your hook 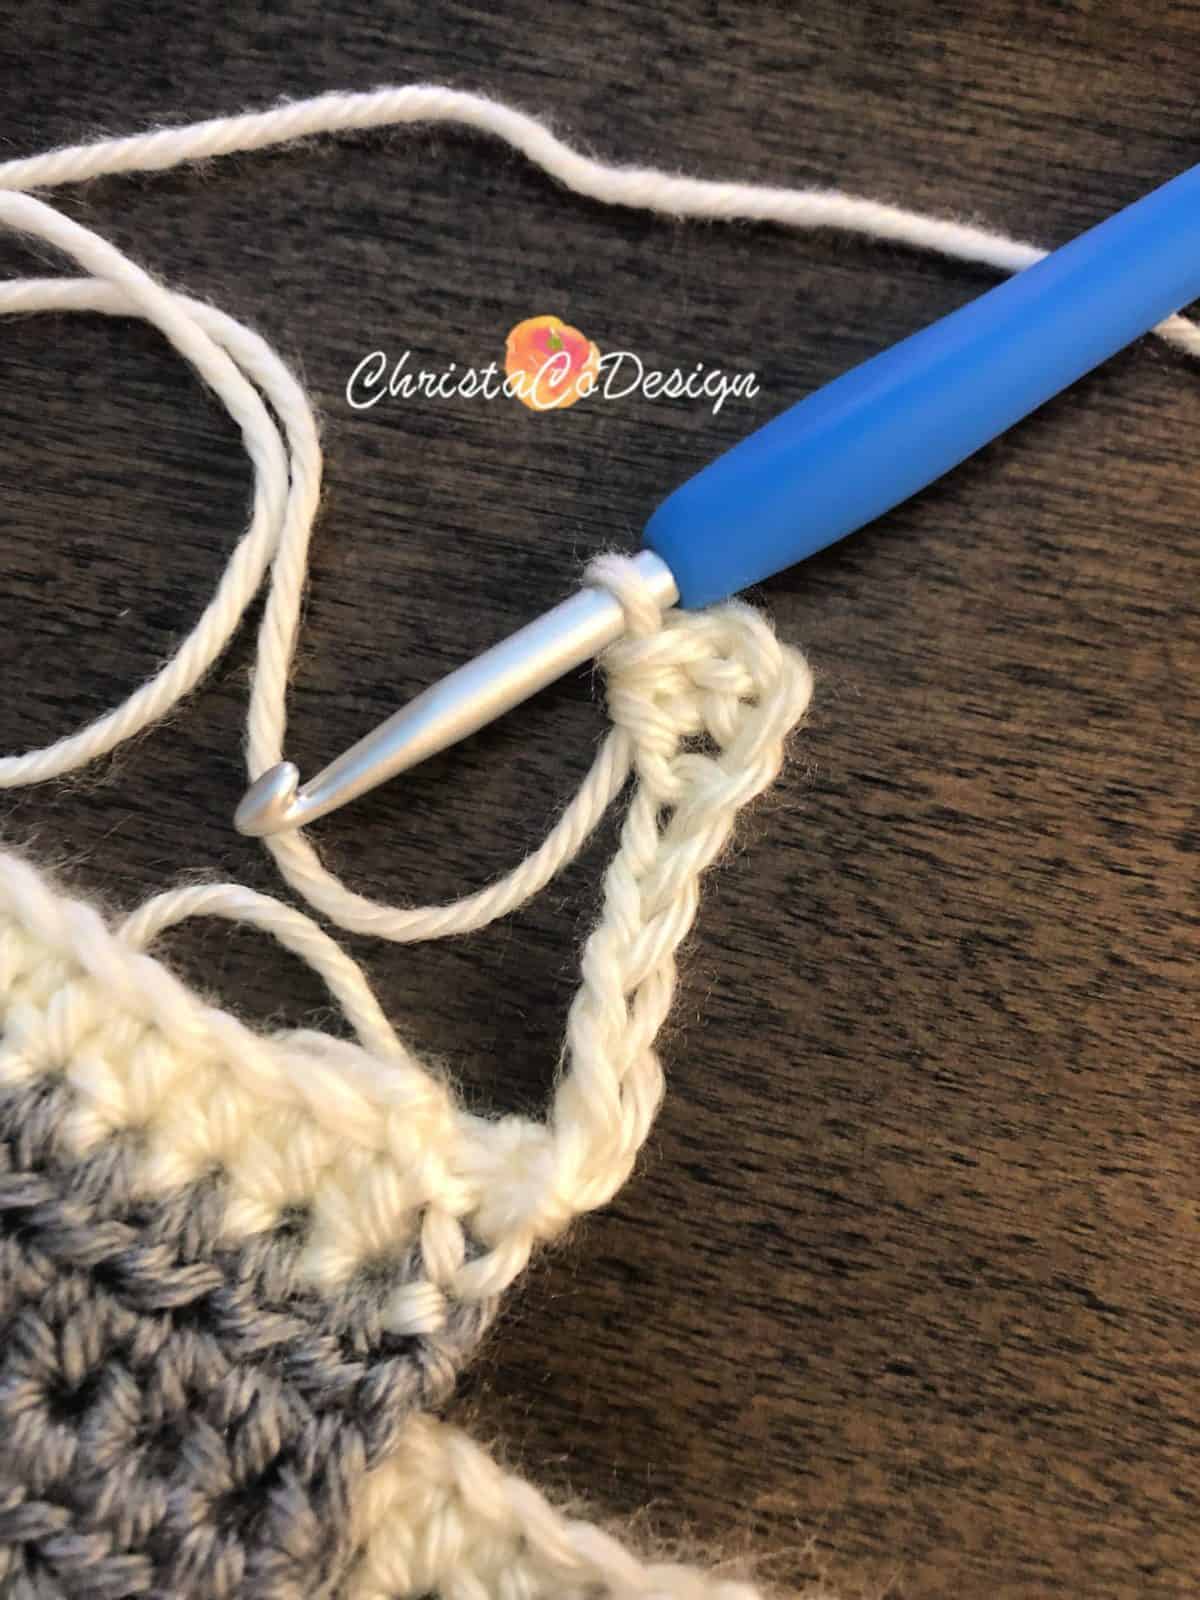 and in each ch across.
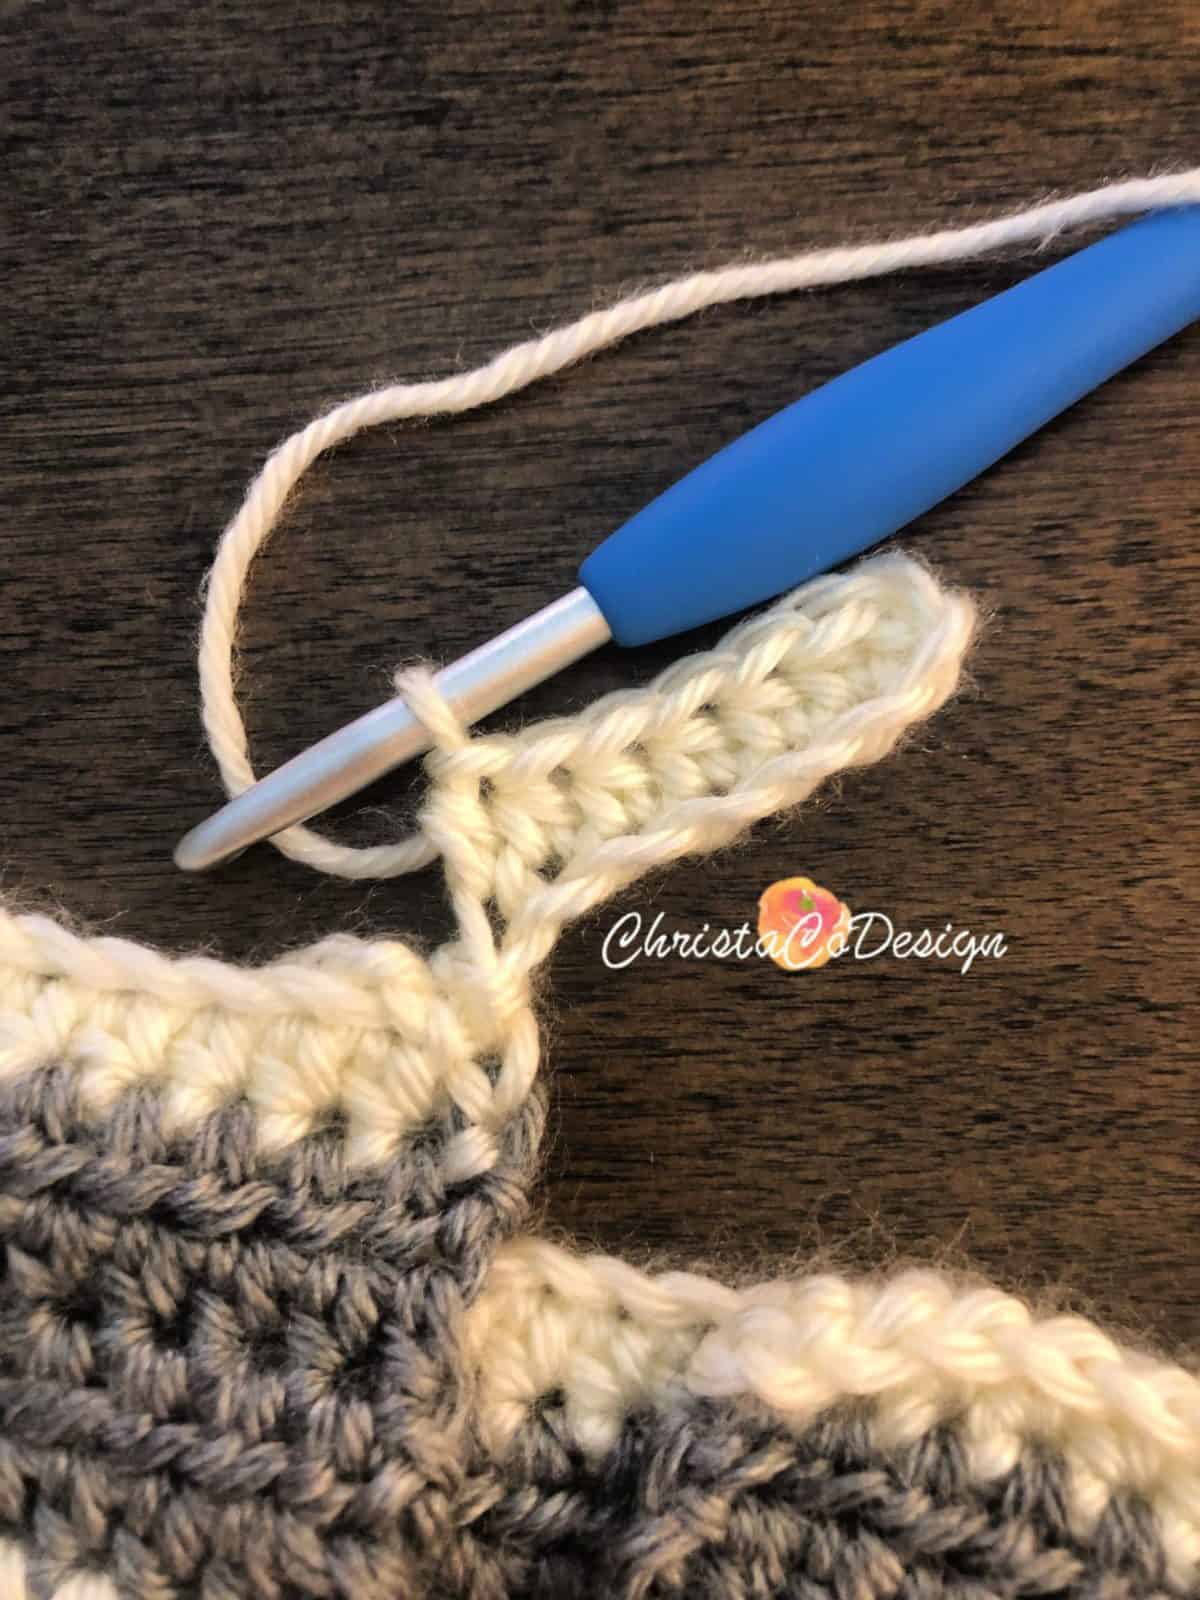 Now you’ve arrived back at the cardigan body, in the next steps you will join the row you just crocheted to the stitches right where you are.
3. To join the row to the cardigan, sc2tog through the row you’ve arrived at and the next row. To do so, insert your hook into the st you are at on the cardigan body, yo and pull up a loop (2 loops on hook), insert your hook in the next st, yo and pull up a loop (3 loops on hook),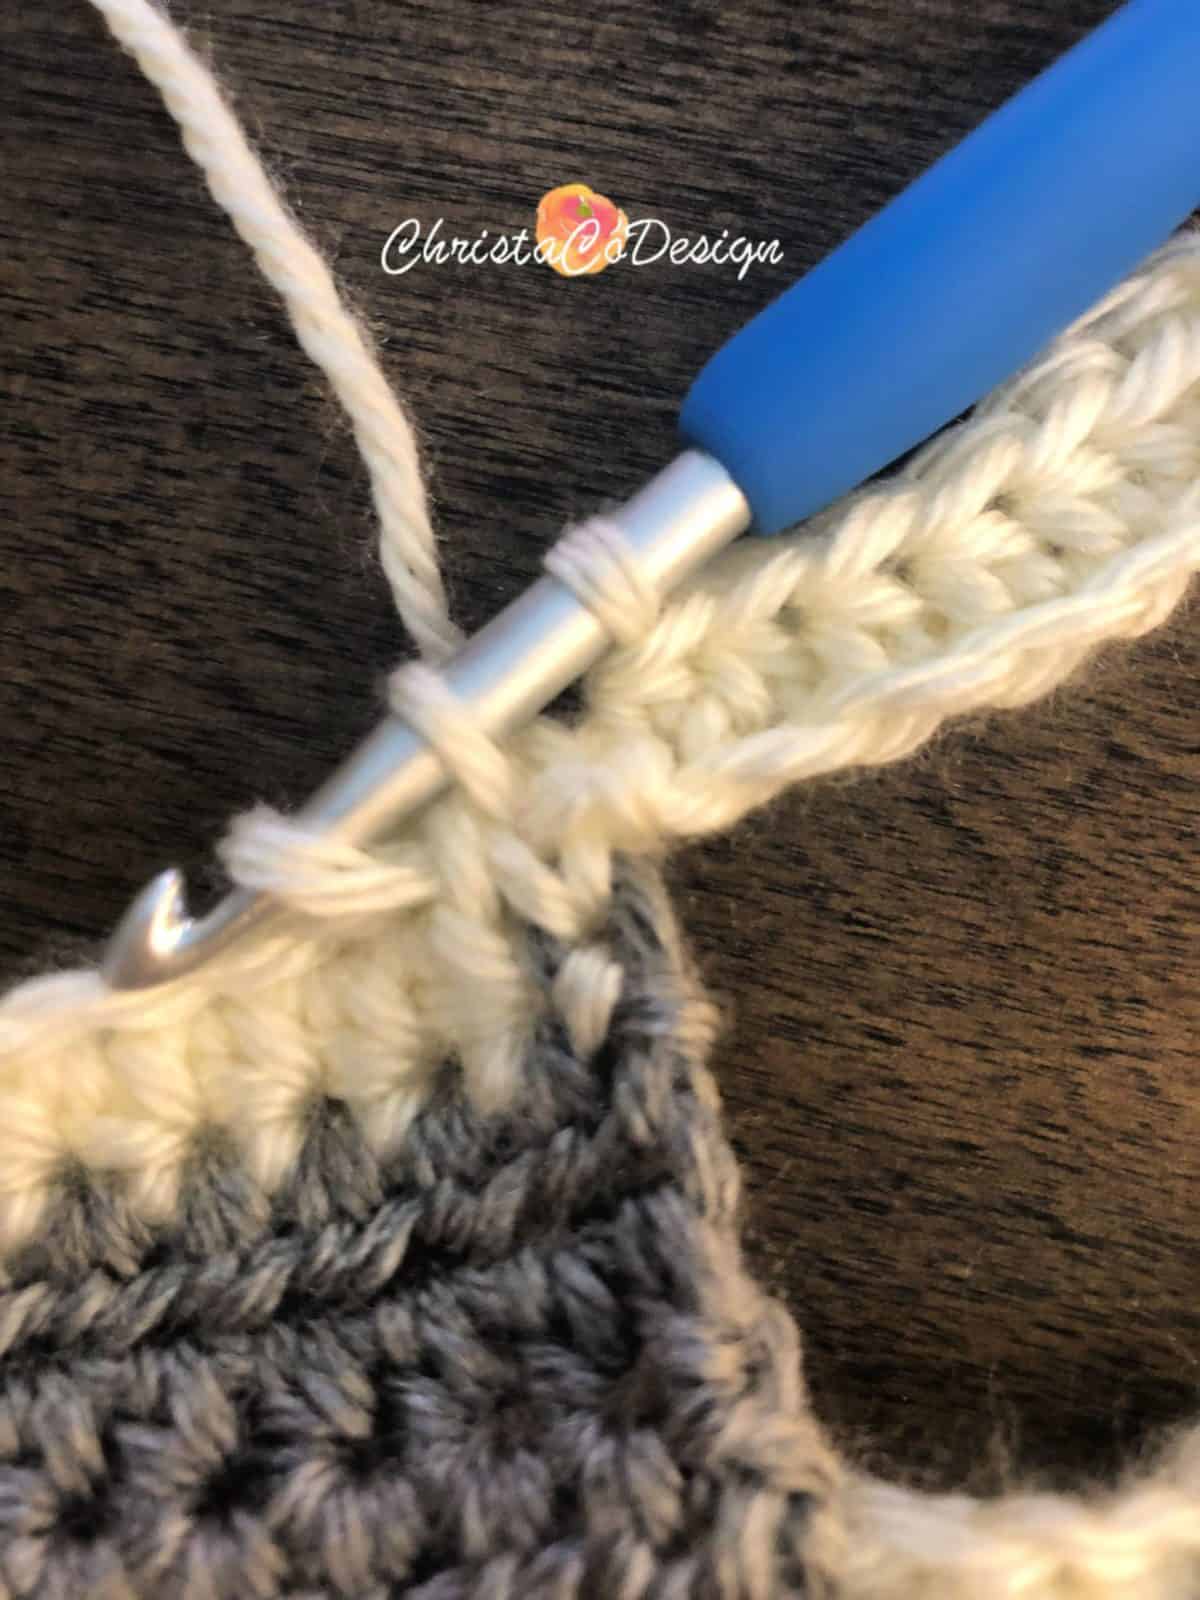 yo and pull through all 3 loops on your hook.
 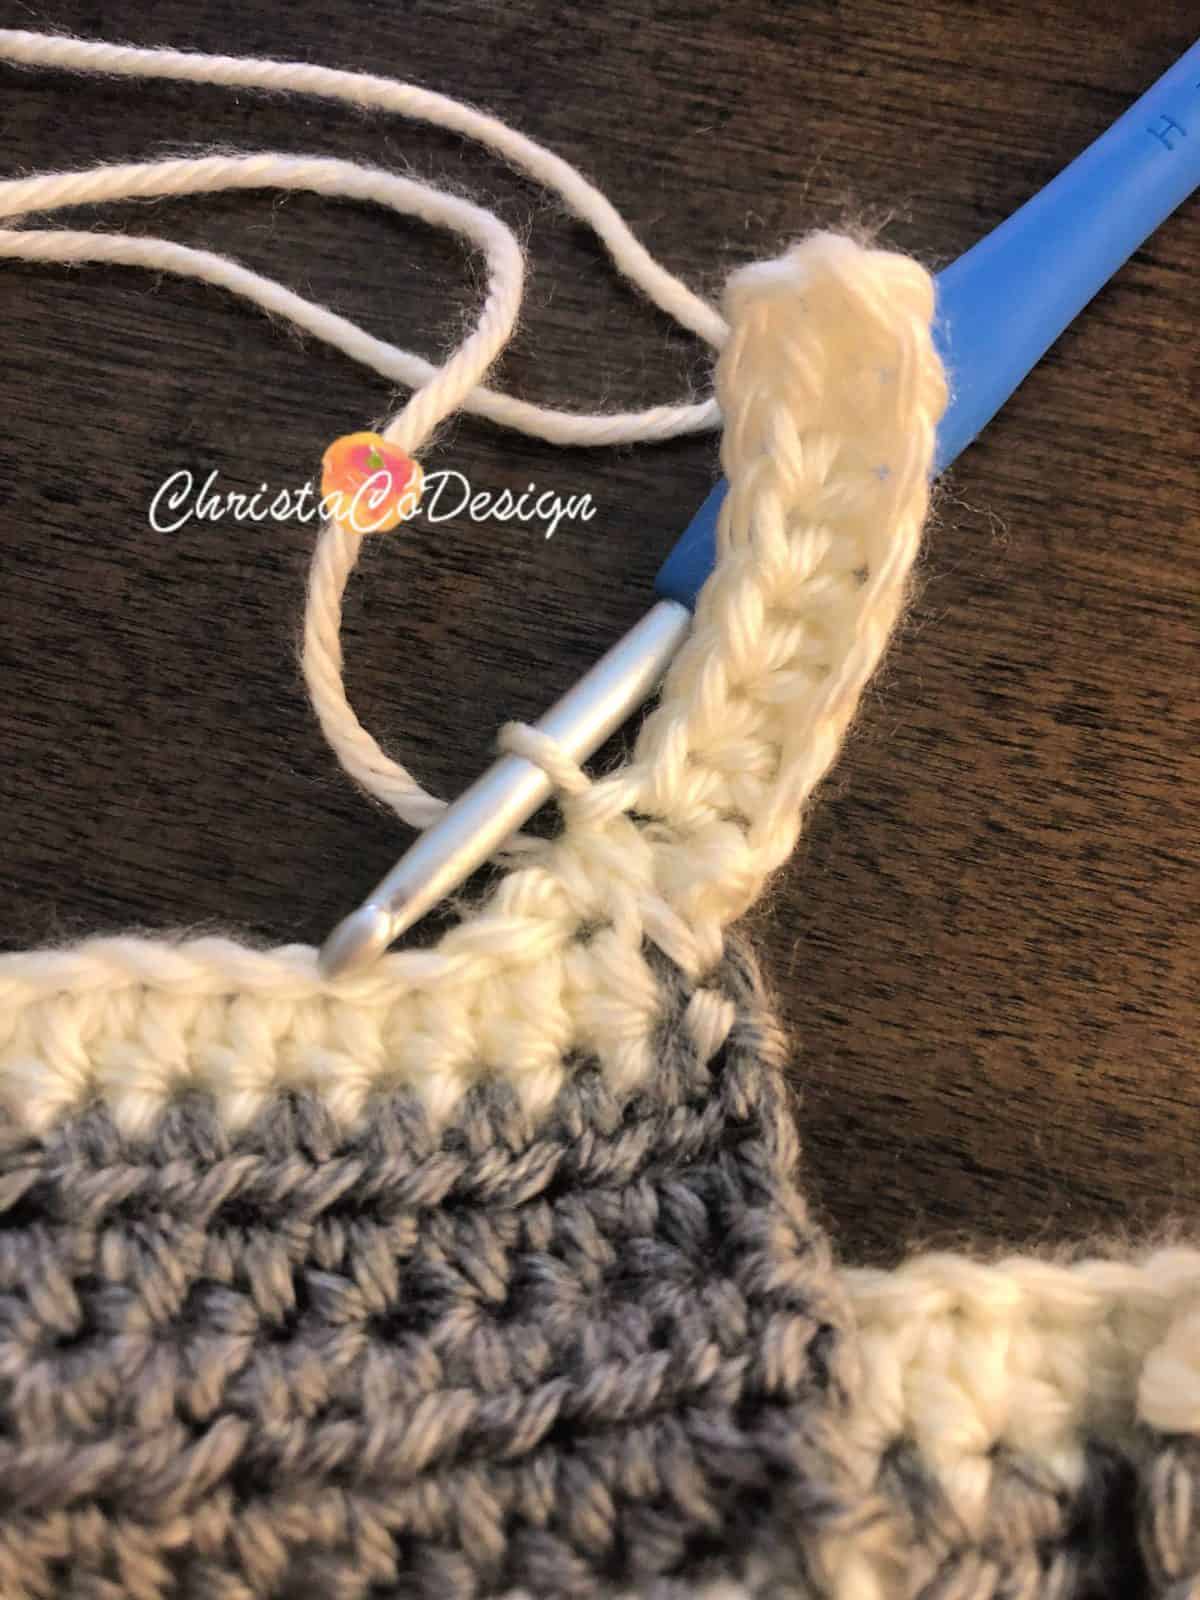 Turn.
Turn.
4. Ch 2 (does not count as a st), 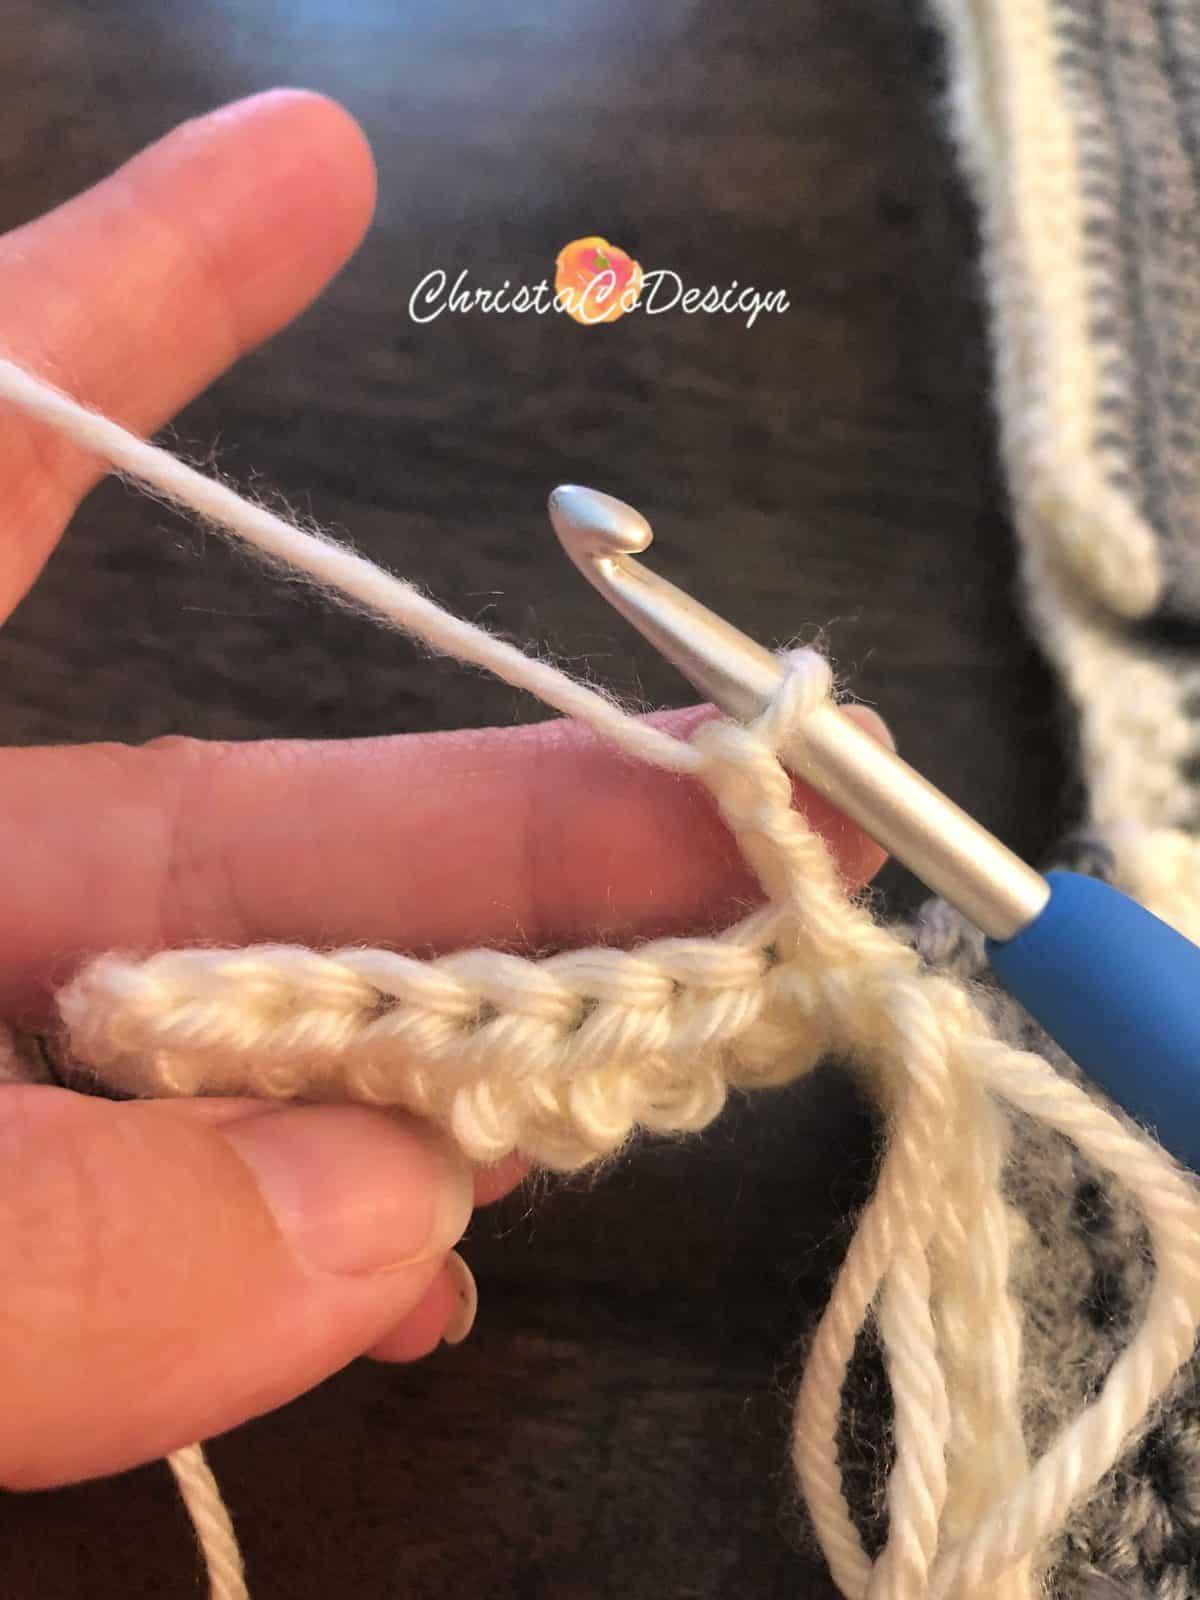 hdc in same st, blo hdc in each st
 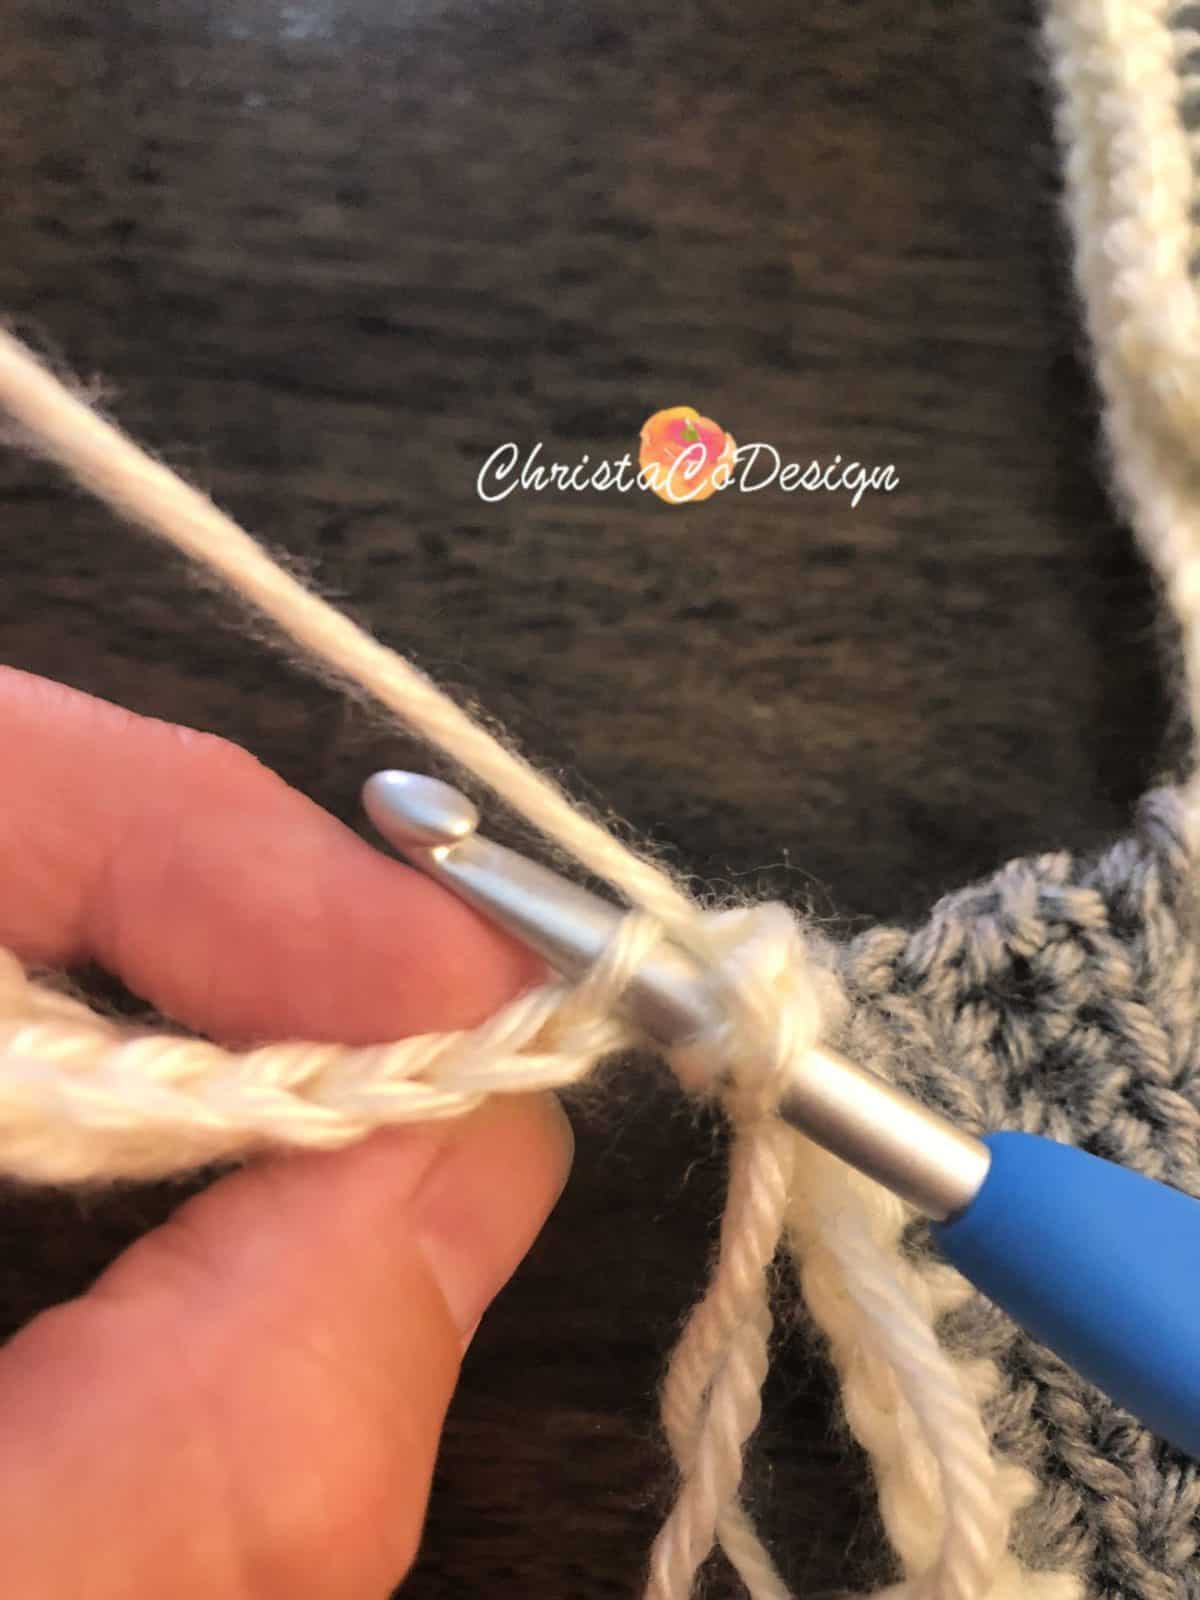 across the row, turn.
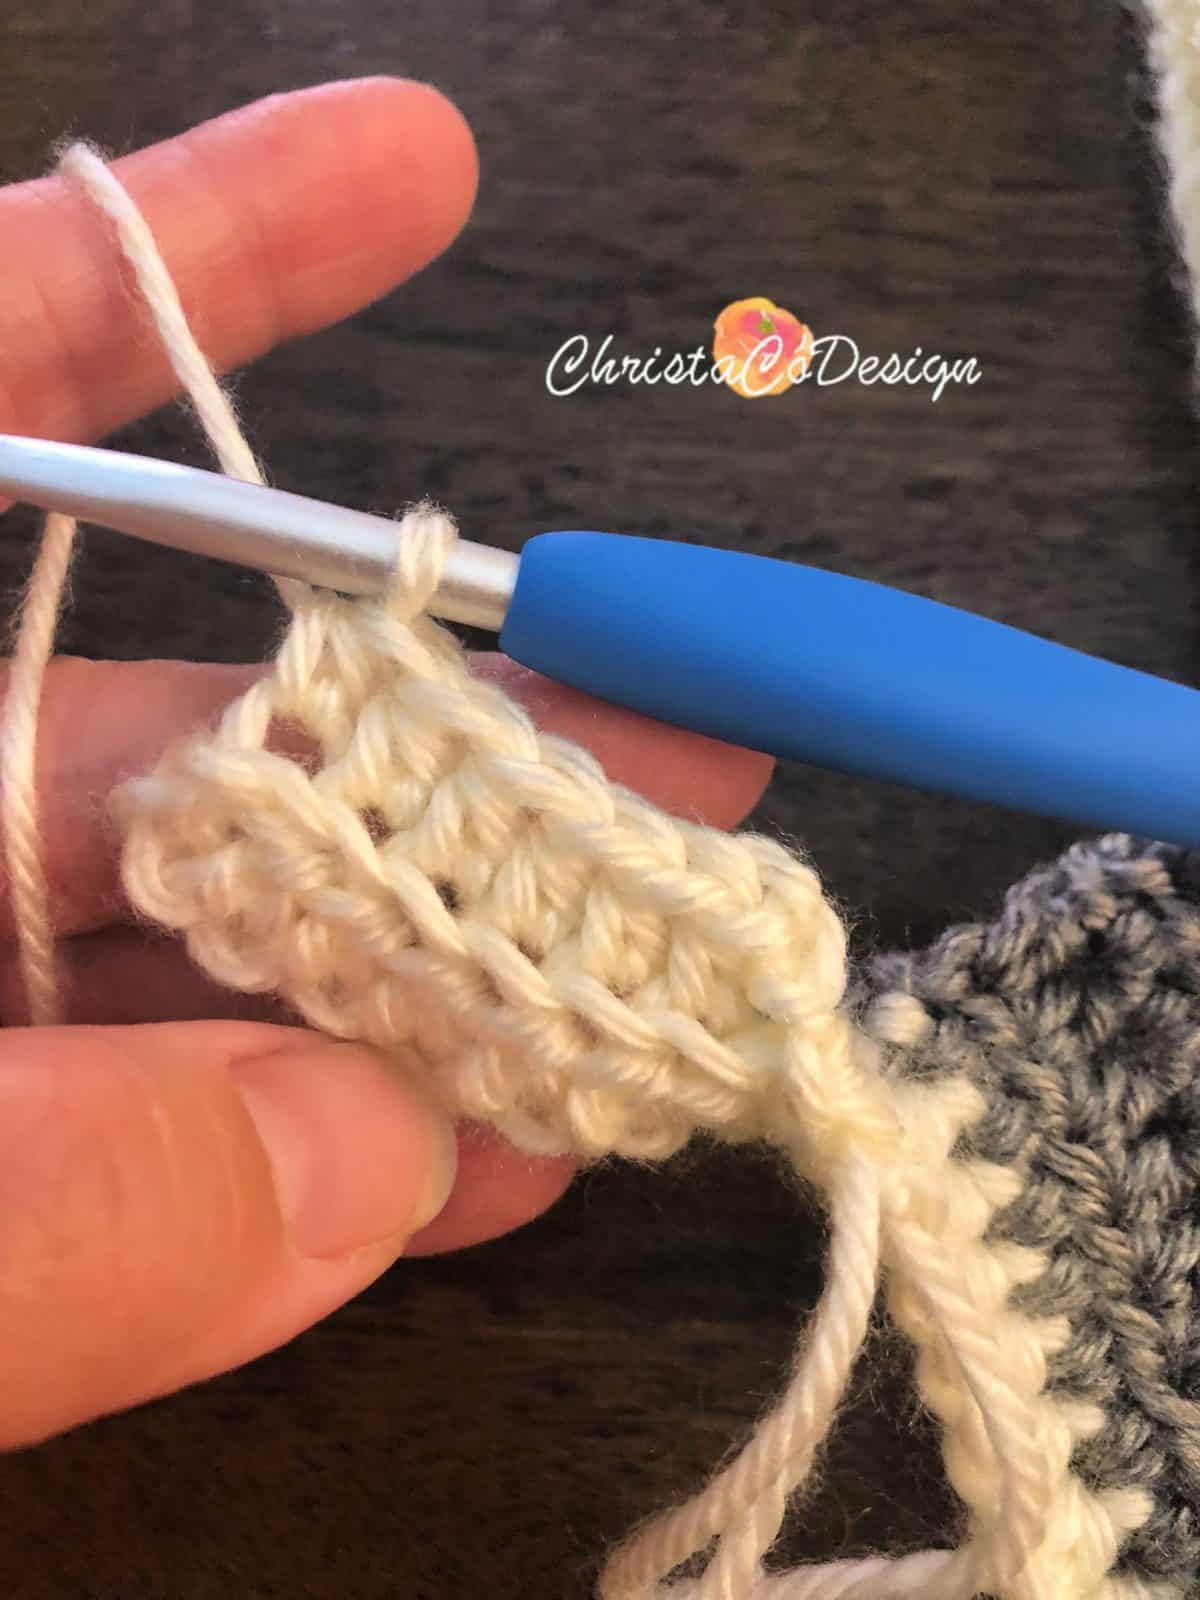
5. Ch 2, hdc in the same st, blo hdc in each st across, sc2tog to 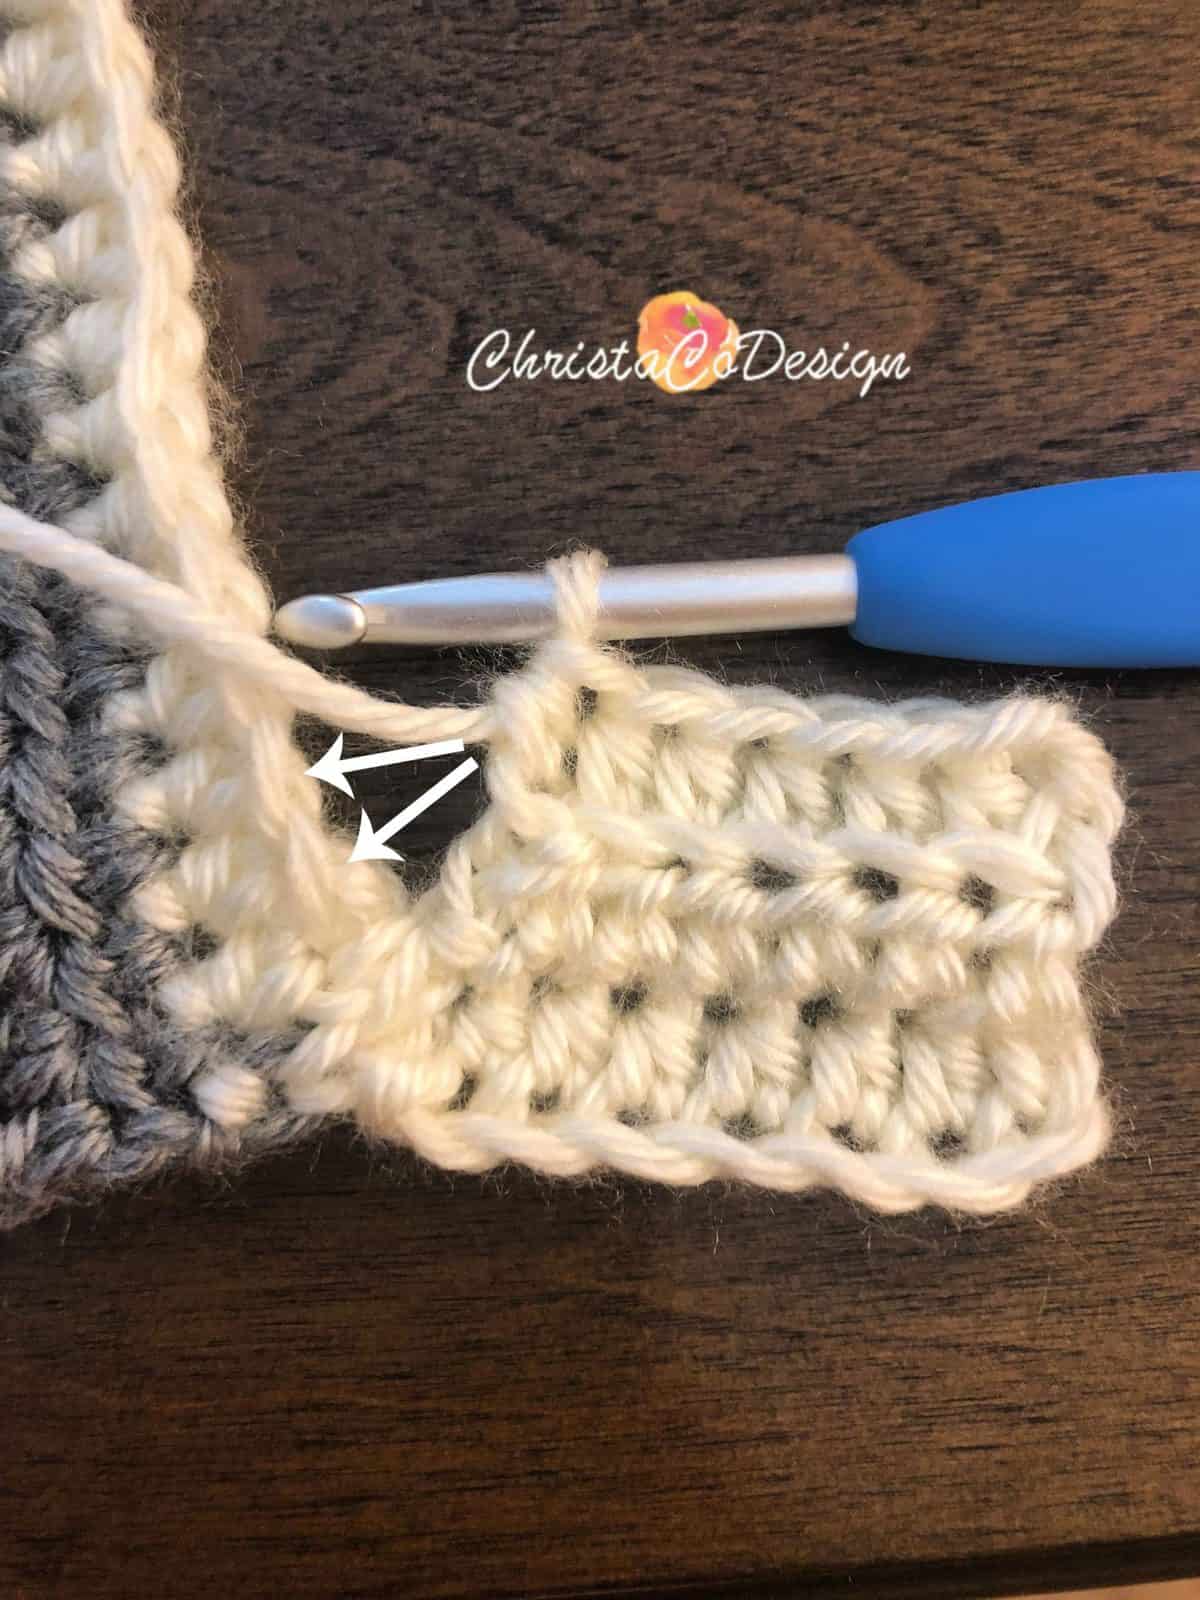 join ribbing to cardigan, turn.
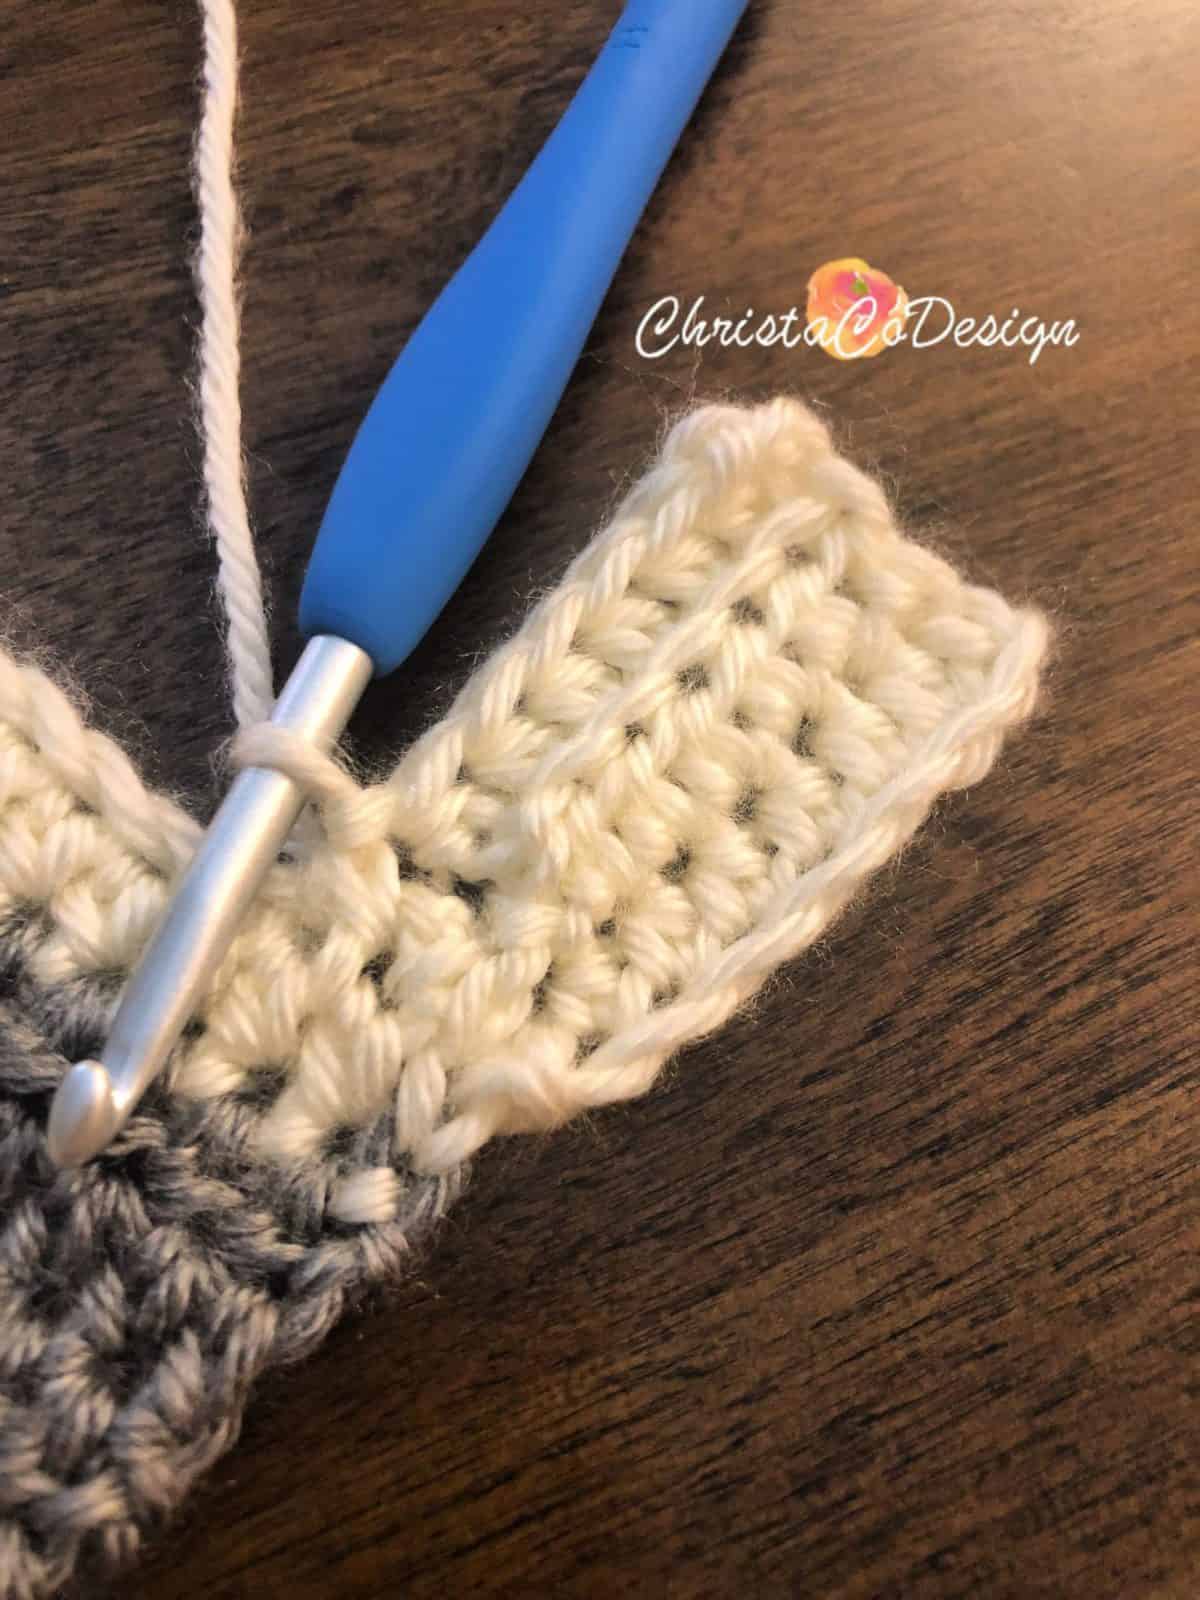
6. Ch 2, hdc in the same st, in blo hdc across, turn.
Continue to repeat steps 5 & 6 all the way around the cardigan hem.
Finish off.
Sleeve Ribbing
The sleeve ribbing is worked in the same way. After the last row meets back up to the first row, leave a long tail. Sew sleeve ribbing edges together and finish off.
For a 1 3/4” sleeve ribbing Ch 7 and follow the steps above. For smaller ribbing chain to the size desired.
Finishing
Before adding the lapel/collar edging decide if you want to add buttons and have them ready. Use a stitch marker to mark which rows you want your button holes. When you get to the middle row of your lapel edging, skip this stitch, chain to the number needed for your size button, leaving a hole for the button. Test your buttonhole before proceeding.
Lapel
To add the lapel/collar join yarn in Color A to bottom corner of ribbing on inside lapel (opposite corner from the hook in the picture below).
Row 1. Ch 2, hdc in the same and in each stitch up the lapel, around the neck and back down the opposite lapel, turn.
This is the buttonhole row if you’re adding buttons.
Row 2. Ch 2, hdc in the same, hdc in the 3rd loop on the backside (the one facing you now-see picture under “Stitches”) of each stitch around, turn.
Row 3. Ch 2, hdc in the same, hdc in the 3rd loop of each stitch (hdc in the buttonhole chain space if using buttons) to end.
Finish off.
Sew buttons on lapel, opposite of buttonholes.
Recommended Products
As an Amazon Associate and member of other affiliate programs, I earn from qualifying purchases.

Love this striped sweater…Have been looking for something suitable for my grandson – THIS IS IT!
THANK YOU!
I would love to make matching ones for my daughter and myself!
Oh that’s a great idea! I love that.
Love that it’s for boys, as I have one! Hard to find clothing patterns for them.
I agree-I have three so I always keep them in mind!
Have to try this one for my grandson. Thanks for a boy’s pattern:)
I love this sweater I want to make for my great grand son
Love it
Thank you, I’m glad you like it!