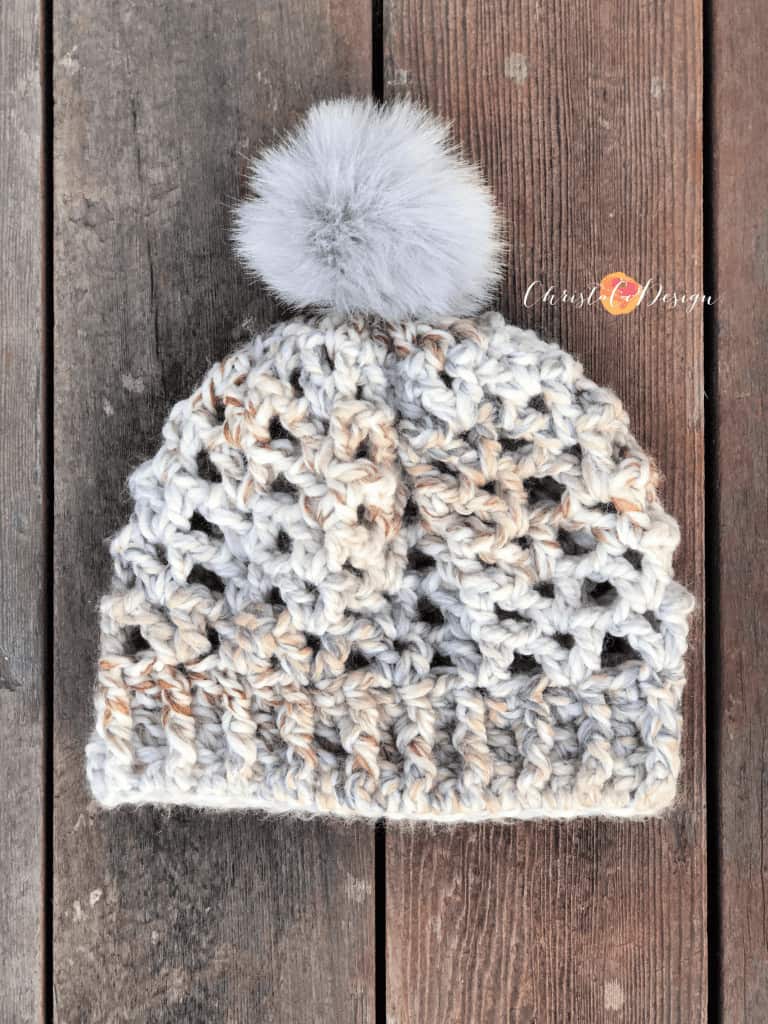
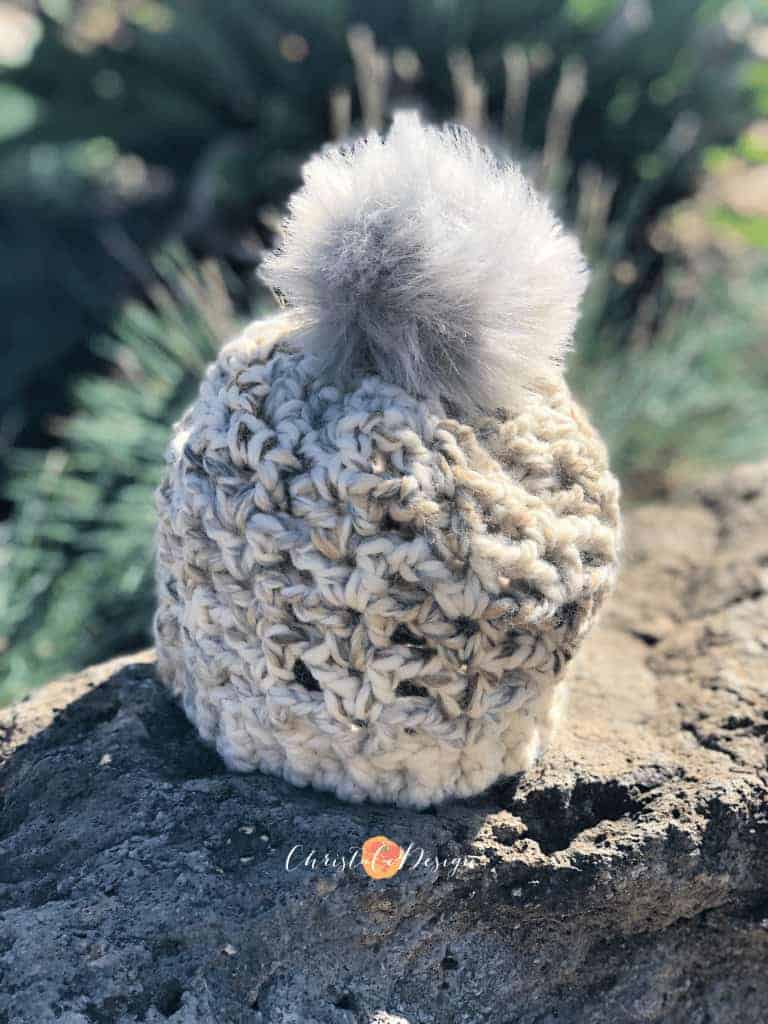
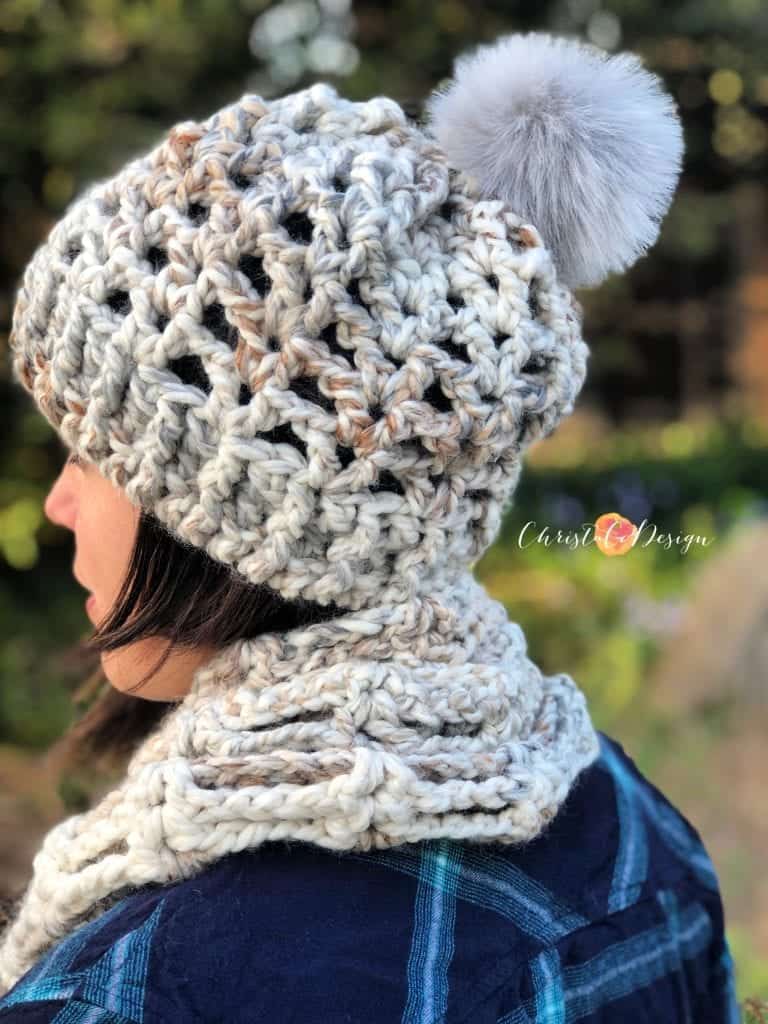
Veneto V-Stitch Crochet Hat Pattern
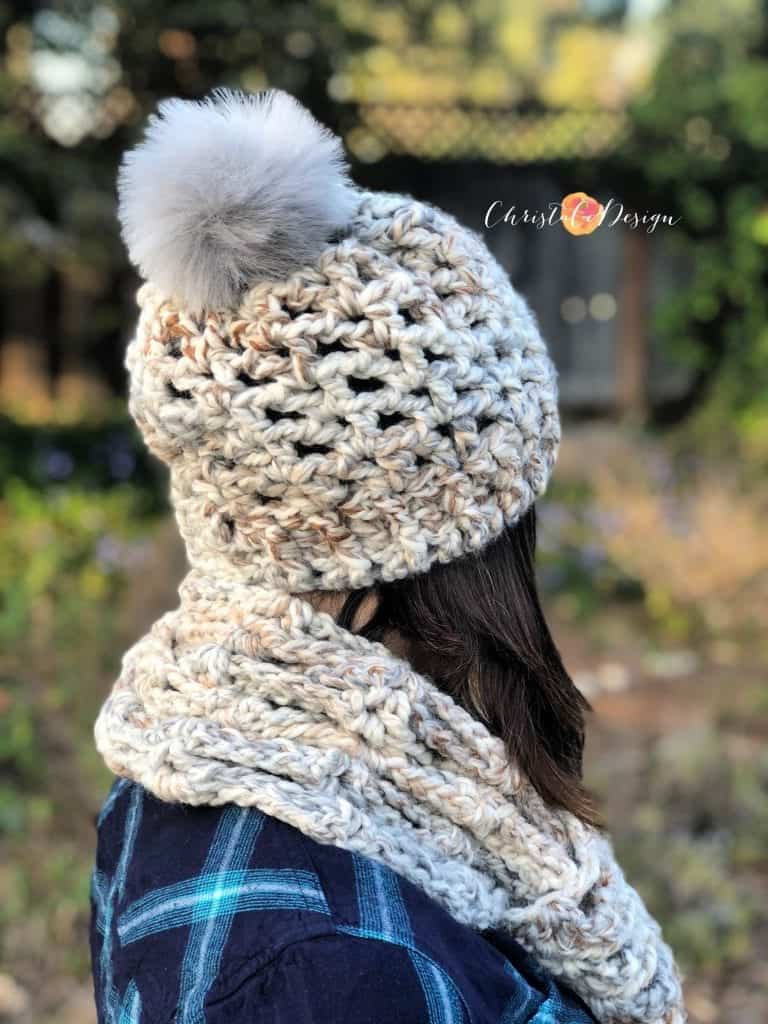
The Veneto Hat will keep you warm and looking stylish through the winter. Crocheted with the versatile v-stitch in bulky yarn this hat works up quickly, and showcases the yarn’s color.
To make them both, get the Veneto Scarf pattern also. This is my favorite crochet set. I adore this yarn. I kept a swatch of it in my purse waaaay past hat weather just so I could squish it.
This post contains affiliate links, I may earn a fee. Read more disclosure policy.
The colorways available in Lion Brand’s Wool Ease Thick & Quick are all so stunning. If you love a neutral they have gorgeous options, plus plenty of colors for those of us who love color!
I love working with squishy bulky yarn in the winter. Hats work up so quickly anyway, but put some chunky yarn on my hook and eccola a new winter perfect hat in record time.
This hat is worked bottom up and looks great finished off with a pom pom.
Materials:
170g/6oz (97m/106yd) of Lion Brand’s Wool Ease Thick & Quick*, in Fossil #6 superbulky yarn
scissors
measuring tape
Level:
Easy
Gauge:
4″x 4″= 10 dc x 4 rows
Stitches Used:
V-stitch: double crochet, chain 1, double crochet in same stitch
Front Post Double Crochet (FPDC): tutorial here
ss-slip stitch
ch-chain
st-stitch
Pattern Notes:
- This hat is worked from the bottom up. First you’ll work the brim in rows and sew it together to form the band. Then you’ll join your yarn to the top of the brim and crochet the rest of the hat in rounds. To join the rounds you will slip stitch (ss) the last stitch of the round to the first stitch.
- The pattern multiple is 3 + 2 for the foundation chain. I’ve provided all sizes here, but you may want to adjust for a custom fit, as every head varies 🙂
- The individual ‘V’ stitches measure 1″ tall and the ‘V’ stitch + ch 1 measure 1.5″ wide.
- If you’d like a little more stretch to your brim or find the starting row a bit tight, you might try starting with a foundation dc row in the same number of stitches as Row 1, instead of a starting with a chain.
Purchase a well formatted, ad-free pdf of the Veneto Hat on Etsy or Ravelry.

Download the Hat Sizing Chart
Get this handy dandy chart so you can crochet perfectly fitting hats!
Pattern:
Preemie
(Head Circumference 12-13.5″)
Brim:
Ch 35, dc in the 4th ch from your hook (2 dcs formed), dc in each ch across, turn. (33)=13.2″ long
Ch 3 (counts as a dc), *{fpdc in the next st, dcin the next st} repeat from * (33) Leave a long tail for sewing the ends together.
Match the short ends of your rectangle together, with the right sides (fpdc side) touching. Thread your yarn needle with the long tail you left. Use a mattress stitch to sew together, forming the circular band. It may help to mark your first and last stitch before the seam you sewed with stitch markers. Now you’ll be working the hat.
Attach your yarn with a ss to the top of the band. I like to start on the first stitch after the seam.
- Ch 4 (counts as a dc + ch 1) and dc in the same st (first v-st made), ch 1, skip 2 sts, *{v-st in the next st, ch 1, skp 2} repeat from * around, ss to the ch space of the first v-st of the round. (11 v-sts)
- Ch 4, dc in the ch space of the same v-st (first v-st made), ch 1, *{v-st into the next v-st} repeat from* ss to the ch space of the first v-st to join. (11 v-sts)
- Repeat round 2.
- Ch 4, dc in the ch space of the same v-st (first v-st made), *{v-st in next v-st} repeat from * around, ss to the ch space of the first v-st to join. (11 vsts)
- Ch 3 (counts as a dc), dc in each v-st around, ss to top of ch 3 to join. (11 dc)
Leave a long tail and use a running stitch to sew the hole closed.
Sew on a pom pom if you want and finish off.
Hat:
Newborn-3mos
(Head Circumference 13.5-14.5)
Brim:
- Ch 38, dc in the 4th ch from your hook (2 dcs formed), dc in each ch across, turn. (36) =14.4″ long
- Ch 3 (counts as a dc), fpdc in the next st, *{dcin the next st, fpdc in the next st} repeat from * (36) Leave a long tail for sewing the ends together.
Match the short ends of your rectangle together, with the right sides (fpdc side) touching. Thread your yarn needle with the long tail you left. Use a mattress stitch to sew together, forming the circular band. It may help to mark your first and last stitch before the seam you sewed with stitch markers. Now you’ll be working the hat.
Hat:
Attach your yarn with a ss to the top of the band. I like to start on the first stitch after the seam.
- Ch 4 (counts as a dc + ch 1) and dc in the same st (first v-st made), ch 1, skip 2 sts, *{v-st in the next st, ch 1, skp 2} repeat from * around, ss to the ch space of the first v-st of the round. (12 v-sts)
- Ch 4, dc in the ch space of the same v-st (first v-st made), ch 1, *{v-st into the next v-st} repeat from* ss to the ch space of the first v-st to join. (12 v-sts)
3-4. Repeat round 2.
- Ch 4, dc in the ch space of the same v-st (first v-st made), *{v-st in next v-st} repeat from * around, ss to the ch space of the first v-st to join. (12 vsts)
- Ch 3 (counts as a dc), dc in each v-st around, ss to top of ch 3 to join. (12 dc)
Leave a long tail and use a running stitch to sew the hole closed. Sew on a pom pom if you want and finish off.
Baby 6-12 mos
Brim:
- Ch 41, dc in the 4th ch from your hook (2 dcs formed), dc in each ch across, turn. (39) 15.6″ lomg
- Ch 3 (counts as a dc), *{fpdc in the next st, dcin the next st} repeat from * repeat from * (39) Leave a long tail for sewing the ends together.
Match the short ends of your rectangle together, with the right sides (fpdc side) touching. Thread your yarn needle with the long tail you left. Use a mattress stitch to sew together, forming the circular band. It may help to mark your first and last stitch before the seam you sewed with stitch markers. Now you’ll be working the hat.
Hat:
Attach your yarn with a ss to the top of the band. I like to start on the first stitch after the seam.
- Ch 4 (counts as a dc + ch 1) and dc in the same st (first v-st made), ch 1, skip 2 sts, *{v-st in the next st, ch 1, skp 2} repeat from * around, ss to the ch space of the first v-st of the round. (13 v-sts)
- Ch 4, dc in the ch space of the same v-st (first v-st made), ch 1, *{v-st into the next v-st} repeat from* ss to the ch space of the first v-st to join. (13 v-sts)
3-5. Repeat round 2.
- Ch 4, dc in the ch space of the same v-st (first v-st made), *{v-st in next v-st} repeat from * around, ss to the ch space of the first v-st to join. (13 vsts)
- Ch 3 (counts as a dc), dc in each v-st around, ss to top of ch 3 to join. (13 dc)
Leave a long tail and use a running stitch to sew the hole closed. Sew on a pom pom if you want and finish off.
Toddler 12-24mos
Brim:
- Ch 44, dc in the 4th ch from your hook (2 dcs formed), dc in each ch across, turn. (42) 16.8″ long
- Ch 3 (counts as a dc), fpdc in the next st, *{dcin the next st, fpdc in the next st} repeat from * (42) Leave a long tail for sewing the ends together.
Match the short ends of your rectangle together, with the right sides (fpdc side) touching. Thread your yarn needle with the long tail you left. Use a mattress stitch to sew together, forming the circular band. It may help to mark your first and last stitch before the seam you sewed with stitch markers. Now you’ll be working the hat.
Hat:
Attach your yarn with a ss to the top of the band. I like to start on the first stitch after the seam.
- Ch 4 (counts as a dc + ch 1) and dc in the same st (first v-st made), ch 1, skip 2 sts, *{v-st in the next st, ch 1, skp 2} repeat from * around, ss to the ch space of the first v-st of the round. (14 v-sts)
- Ch 4, dc in the ch space of the same v-st (first v-st made), ch 1, *{v-st into the next v-st} repeat from* ss to the ch space of the first v-st to join. (14 v-sts)
3-5. Repeat round 2.
- Ch 4, dc in the ch space of the same v-st (first v-st made), *{v-st in next v-st} repeat from * around, ss to the ch space of the first v-st to join. (14 vsts)
- Ch 3 (counts as a dc), dc in each v-st around, ss to top of ch 3 to join. (14 dc)
Leave a long tail and use a running stitch to sew the hole closed. Sew on a pom pom if you want and finish off.
Preschool 2-5yrs
Brim:
- Ch 44, dc in the 4th ch from your hook (2 dcs formed), dc in each ch across, turn. (42) 16.8″ long
- Ch 3 (counts as a dc), fpdc in the next st, *{dcin the next st, fpdc in the next st} repeat from * (42) Leave a long tail for sewing the ends together.
Match the short ends of your rectangle together, with the right sides (fpdc side) touching. Thread your yarn needle with the long tail you left. Use a mattress stitch to sew together, forming the circular band. It may help to mark your first and last stitch before the seam you sewed with stitch markers. Now you’ll be working the hat.
Hat:
Attach your yarn with a ss to the top of the band. I like to start on the first stitch after the seam.
- Ch 4 (counts as a dc + ch 1) and dc in the same st (first v-st made), ch 1, skip 2 sts, *{v-st in the next st, ch 1, skp 2} repeat from * around, ss to the ch space of the first v-st of the round. (14 v-sts)
- Ch 4, dc in the ch space of the same v-st (first v-st made), ch 1, *{v-st into the next v-st} repeat from* ss to the ch space of the first v-st to join. (14 v-sts)
3-6. Repeat round 2.
- Ch 4, dc in the ch space of the same v-st (first v-st made), *{v-st in next v-st} repeat from * around, ss to the ch space of the first v-st to join. (14 vsts)
- Ch 3 (counts as a dc), dc in each v-st around, ss to top of ch 3 to join. (14 dc)
Leave a long tail and use a running stitch to sew the hole closed. Sew on a pom pom if you want and finish off.
Child
Brim:
- Ch 47, dc in the 4th ch from your hook (2 dcs formed), dc in each ch across, turn. (45) 18″
- Ch 3 (counts as a dc), *{fpdc in the next st, dcin the next st} repeat from * repeat from * (45) Leave a long tail for sewing the ends together.
Match the short ends of your rectangle together, with the right sides (fpdc side) touching. Thread your yarn needle with the long tail you left. Use a mattress stitch to sew together, forming the circular band. It may help to mark your first and last stitch before the seam you sewed with stitch markers. Now you’ll be working the hat.
Hat:
Attach your yarn with a ss to the top of the band. I like to start on the first stitch after the seam.
- Ch 4 (counts as a dc + ch 1) and dc in the same st (first v-st made), ch 1, skip 2 sts, *{v-st in the next st, ch 1, skp 2} repeat from * around, ss to the ch space of the first v-st of the round. (15 v-sts)
- Ch 4, dc in the ch space of the same v-st (first v-st made), ch 1, *{v-st into the next v-st} repeat from* ss to the ch space of the first v-st to join. (15 v-sts)
3-6. Repeat round 2.
- Ch 4, dc in the ch space of the same v-st (first v-st made), *{v-st in next v-st} repeat from * around, ss to the ch space of the first v-st to join. (15 vsts)
- Ch 3 (counts as a dc), dc in each v-st around, ss to top of ch 3 to join. (15 dc)
Leave a long tail and use a running stitch to sew the hole closed. Sew on a pom pom if you want and finish off.
Teen
Brim:
- Ch 50, dc in the 4th ch from your hook (2 dcs formed), dc in each ch across, turn. (48) 19.2″
- Ch 3 (counts as a dc), fpdc in the next st, *{dcin the next st, fpdc in the next st} repeat from * (48) Leave a long tail for sewing the ends together.
Match the short ends of your rectangle together, with the right sides (fpdc side) touching. Thread your yarn needle with the long tail you left. Use a mattress stitch to sew together, forming the circular band. It may help to mark your first and last stitch before the seam you sewed with stitch markers. Now you’ll be working the hat.
Hat:
Attach your yarn with a ss to the top of the band. I like to start on the first stitch after the seam.
- Ch 4 (counts as a dc + ch 1) and dc in the same st (first v-st made), ch 1, skip 2 sts, *{v-st in the next st, ch 1, skp 2} repeat from * around, ss to the ch space of the first v-st of the round. (16 v-sts)
- Ch 4, dc in the ch space of the same v-st (first v-st made), ch 1, *{v-st into the next v-st} repeat from* ss to the ch space of the first v-st to join. (16 v-sts)
3-6. Repeat round 2.
- Ch 4, dc in the ch space of the same v-st (first v-st made), *{v-st in next v-st} repeat from * around, ss to the ch space of the first v-st to join. (16 vsts)
- Ch 3 (counts as a dc), dc in each v-st around, ss to top of ch 3 to join. (16 dc)
Leave a long tail and use a running stitch to sew the hole closed. Sew on a pom pom if you want and finish off.
Teen/Sm Adult
Brim:
- Ch 56, dc in the 4th ch from your hook (2 dcs formed), dc in each ch across, turn. (54) 21.6″ brim circumference
- Ch 3 (counts as a dc), fpdc in the next st, *{dcin the next st, fpdc in the next st} repeat from * (54) Leave a long tail for sewing the ends together.
- Repeat row 2. (54)
Match the short ends of your rectangle together, with the right sides (fpdc side) touching. Thread your yarn needle with the long tail you left. Use a mattress stitch to sew together, forming the circular band. It may help to mark your first and last stitch before the seam you sewed with stitch markers. Now you’ll be working the hat.
Hat:
Attach your yarn with a ss to the top of the band. I like to start on the first stitch after the seam.
1.Ch 4 (counts as a dc + ch 1) and dc in the same st (first v-st made), ch 1, skip 2 sts, *{v-st in the next st, ch 1, skp 2} repeat from * around, ss to the ch space of the first v-st of the round. (18 v-sts)
2. Ch 4, dc in the ch space of the same v-st (first v-st made), ch 1, *{v-st into the next v-st} repeat from* ss to the ch space of the first v-st to join. (18 v-sts)
3-5. Repeat round 2.
6. Ch 4, dc in the ch space of the same v-st (first v-st made), *{v-st in next v-st} repeat from * around, ss to the ch space of the first v-st to join. (18 vsts)
7. Ch 3 (counts as a dc), dc in each v-st around, ss to top of ch 3 to join. (18 dc) 7″ tall
Leave a long tail and use a running stitch to sew the hole closed. Sew on a pom pom if you want and finish off.
Pin it: